
Hi Friends! 😀 This may or may not be a surprise to you, but I love all things Disney. Disney brings out my inner child and inspires me to dream, and be creative. In fact, Disney animation was one of my inspirations to become a Graphic Designer. Although, Graphic Design isn’t animation, Disney inspired me to go down the creative path that I have today. As a lover of Disney and animation, I was thrilled to see an Instagram ad for The Science Behind Pixar. From the ad, I discovered that The Science Behind Pixar was a new exhibit at The Museum of Science and Industry (MSI) in Chicago. The exhibit is a behind the scenes look at the production of a Pixar film – from concept to the big screen. Of course, I took so many pictures while I was there! Therefore, I’m excited to show you my entire experience at The Science Behind Pixar!
Pixar Knows How to Make an Entrance
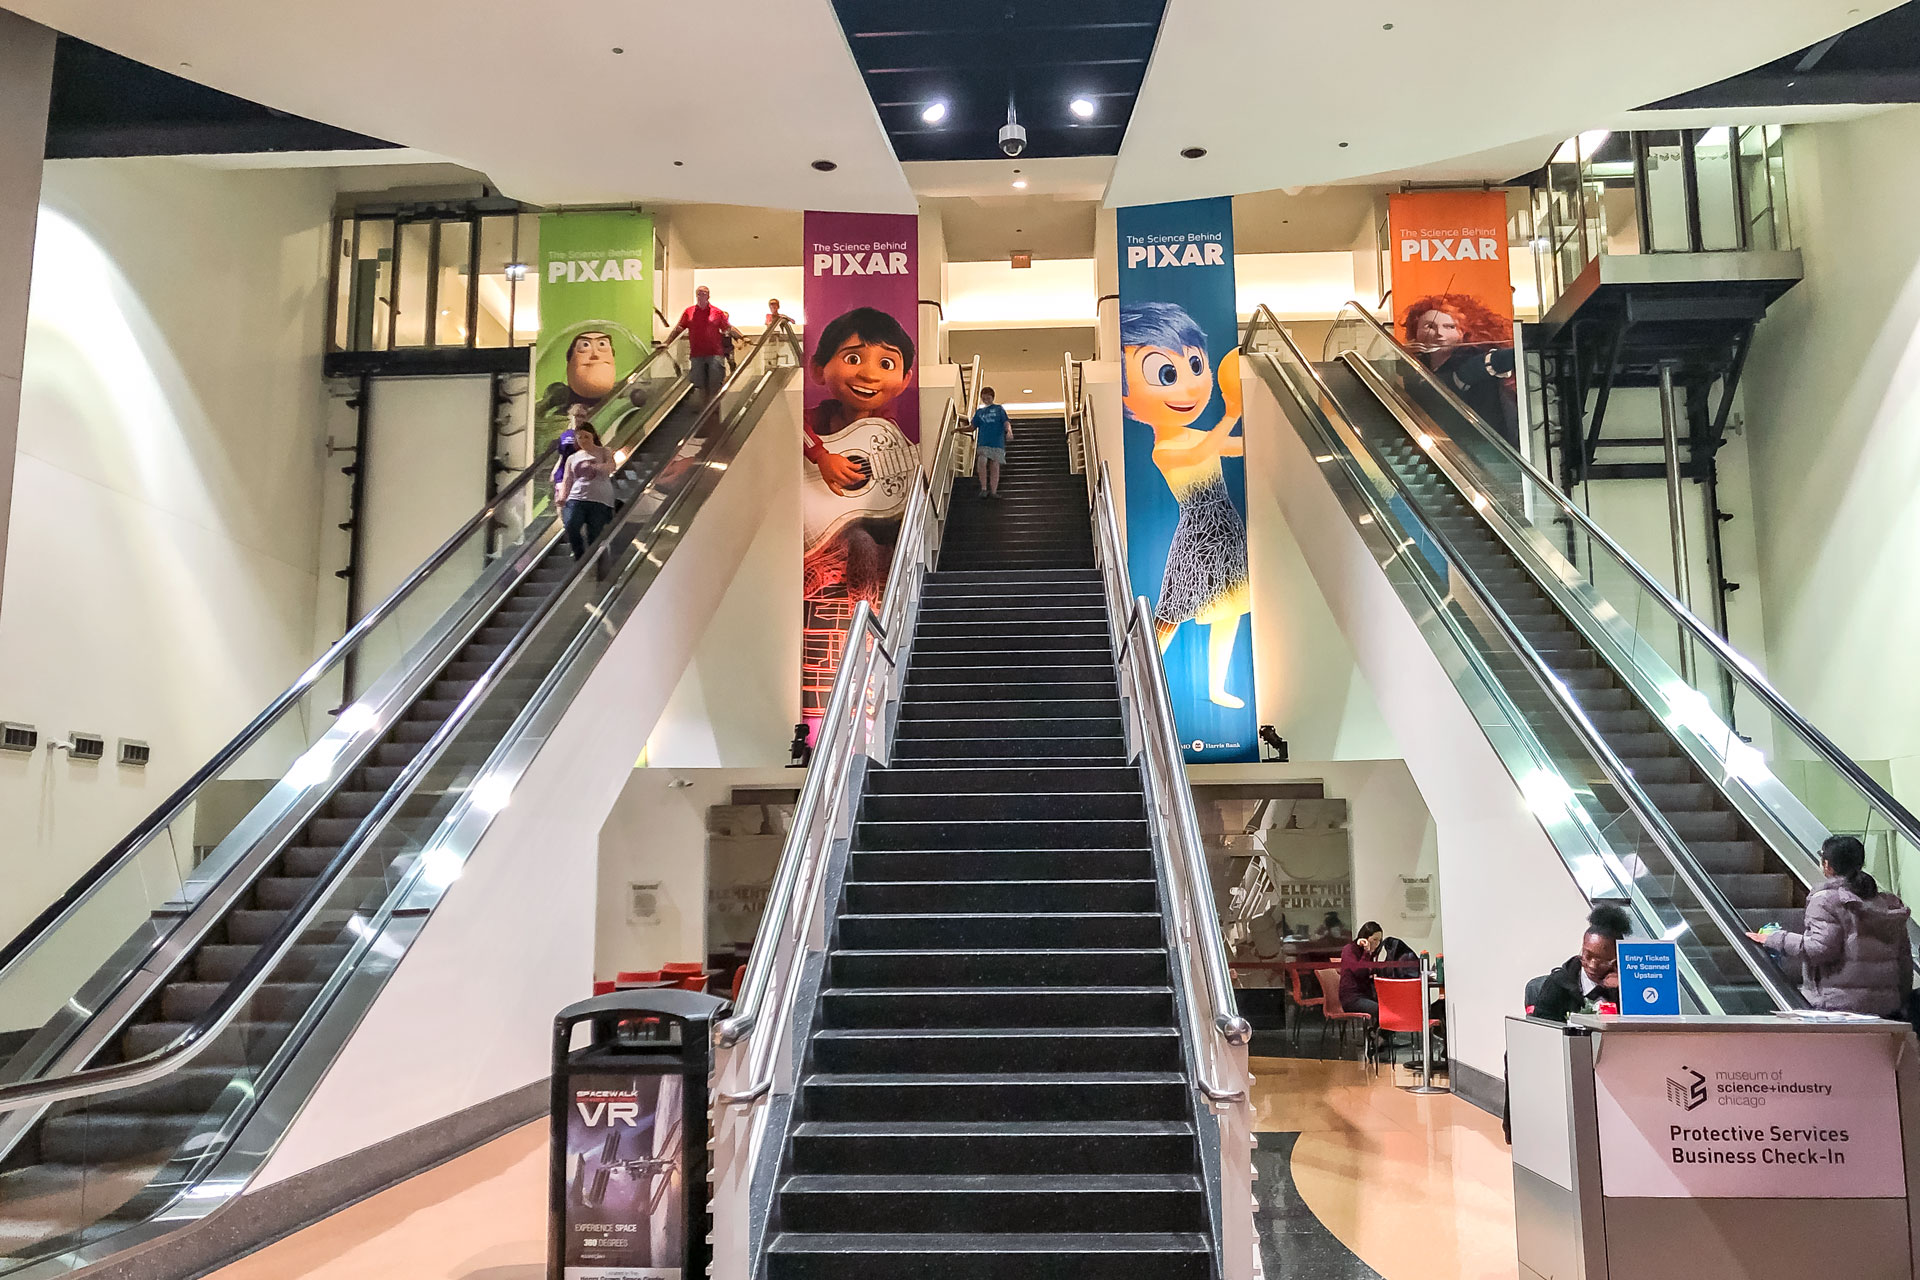
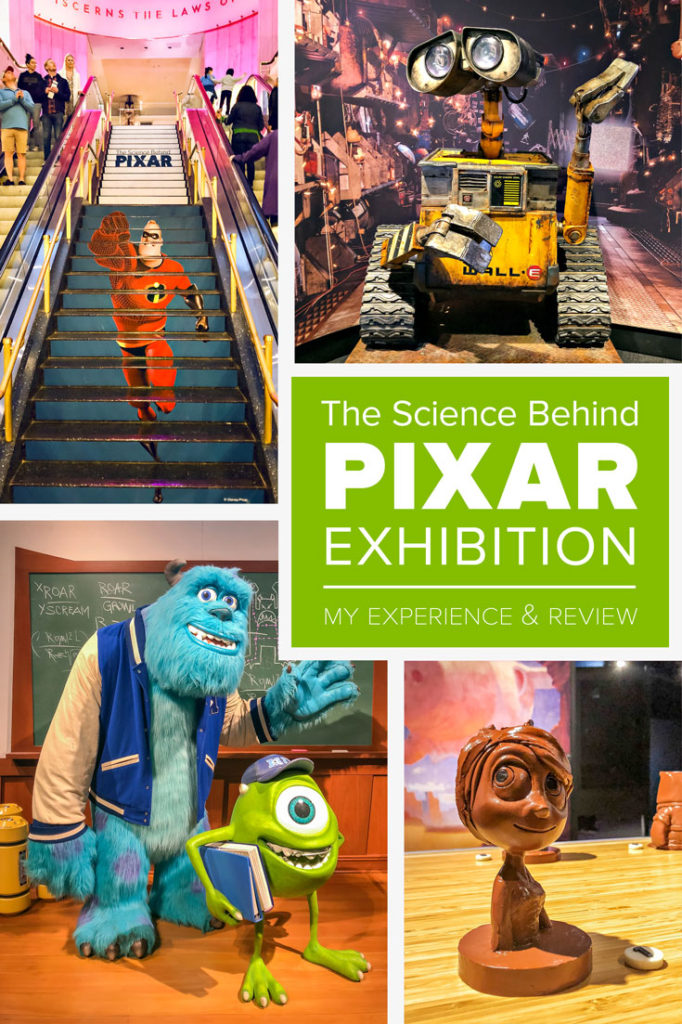
As soon as I entered the main lobby of MSI, I became super pumped for The Science Behind Pixar exhibit. I couldn’t stop geeking out over the banners above the escalators, which were each a different Pixar character. Little Miguel’s (from Coco) face just melts my heart! Unfortunately, The Science Behind Pixar was designed before Coco hit the big screen, so the film isn’t included in the exhibit. In fact, only the first 17 Pixar films are included in The Science Behind Pixar.
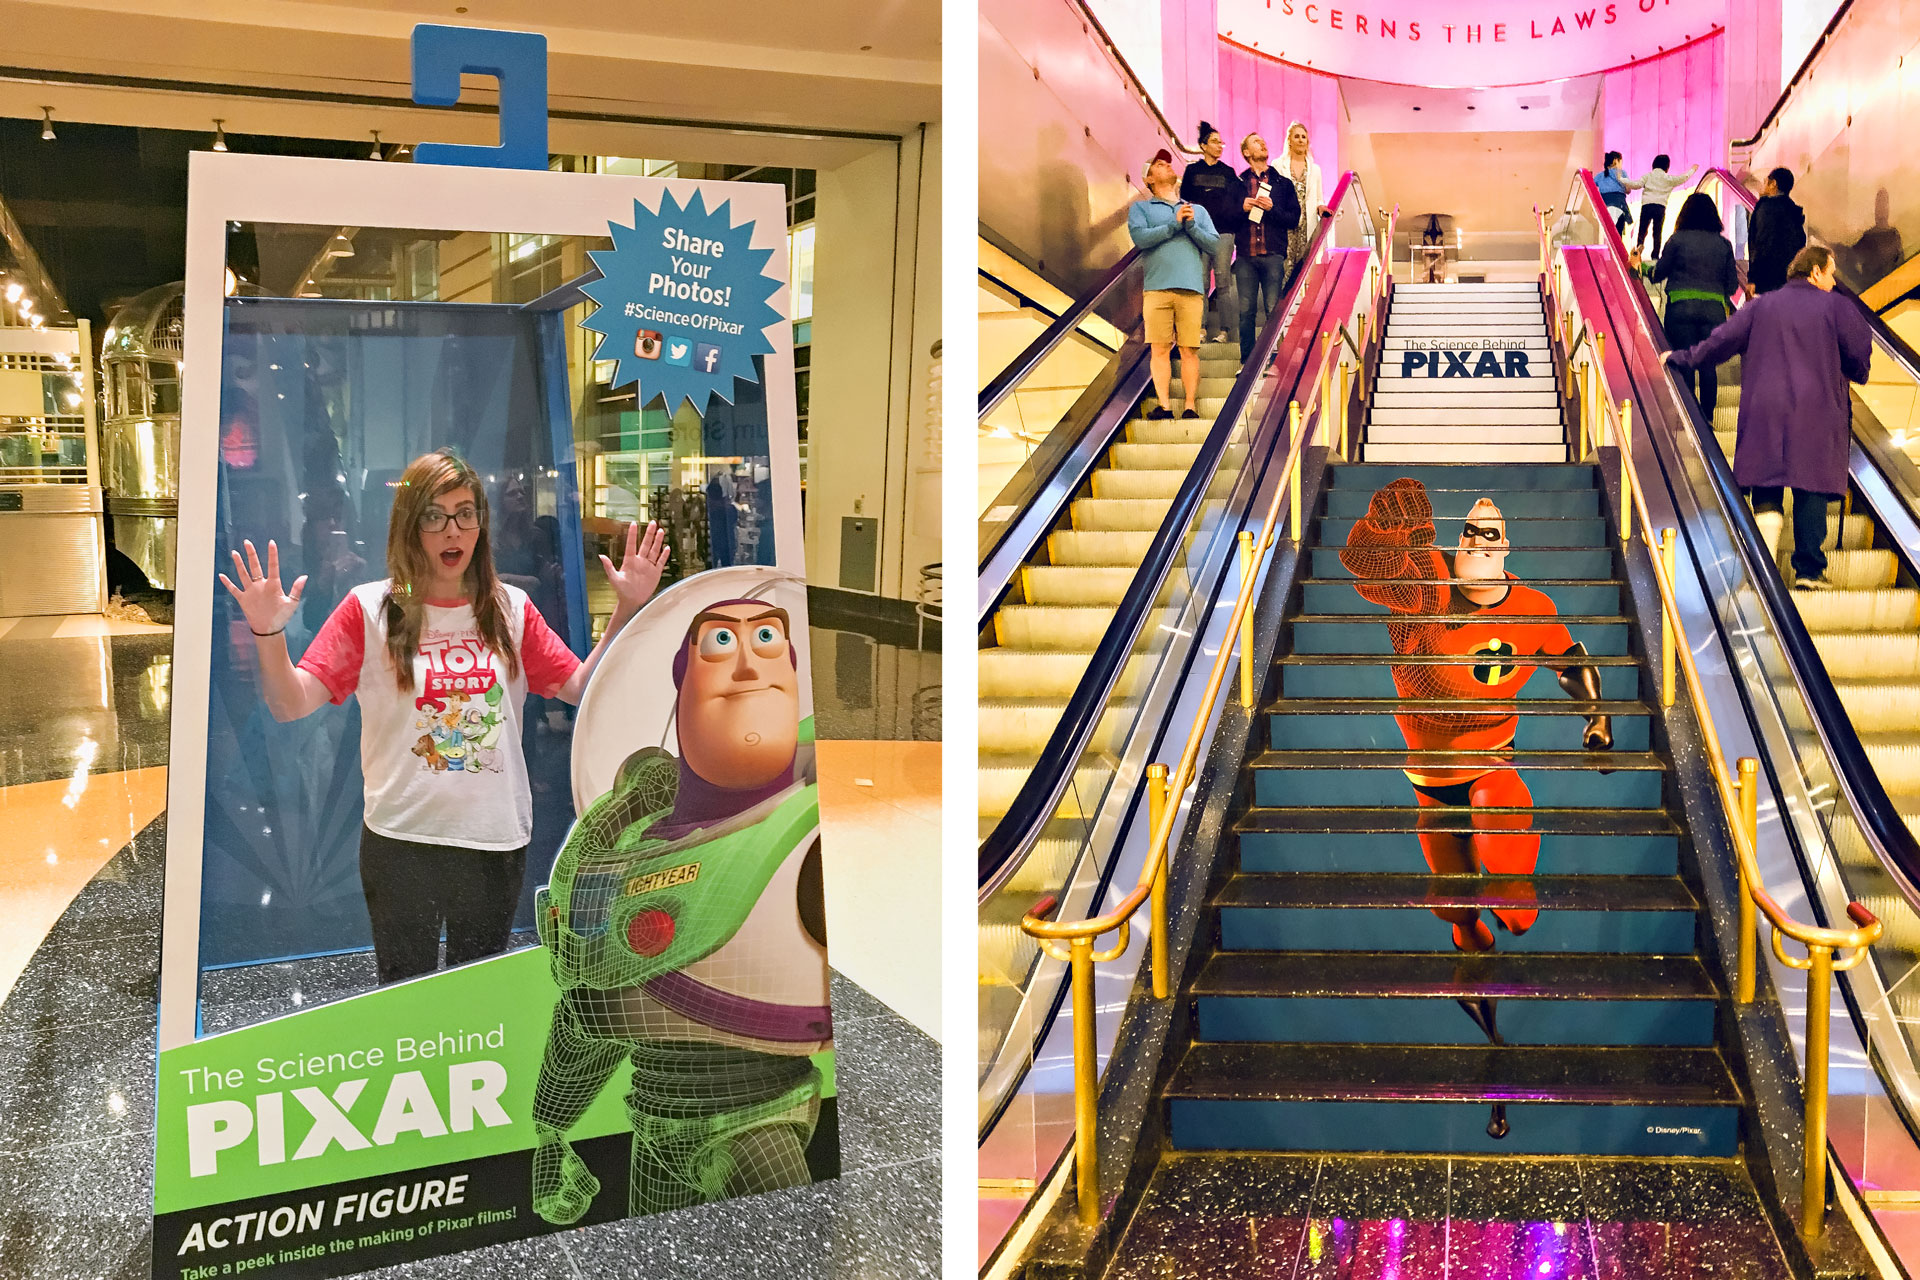
Left: In the main lobby of MSI, there was a photo-op to be an action figure in Buzz Lightyear’s toy packaging. Of course, I had to take a picture in it!
Right: What an INCREDIBLE staircase! It leads to the main floor of the exhibit.
Pixar’s Production Pipeline
When my family and I arrived on the main floor of The Science Behind Pixar, we noticed that the exhibit was broken up into two rooms known as “galleries”. Without a doubt, it’s essential to go to Gallery 1 first because it begins with a 5-minute introduction video, and includes the firsts steps of Pixar’s Production Pipeline. The Pixar Production Pipeline is a series of 9 steps in Pixar’s development process: Story & Art, Modeling, Rigging, Surfaces, Sets & Camera, Animation, Simulation, Lighting, and Rendering.
Gallery #1
Gallery 1 is broken up into three rooms: a waiting room, the viewing area for introduction video, and the exhibition room. As soon as the introduction video was over, my family and I entered Gallery 1’s exhibition room. Right away, we came across two photo-op opportunities: Buzz Lightyear from Toy Story (left image), and Mike and Sulley from Monster’s Inc. (right image). I highly recommend taking advantage of these fun photo-ops before making your way through the rest of the first gallery. Gallery 1 includes the following steps from Pixar’s Production Pipeline: Story & Art, Modeling, Rigging, and Sets & Camera. Since Surfaces is the fourth step in Pixar’s Production Pipeline, it was confusing as to why that step was included in Gallery 2 instead of Gallery 1.
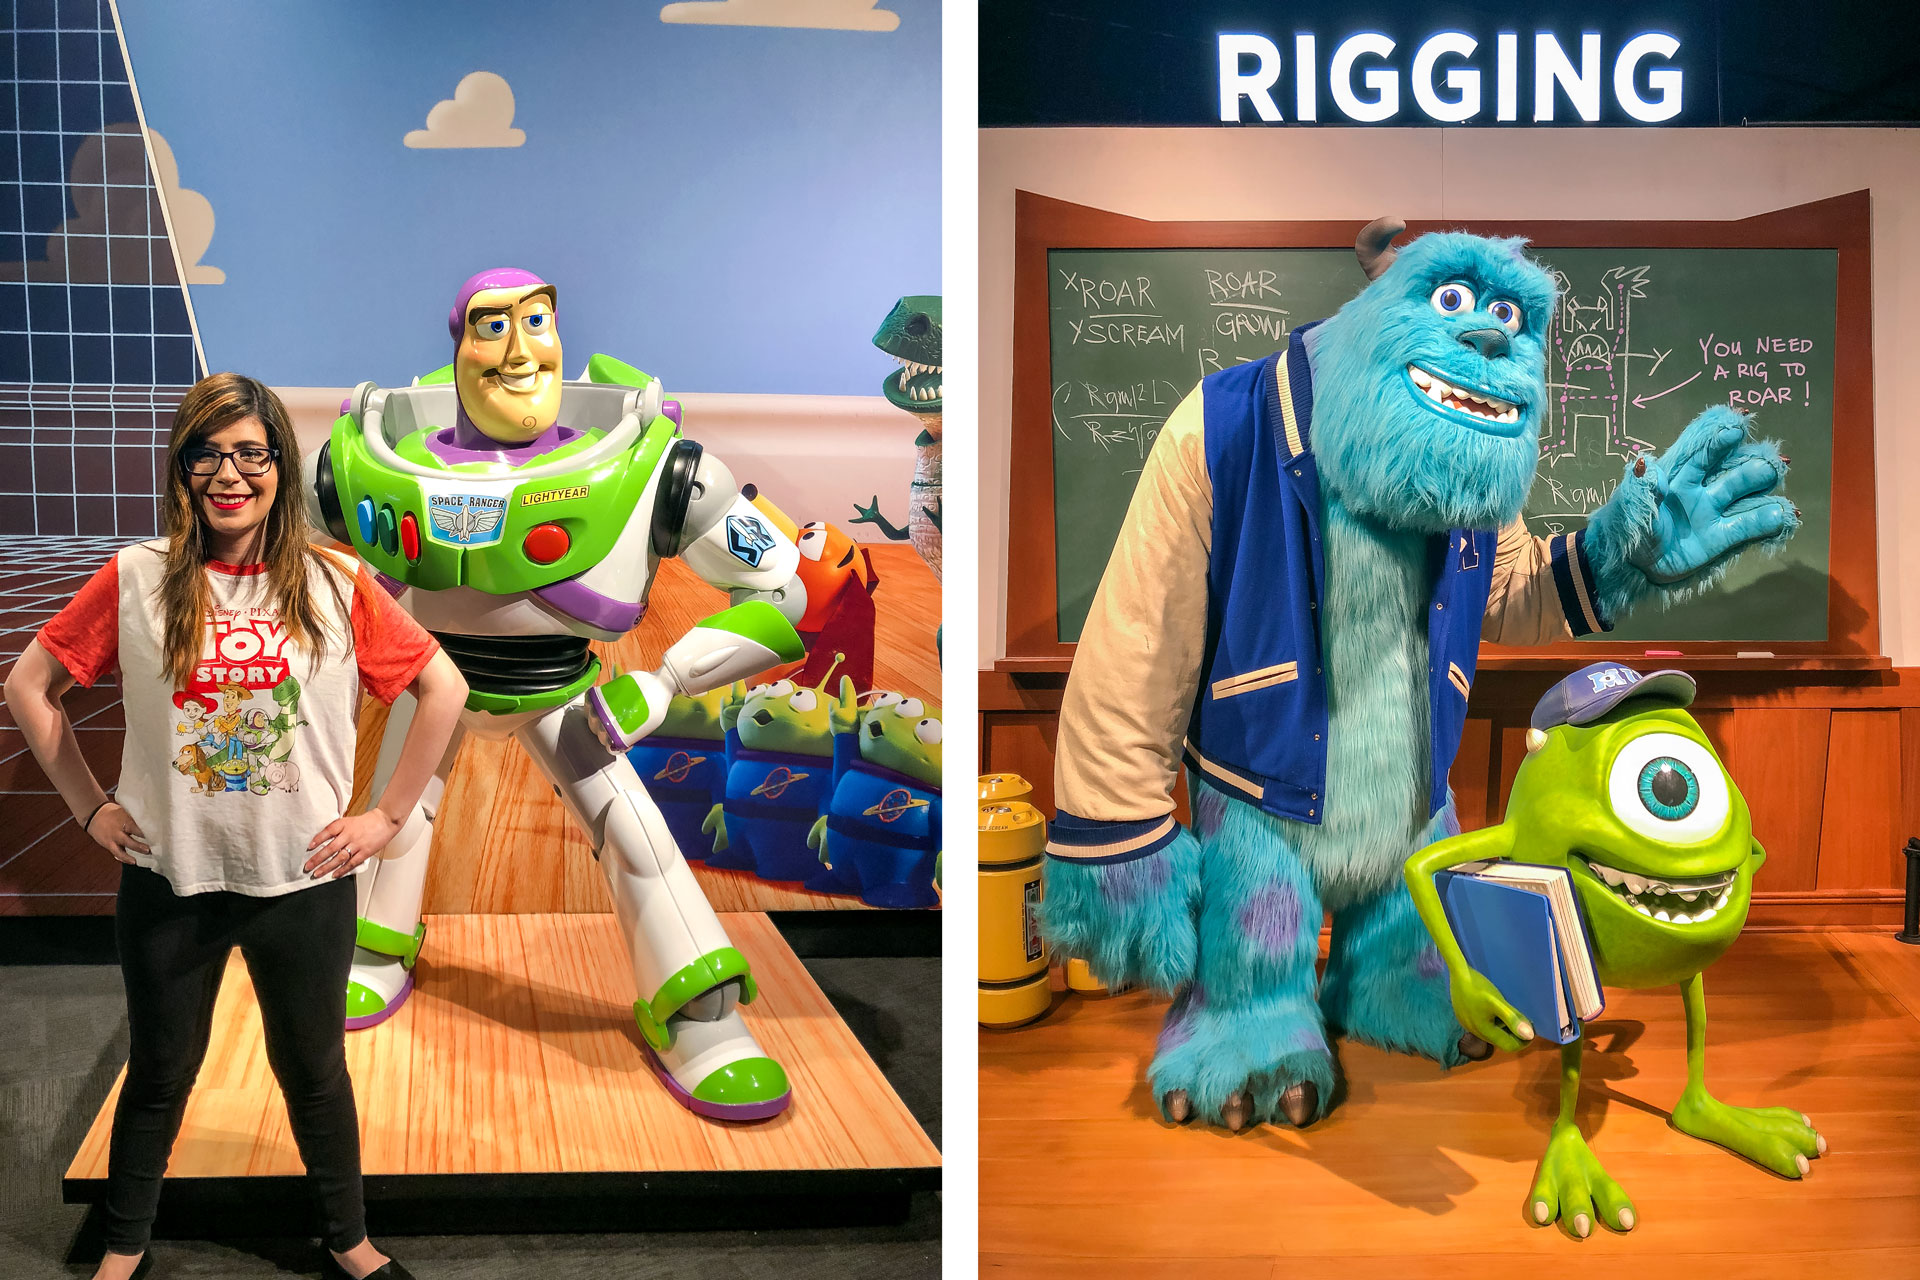
Photo-Ops: Buzz Lightyear (left image), and Sulley and Mike (right image).
Surprisingly, The Science Behind Pixar exhibit was super interactive. All over Gallery 1, there were workstations, video stations, and other information areas that explained the earlier steps in Pixar’s Production Pipeline. Each workstation had a computer where I got hands-on with each step in the production process. For example, at the Face Rigging Workstation, I used a rig to create character expressions. At the Set Layout Workstation, I designed a virtual set. For the most part, every workstation demonstrated how math and science work hand-in-hand in the animation process.
Story & Art
“The process starts with the writers and artists who create the story and concept art.”

Concept Art: Woody and Buzz | Toy Story, 1995 | Bob Pauley | Marker and pencil on paper
Concept Art: Hamm Air | Toy Story 3 | Giclee on Canvas
Concept Art – Sketches and paintings are created to define a character’s personality and appearance, and help build the world for each Pixar film.
The concept art has to be my favorite part of Pixar’s Production Pipeline because I love seeing all of the different concepts of a character or setting. More often than not, the original concept for a character is drastically different than the final version used in the film. I’m drawn to the original concept art for Woody and Buzz from Toy Story because the aesthetic in which they were drawn in resembles a child’s Crayon drawing. Obviously, so it looks so much better than a child’s drawing. Haha! I don’t know how many versions of Woody and Buzz there were before creating the concept art shown in the exhibit. However, it’s inferred that this was the final concept art that lead to the Woody and Buzz we know today.
Modeling
“Digital modelers create virtual 3D models of the characters based on concept art.”
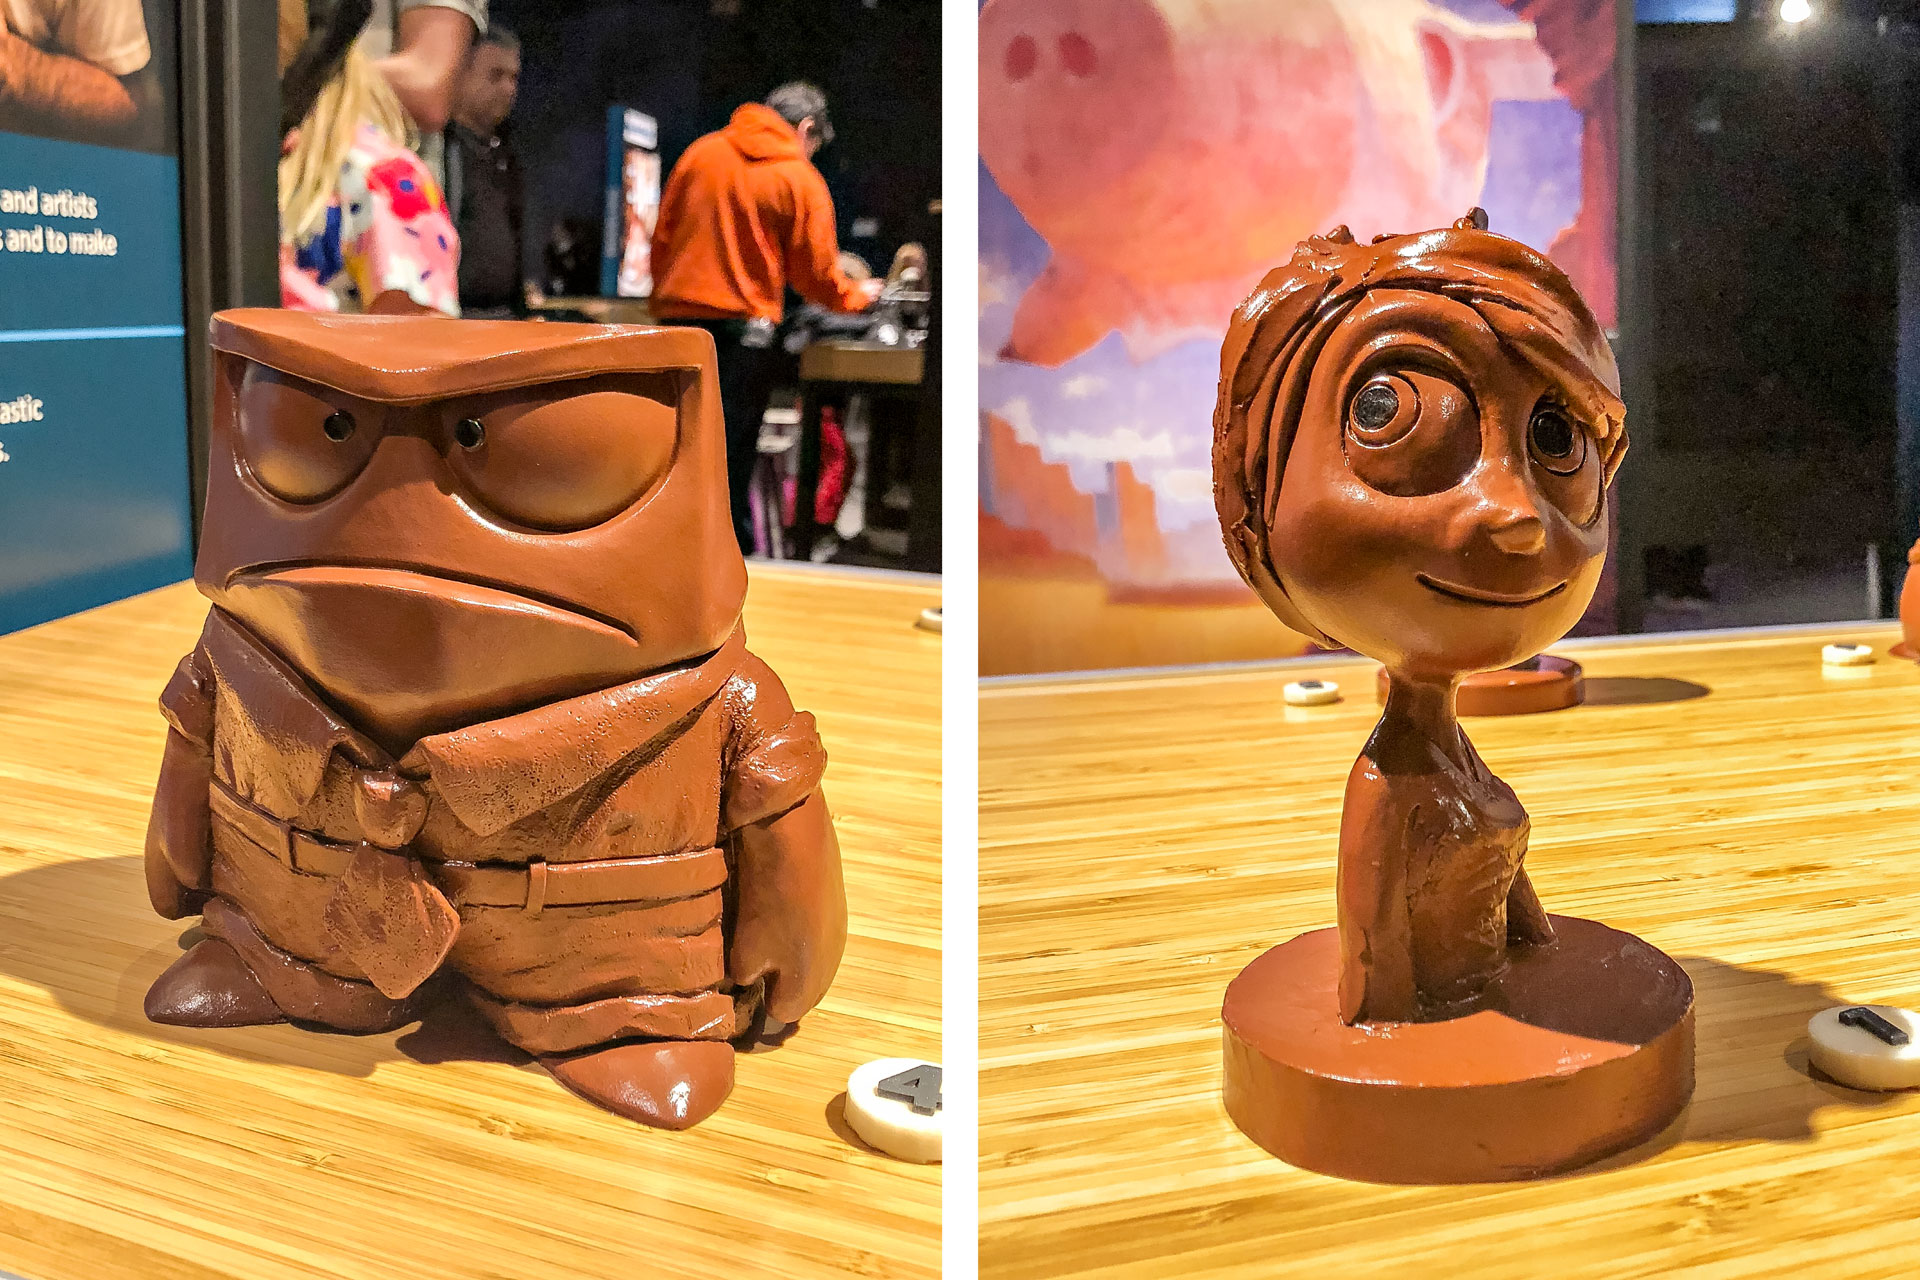
Character Marquettes: Anger (left), and Joy (right) from Inside Out.
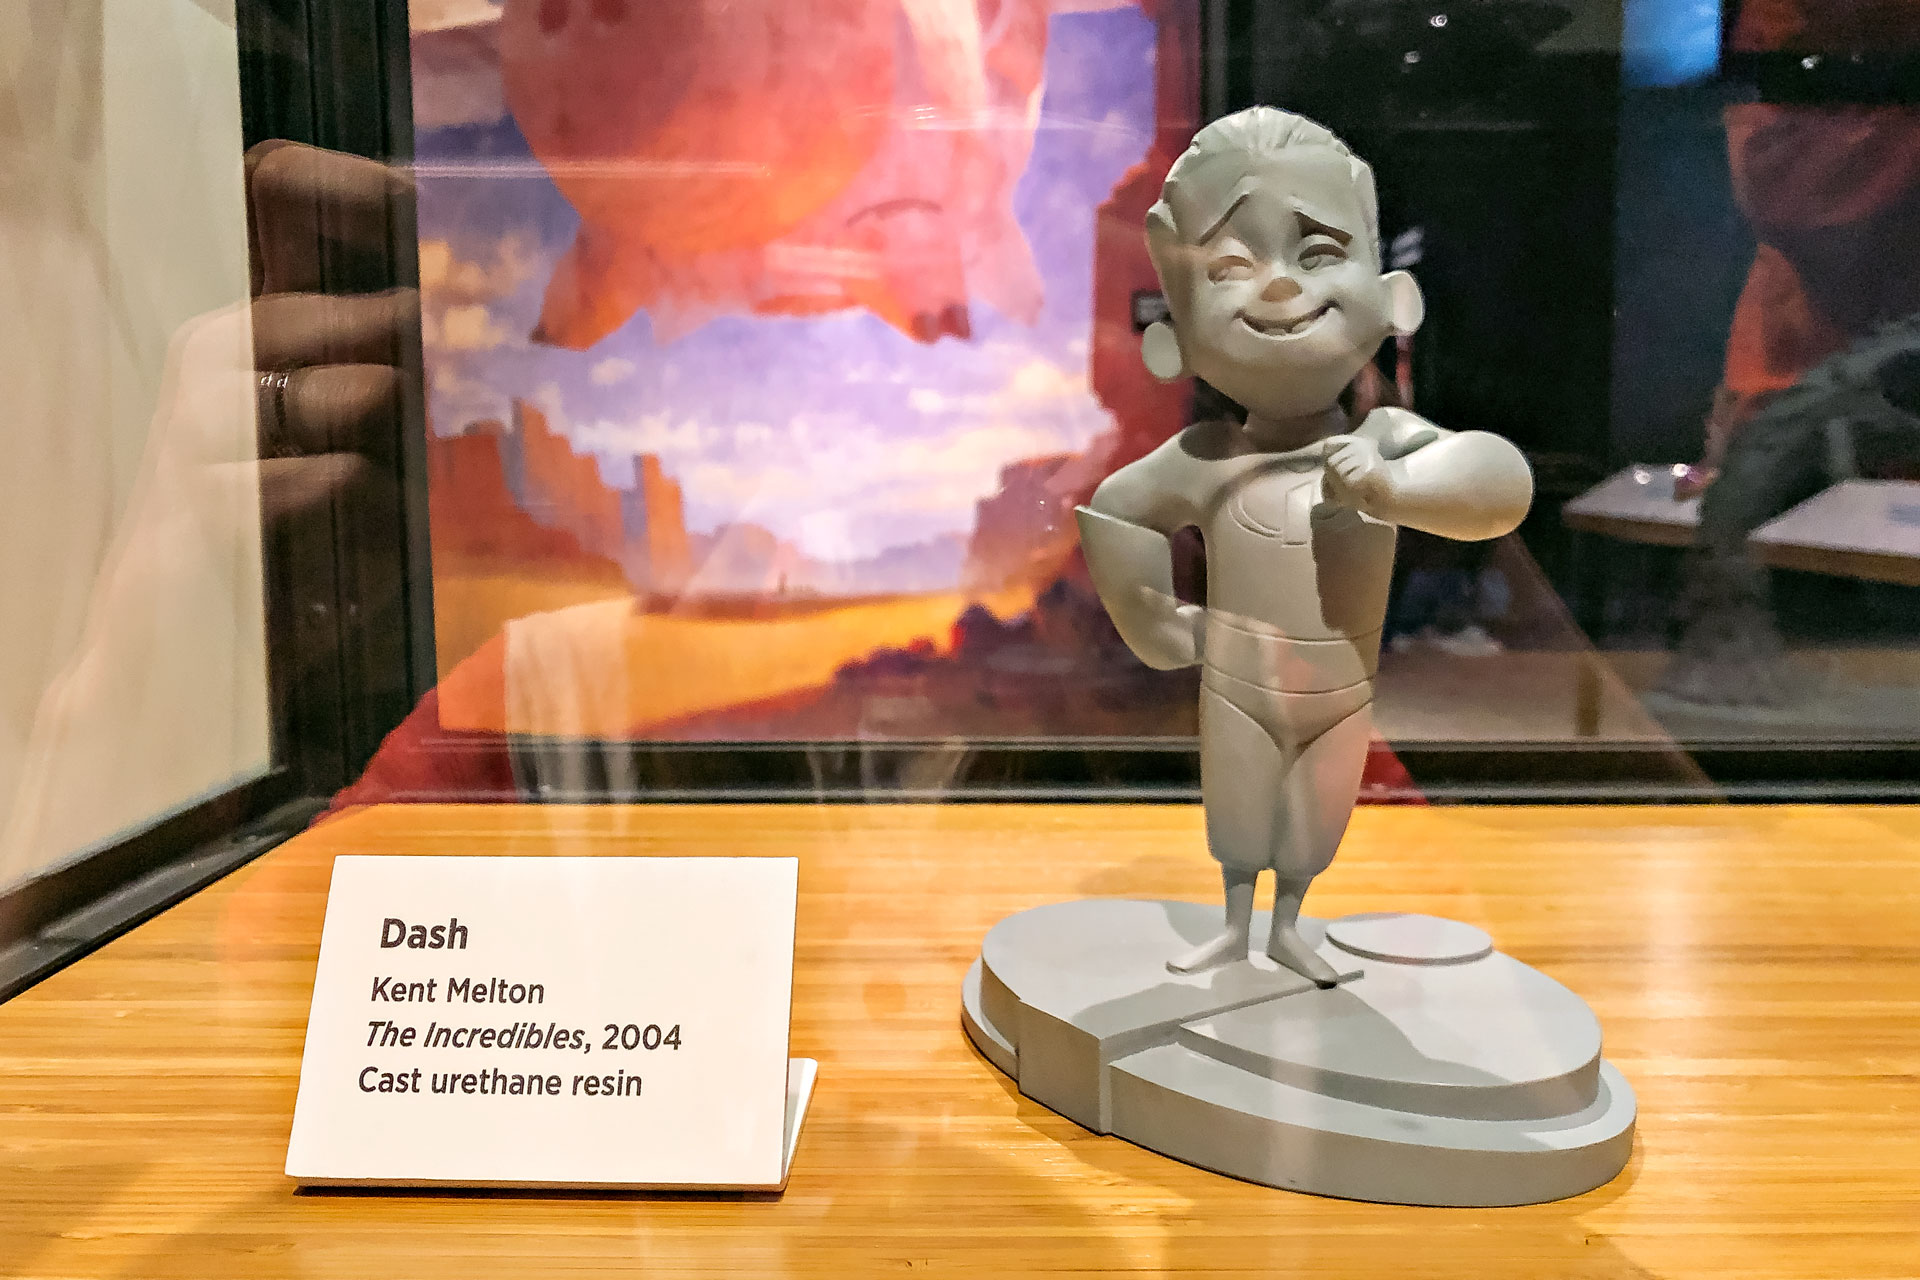
Character Marquette: Dash from The Incredibles.
Character Marquettes – Models made of sculpting clay that will be scanned into the computer to create a virtual 3D model for the modeling stage.
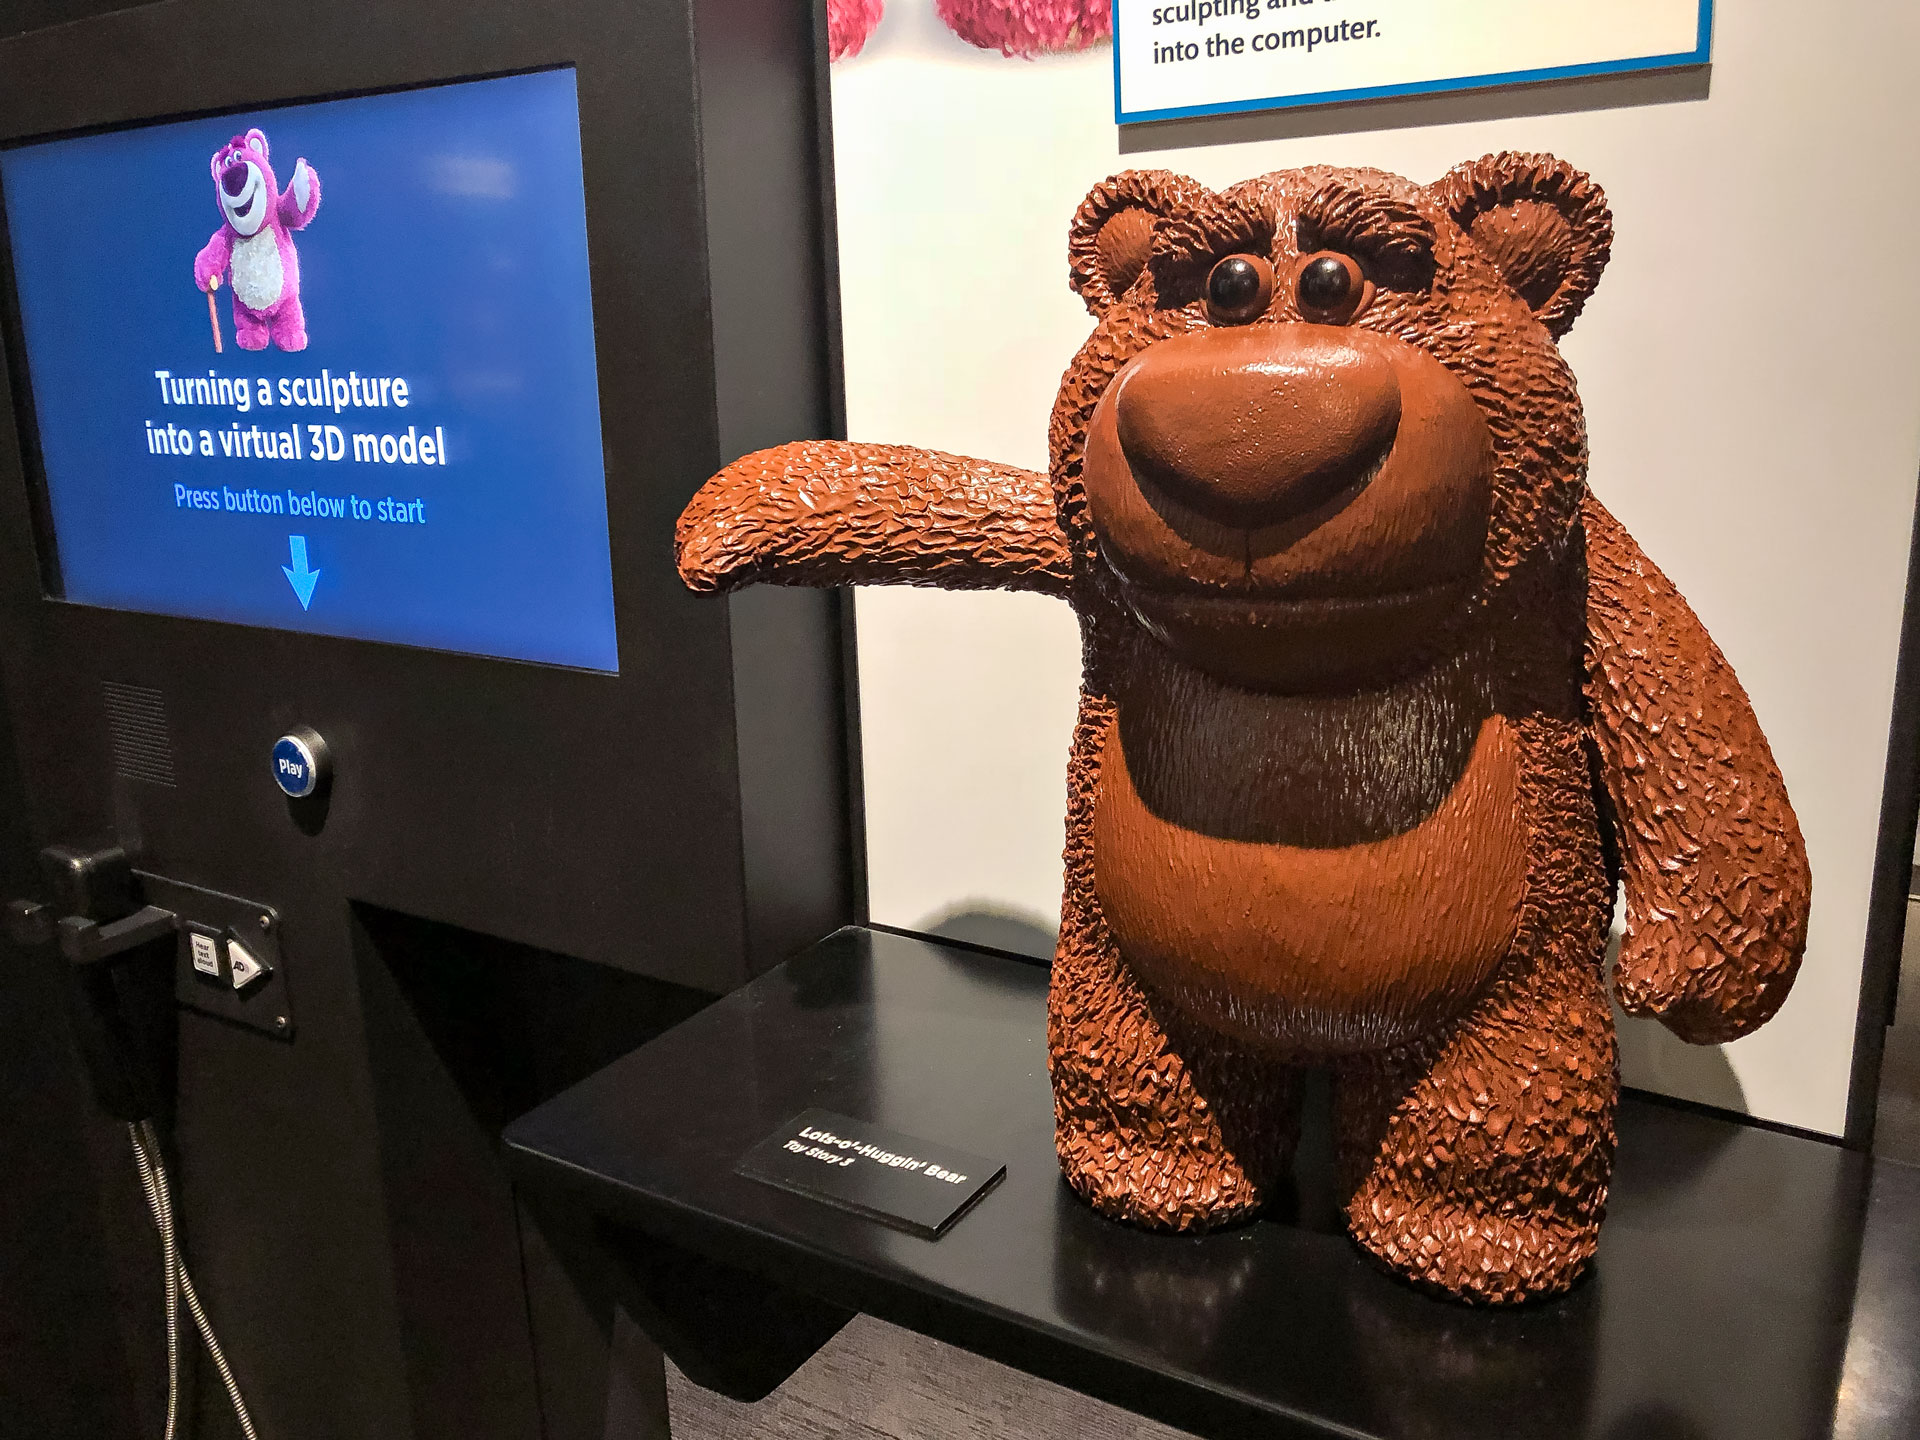
Character Marquette: Lots-O’-Huggin’ Bear (a.k.a Lotso) from Toy Story 3.
Once the character marquettes are scanned into the computer, a modeler can create a 3D model, which is a virtual wireframe made up of points to create a character’s shape. In the past, I’ve seen character sculptures like the Anger, and Joy marquettes shown here. It was news to me that character marquettes are scanned into a computer to aid a modeler in the modeling stage. That’s got to be quite a time saver when modeling every single character, right?
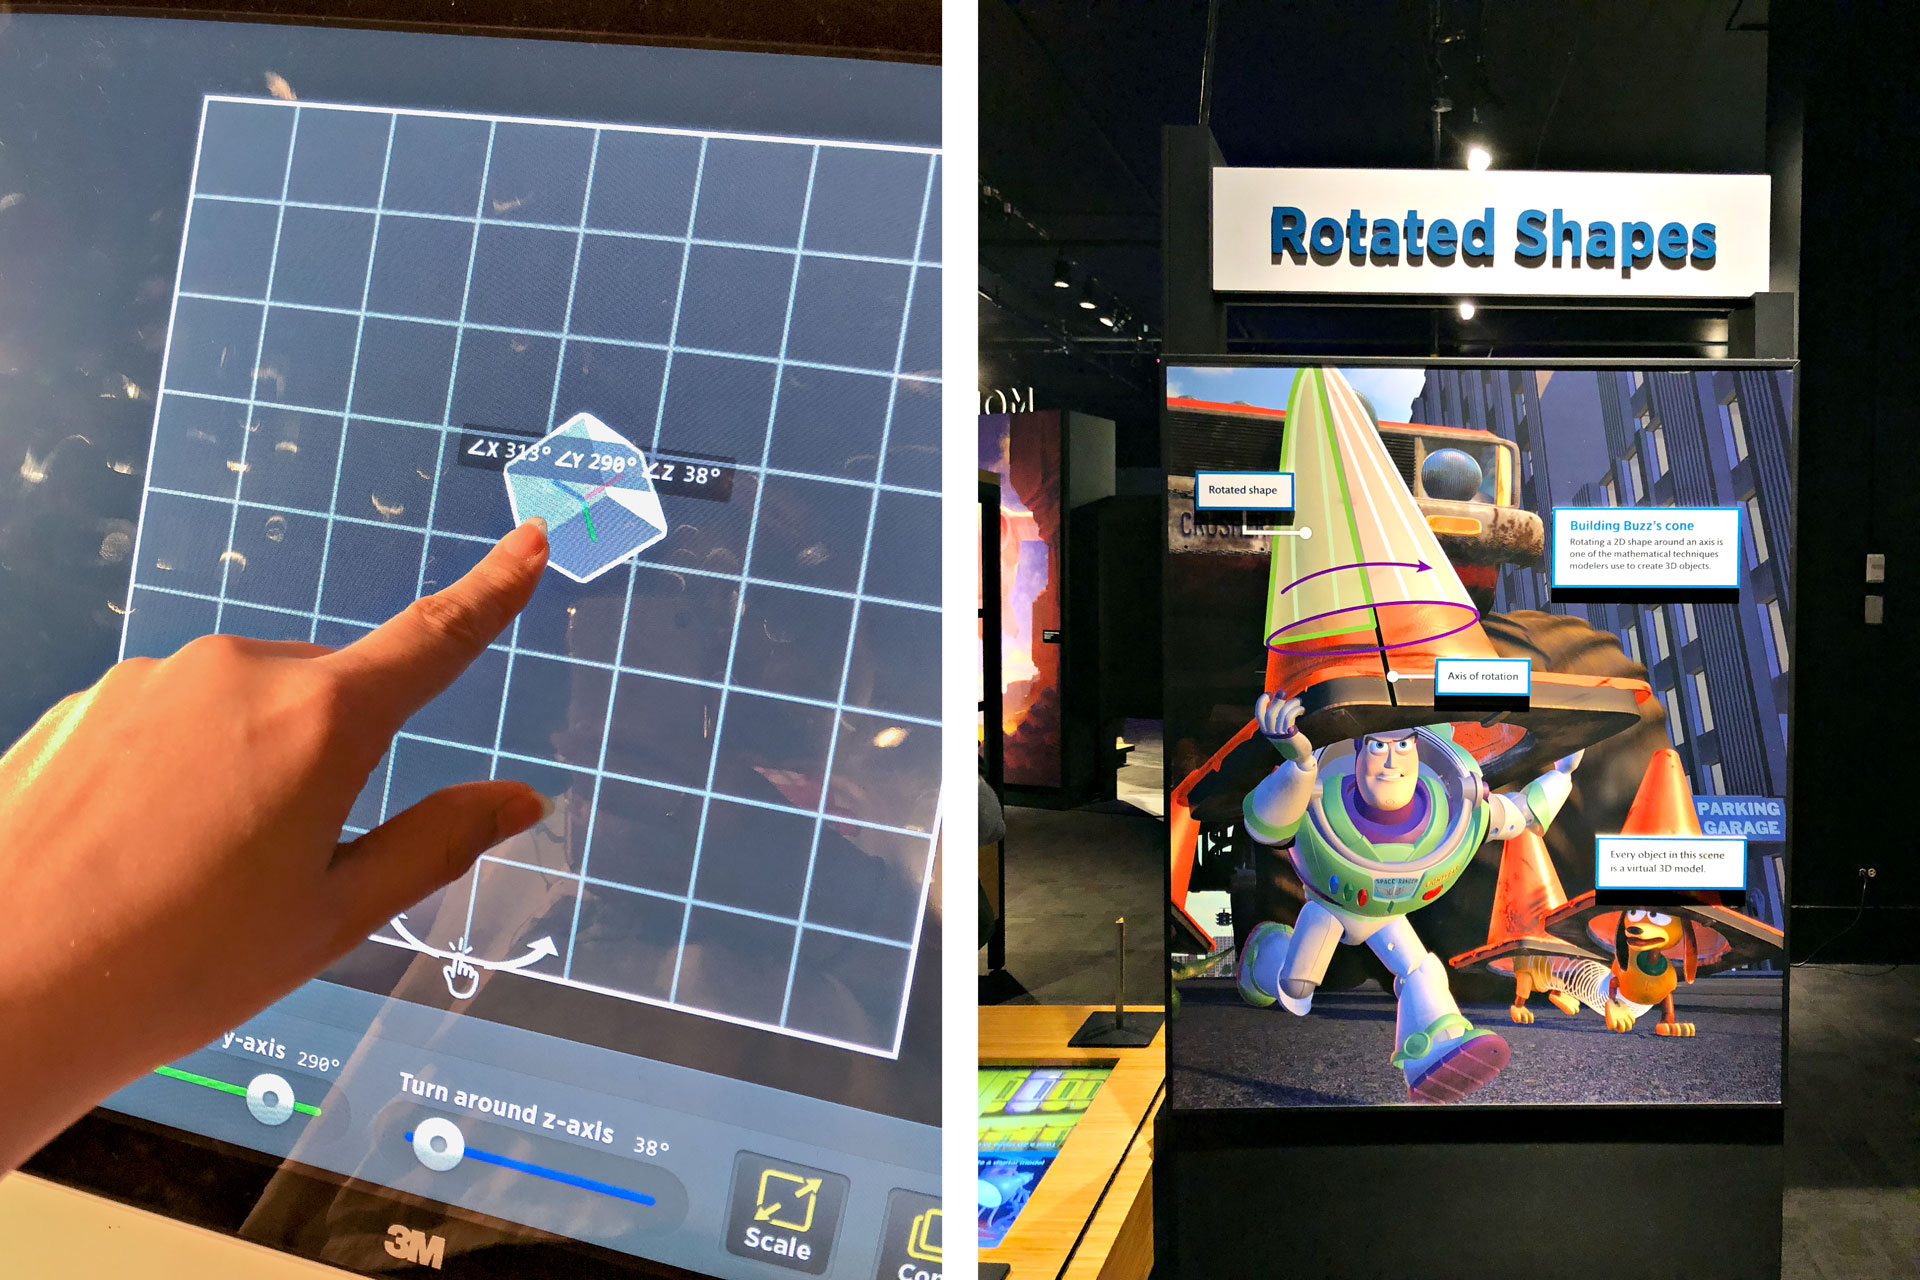
Left: Virtual Modeling Workstation | Right: Rotated Shapes
Virtual Modeling Workstation – To create a 3D model of a character, a modeler starts with a simple shape. At the Virtual Modeling Workstation, I transformed a cube into another shape by moving, rotating, and scaling it. Although I didn’t play around enough, this station provided me with different shapes that I could transform and combine to create my own 3D model.
Rotated Shapes – One way modelers create 3D shapes is by rotating a 2D shape around an axis. An example of a rotated shape is a cone, which is a series of triangular shapes rotated and repeated around in a circular direction. There was a workstation where I was able to test out this mathematical technique of creating a 3D object.
Extruded Shapes – Another way modelers create 3D shapes is sliding a 2D shape along a path. An example of an extruded shape is Linguini’s chef hat in Ratatouille.
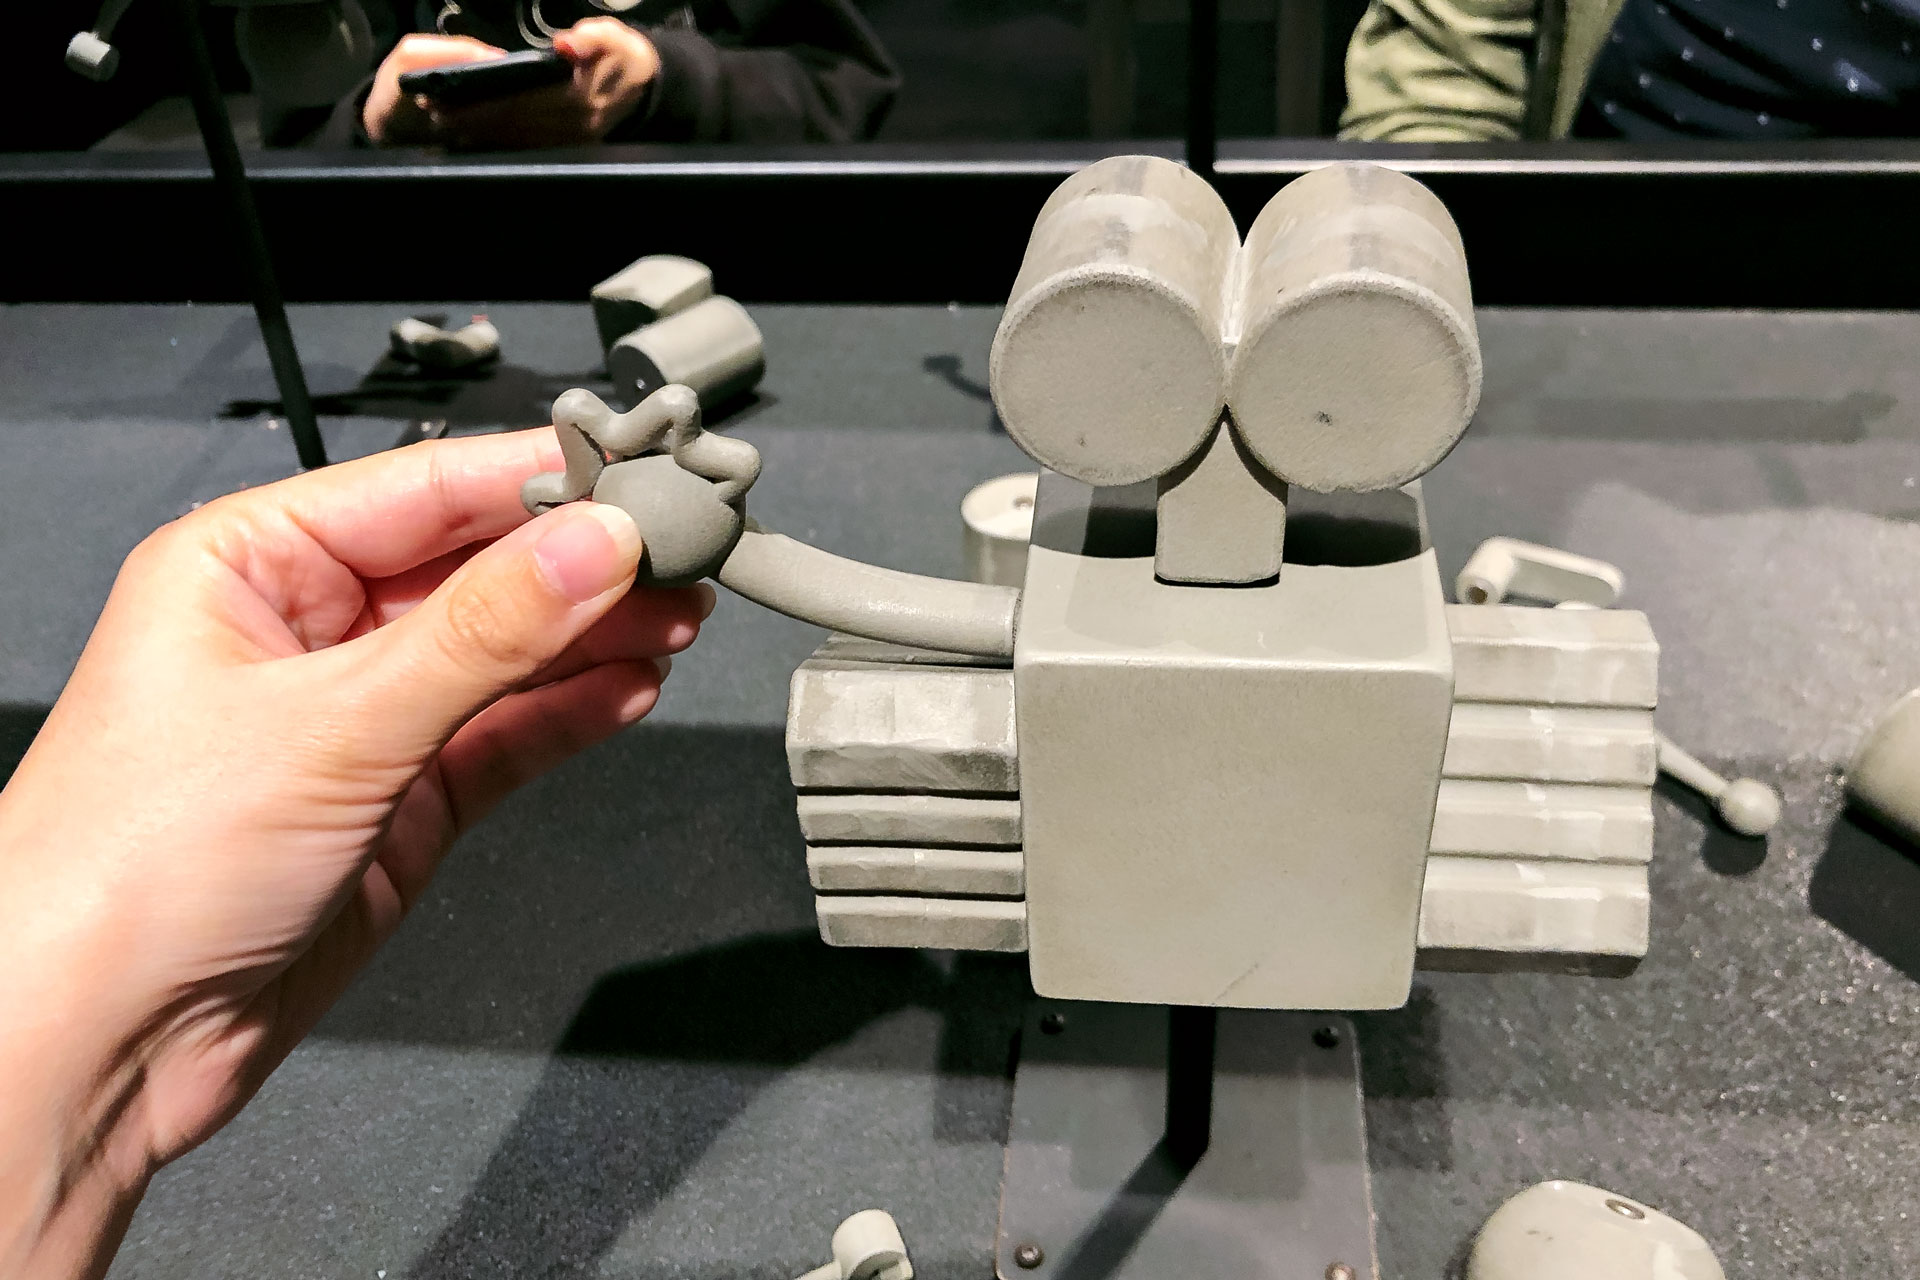
Build A Robot – At this station, I built my own little robot using the magnetic blocks given. According to the exhibit, “Modelers on WALL-E relied on a library of virtual parts to quickly assemble new robots.” I thought this activity was a good way to demonstrate that process.
Rigging
“Riggers create the virtual joints and muscles that allow the models to move.”
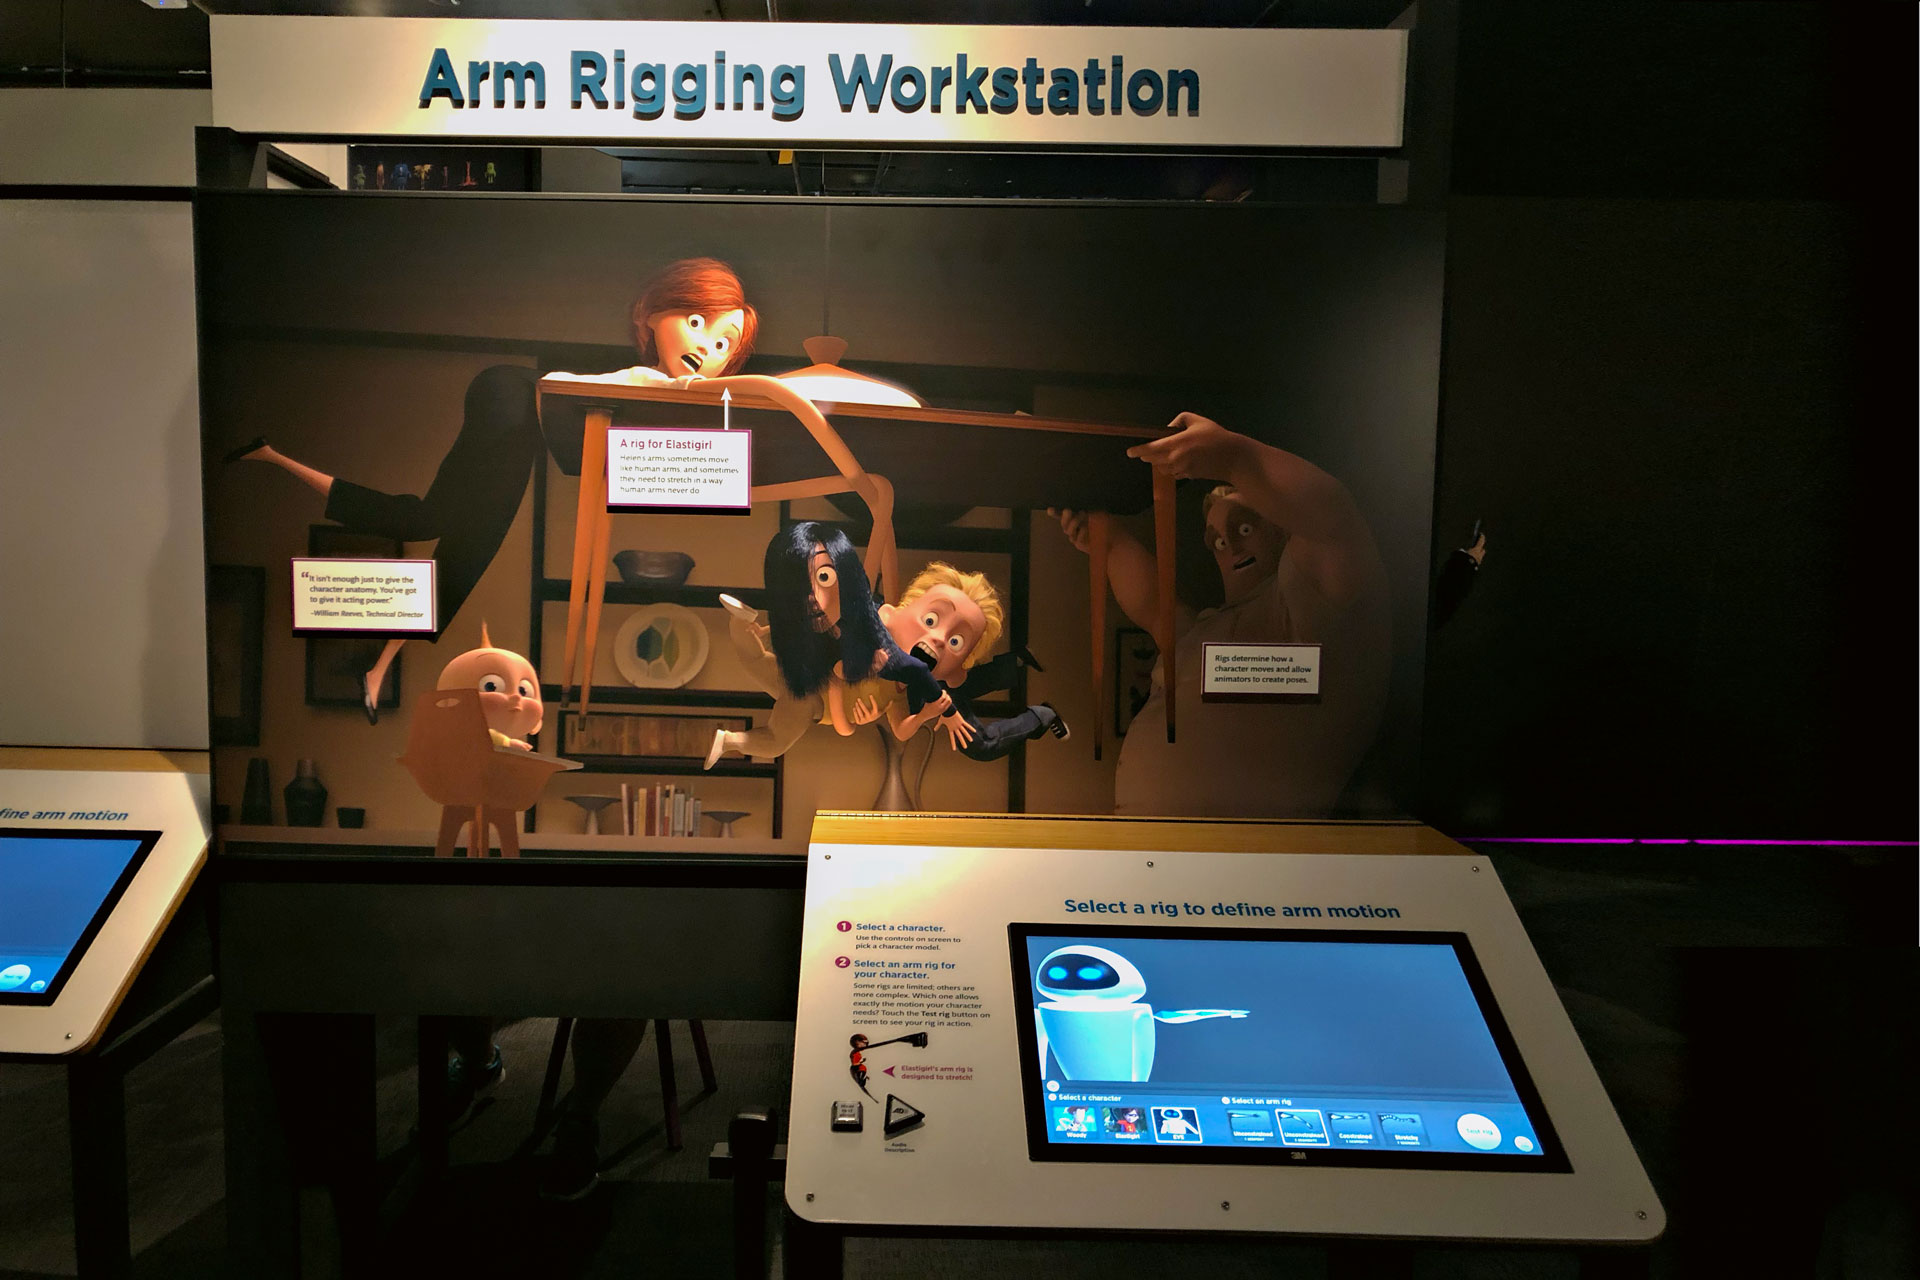
Arm Rigging – In order to learn about arm rigging, I tested out arm rigs for three characters: Woody, Elasticgirl, and EVE. Some of the rigs are limited and some are more complex. It really depends which kind of rig each character needs.
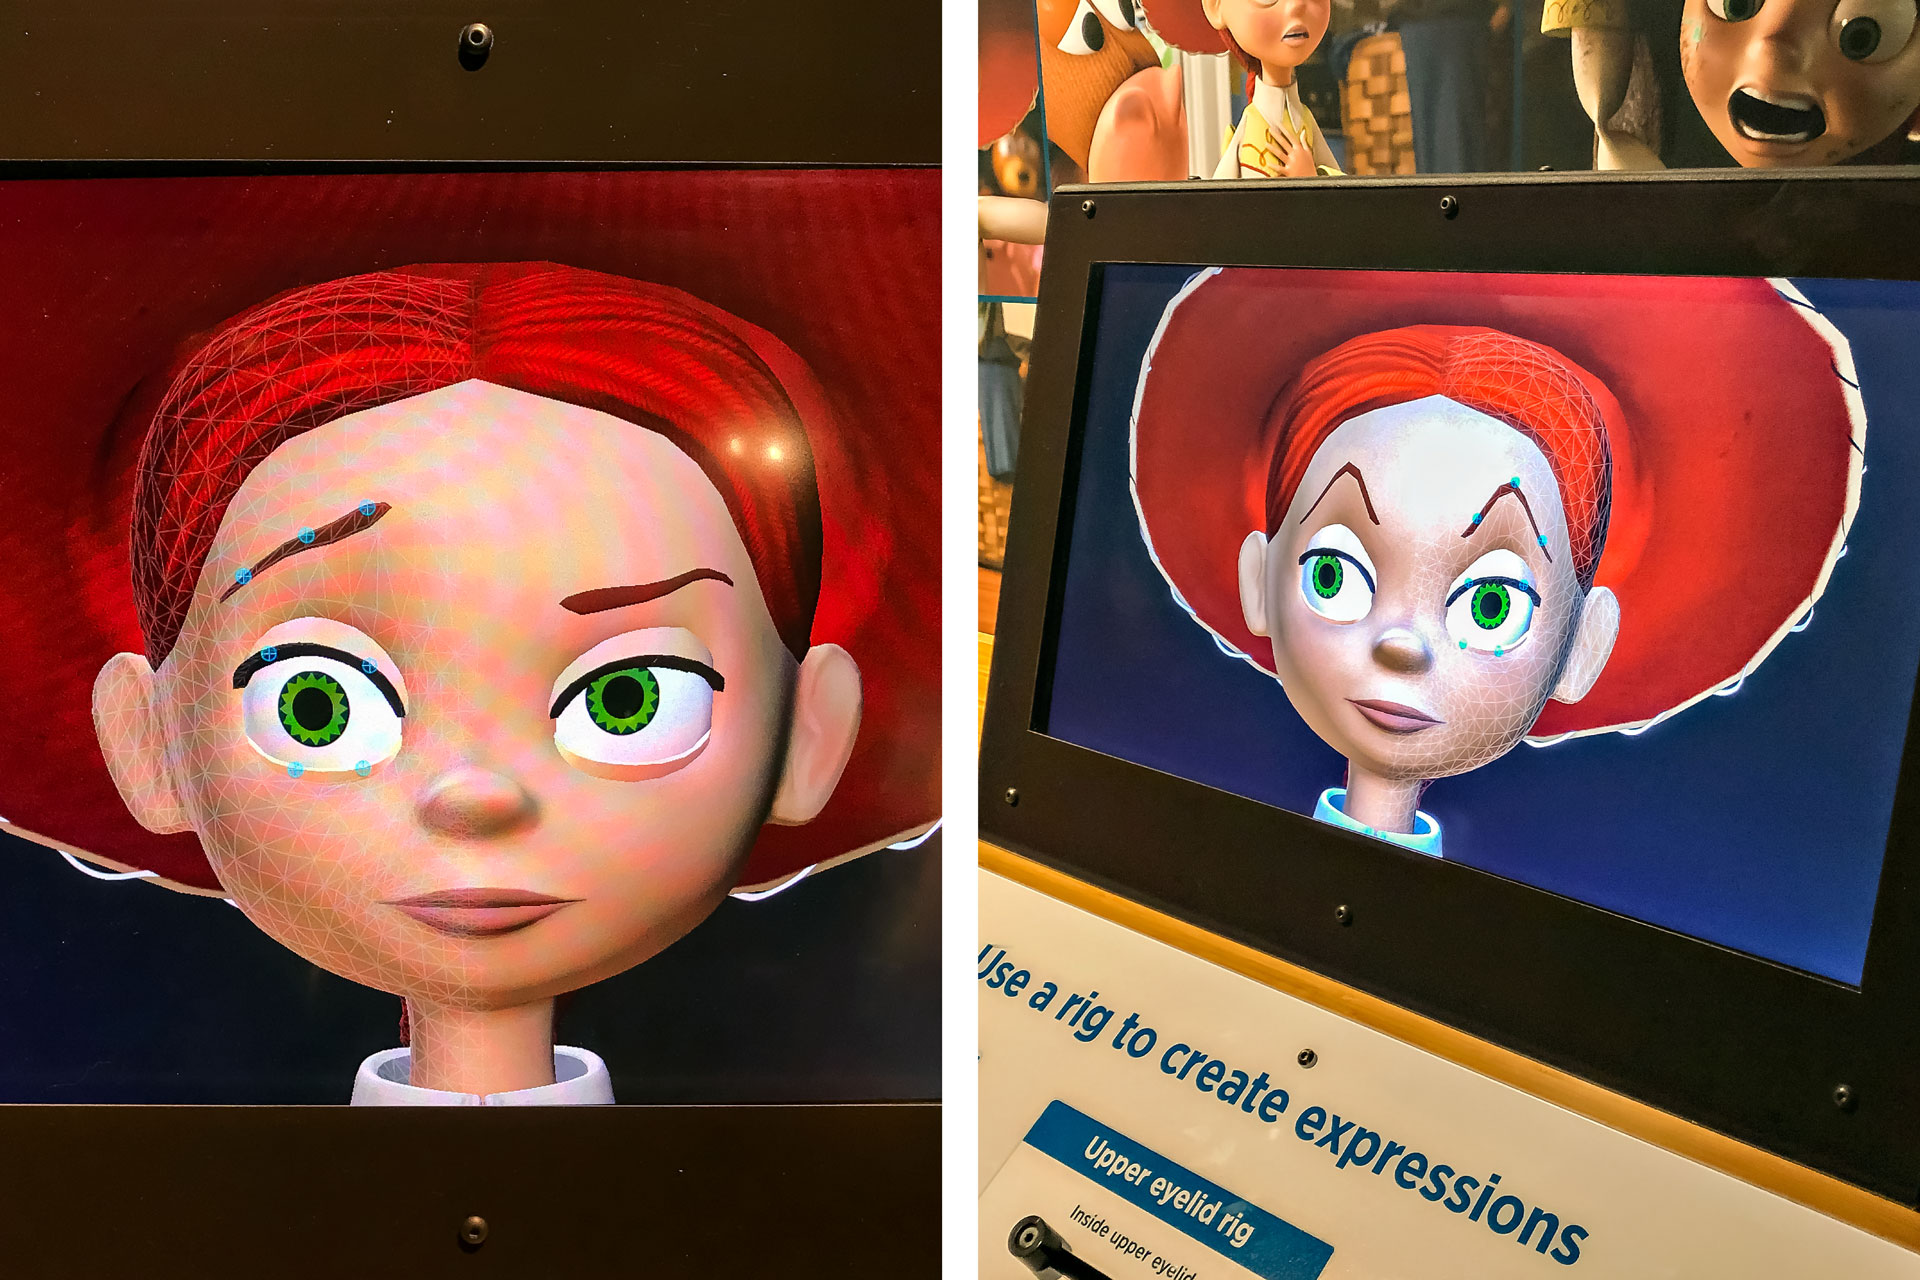
Face Rigging – To experiment with face rigging, I used a rig to create Jesse’s expressions. Each part of Jessie’s face is controlled by a rig, such as an Eyebrow rig, Upper eyelid rig, Lower eyelid rig, and Pupil rig. There are even rigs for multiple areas of a facial feature, such as the Inside Eyebrow, Middle eyebrow, and Outside eyebrow. With hundreds of combinations of these rigs, many different emotions can be depicted on Jesse’s face.
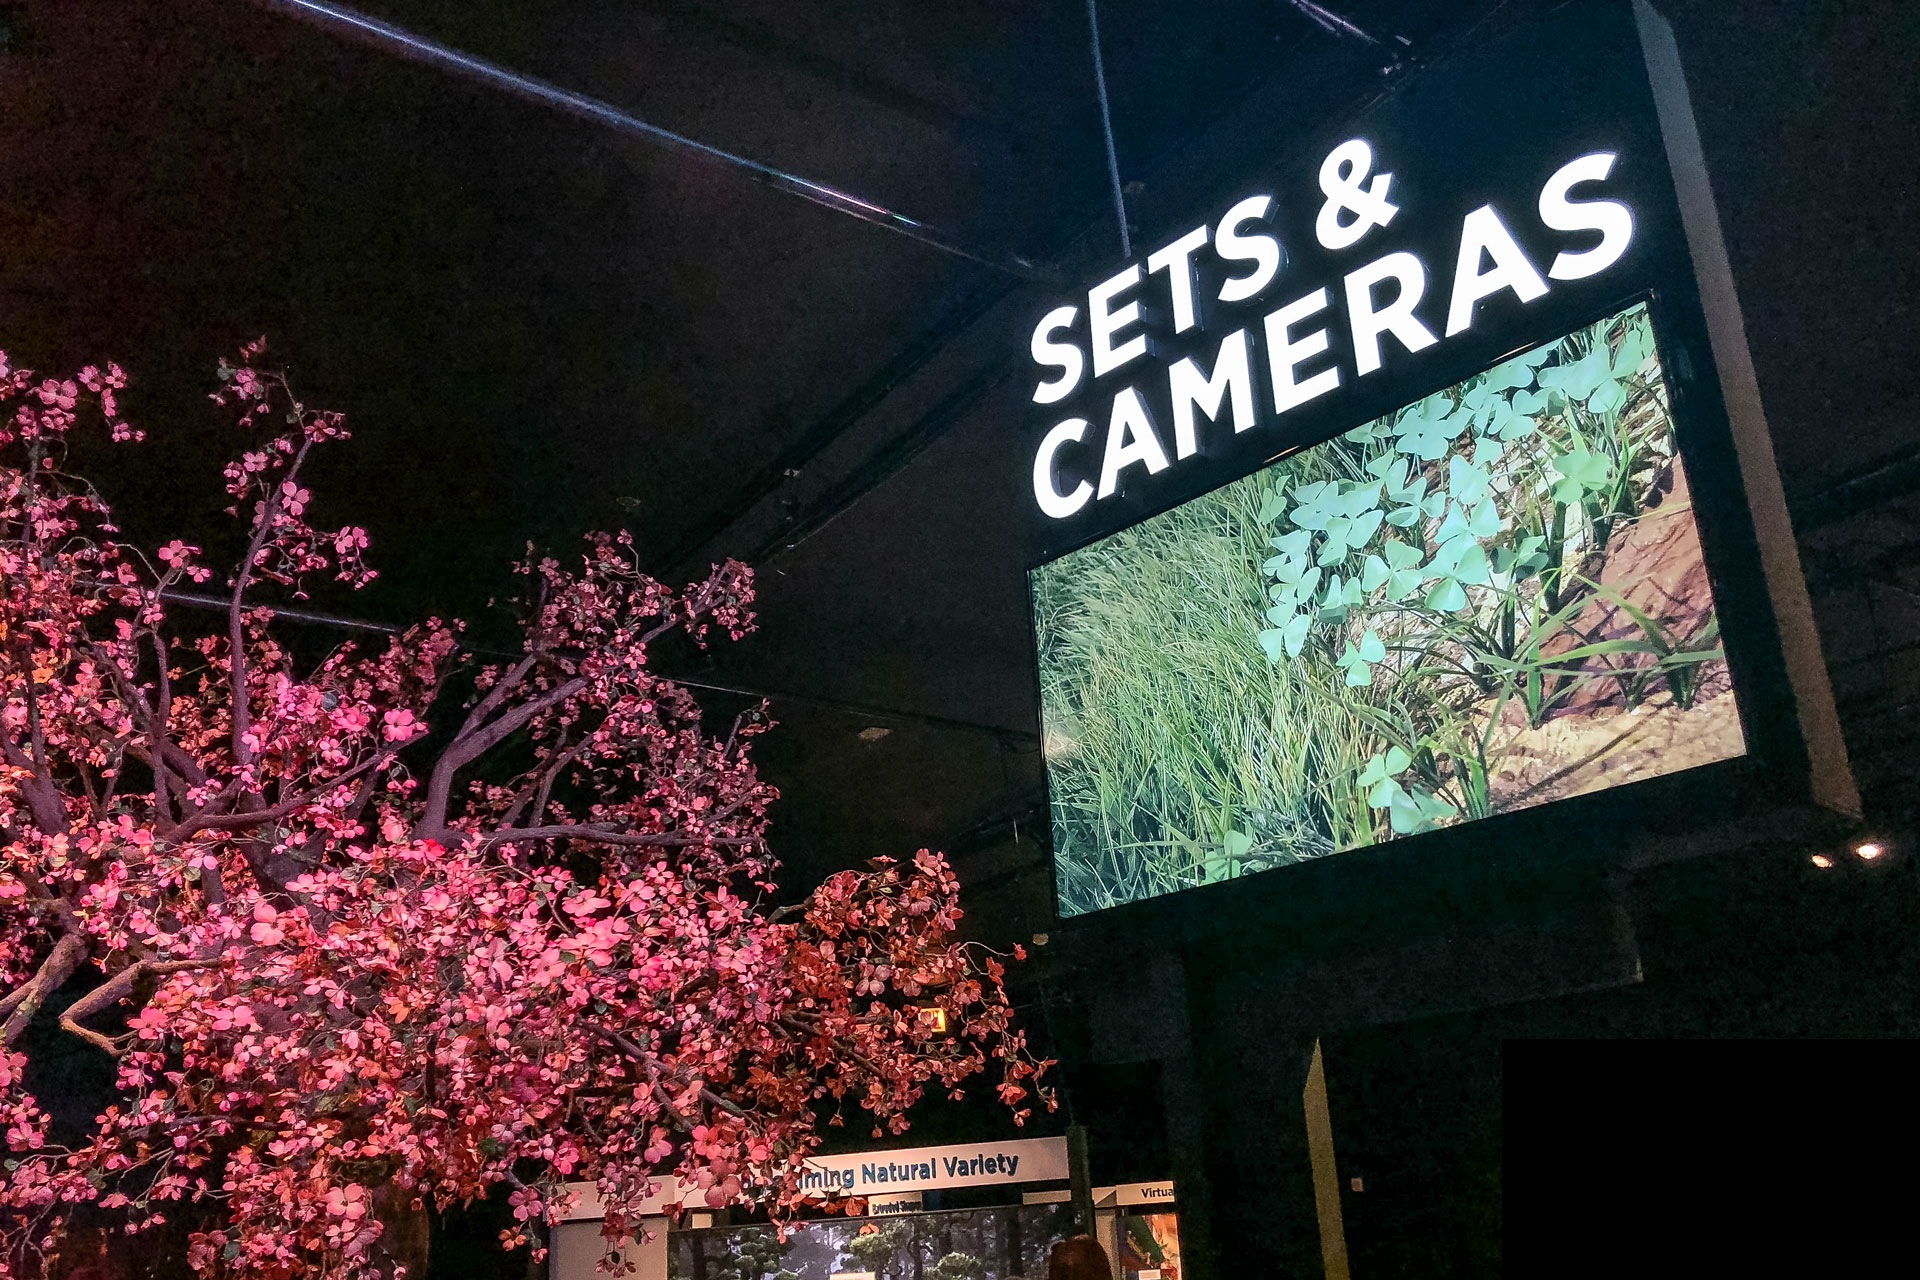
Sets & Camera
“In this stage of the process, the camera angles and the basic motions of the characters are finalized.”
According to The Science Behind Pixar’s website, “Camera artists are cinematographers of the virtual world. They use virtual cameras to shape what is shown in each frame. Camera artists choose the composition, camera movement, and lens type to support the story.” Virtual cinematography is really neat because modelers build out a whole virtual world, but only a portion is chosen to be seen in each frame or scene.
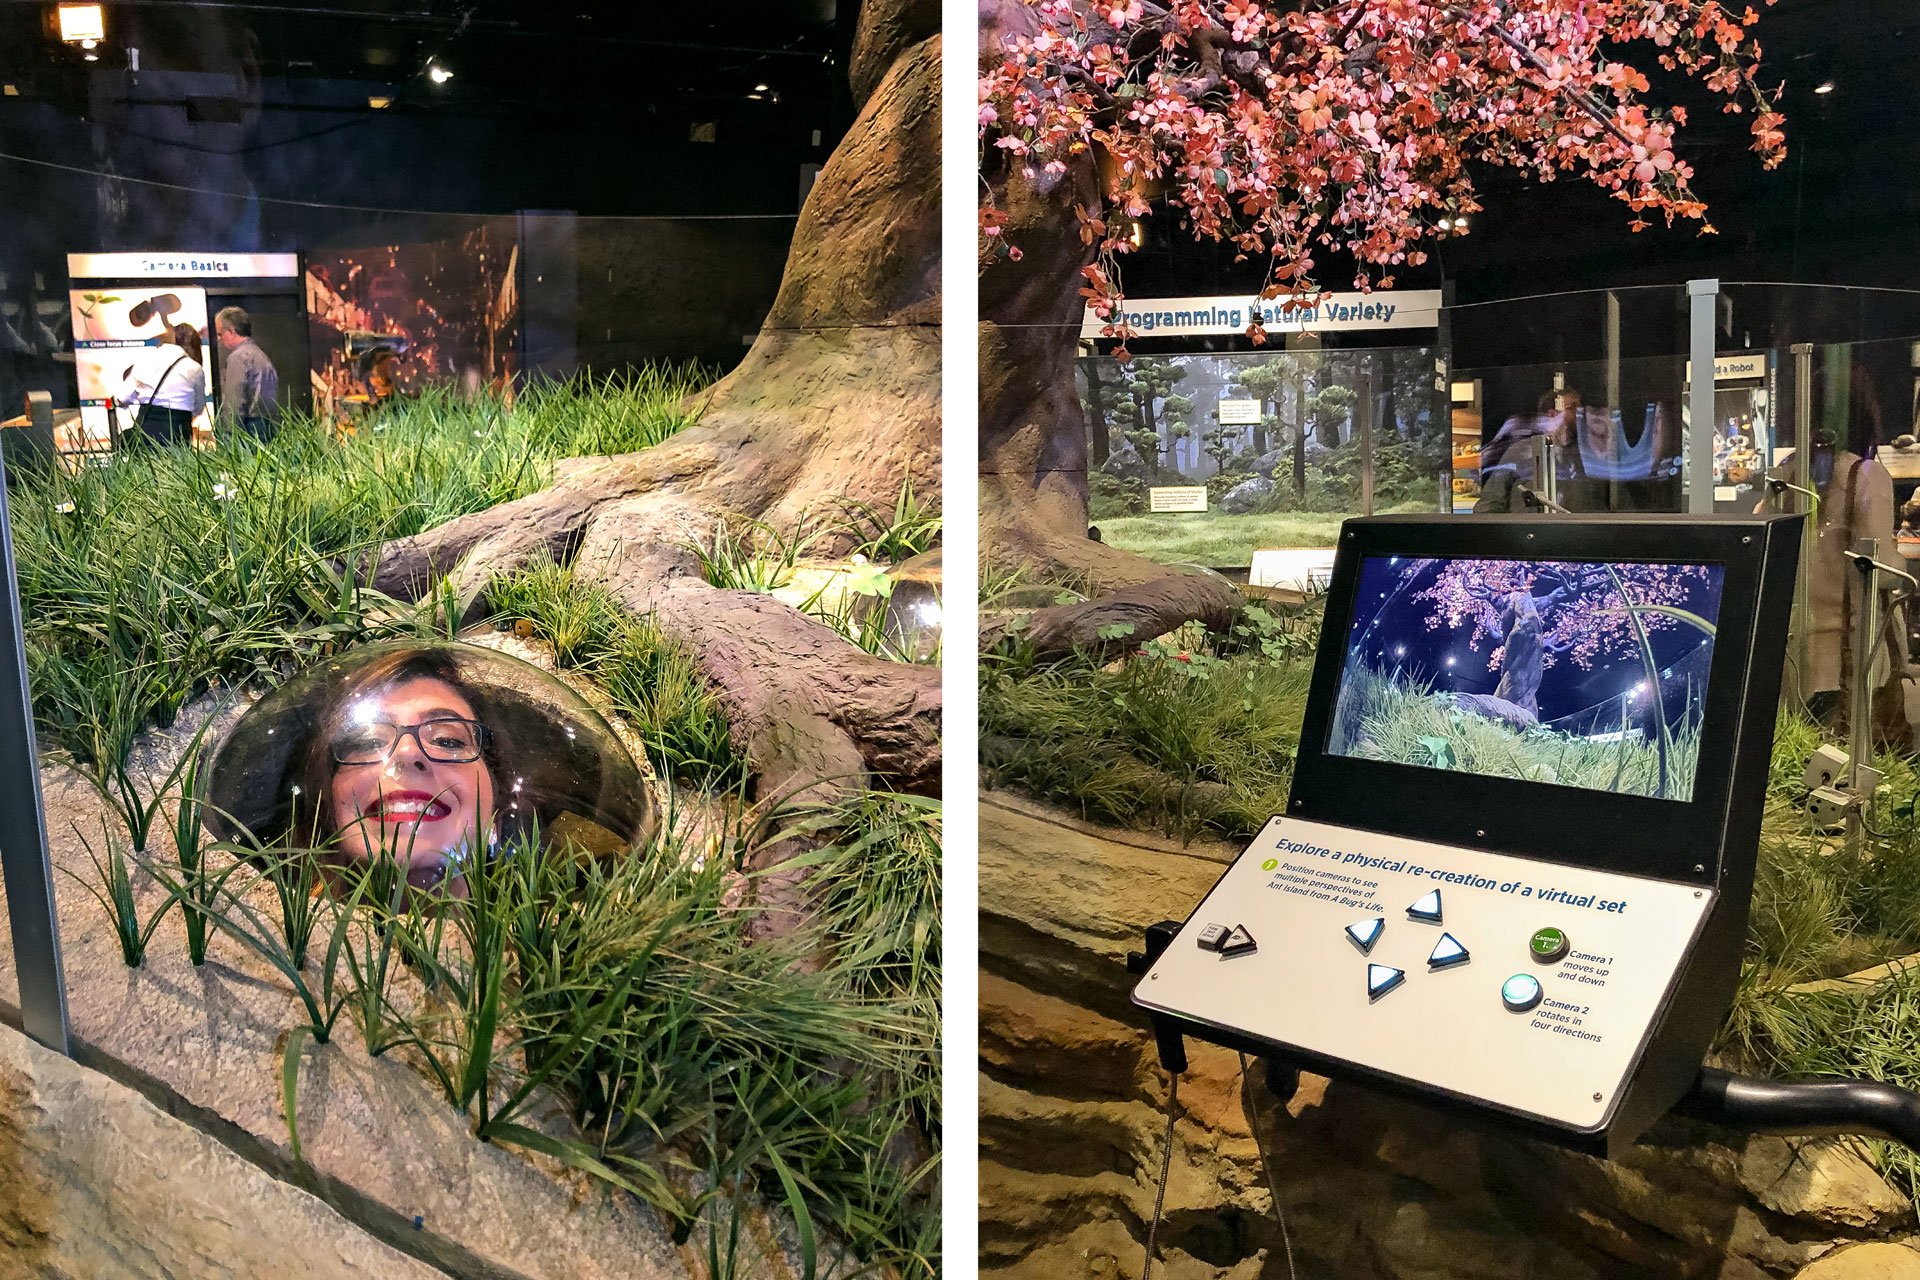
Explore a physical re-creation of a virtual set – At the Sets and Camera’s Workstation, I got a bugs eye view of Ant Island from A Bug’s Life. Not only did I get to move cameras around to see different perspectives of the set, but I got to pop my head inside the set as well. Haha!
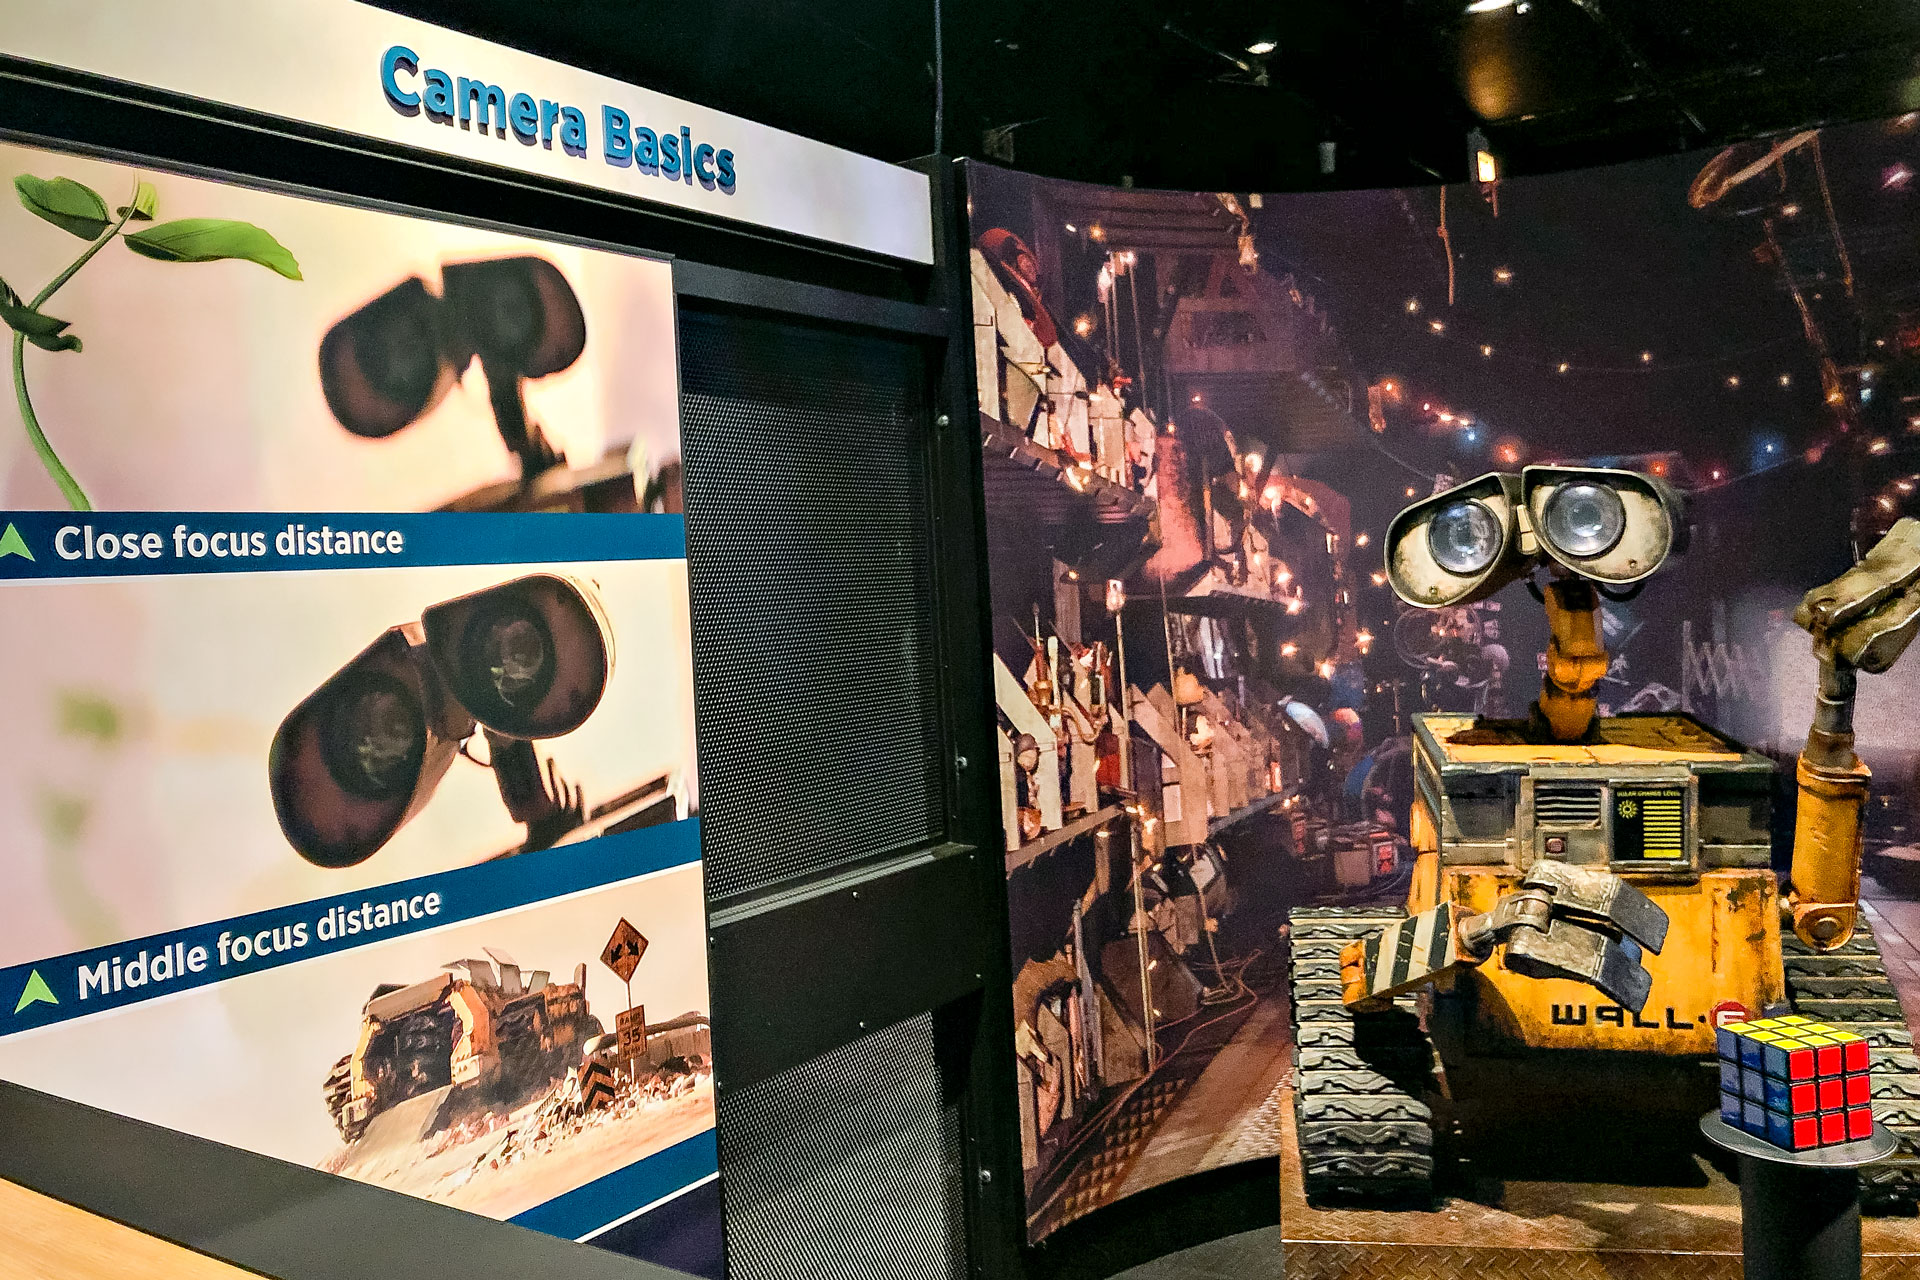
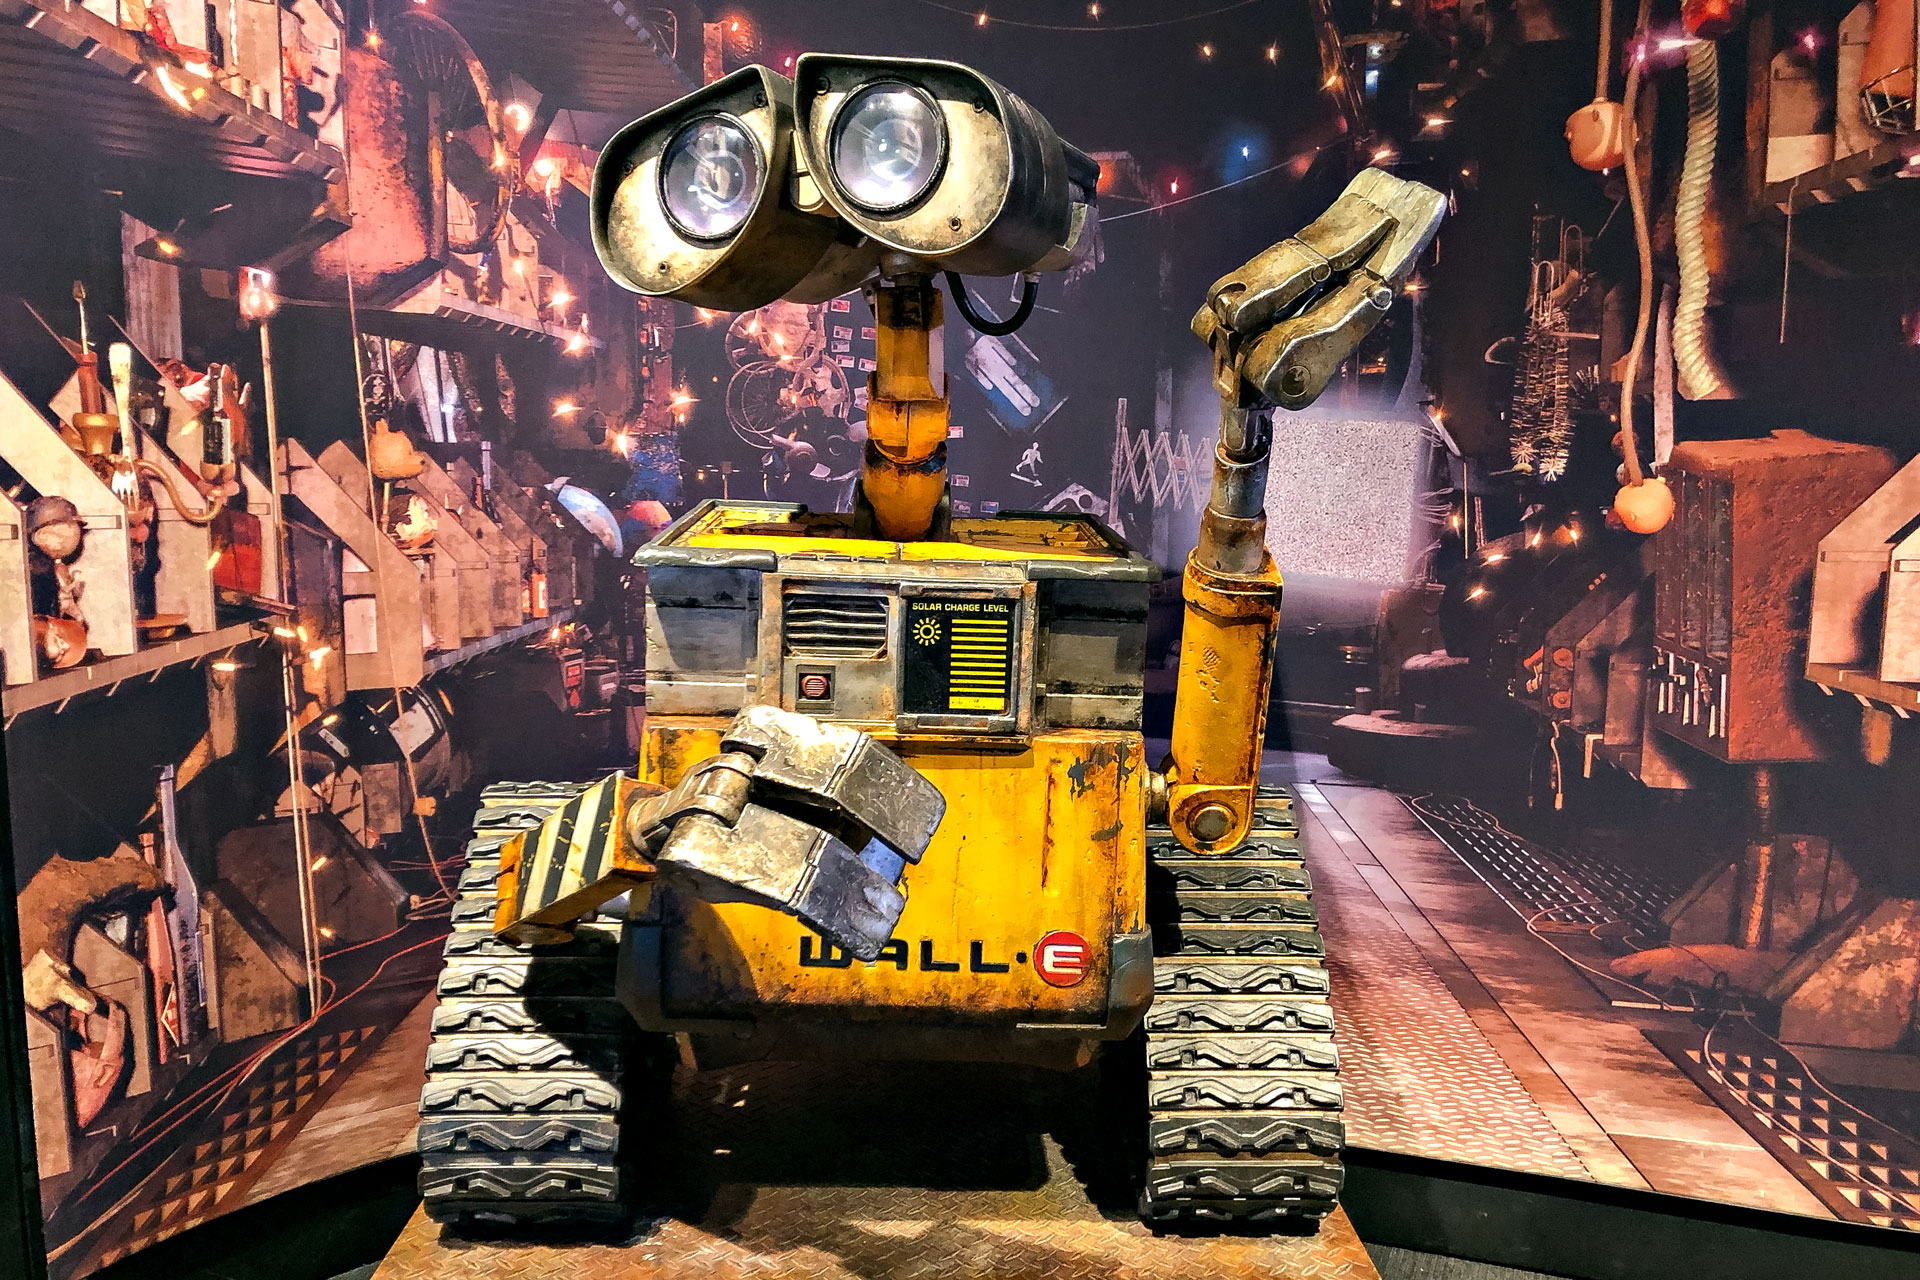
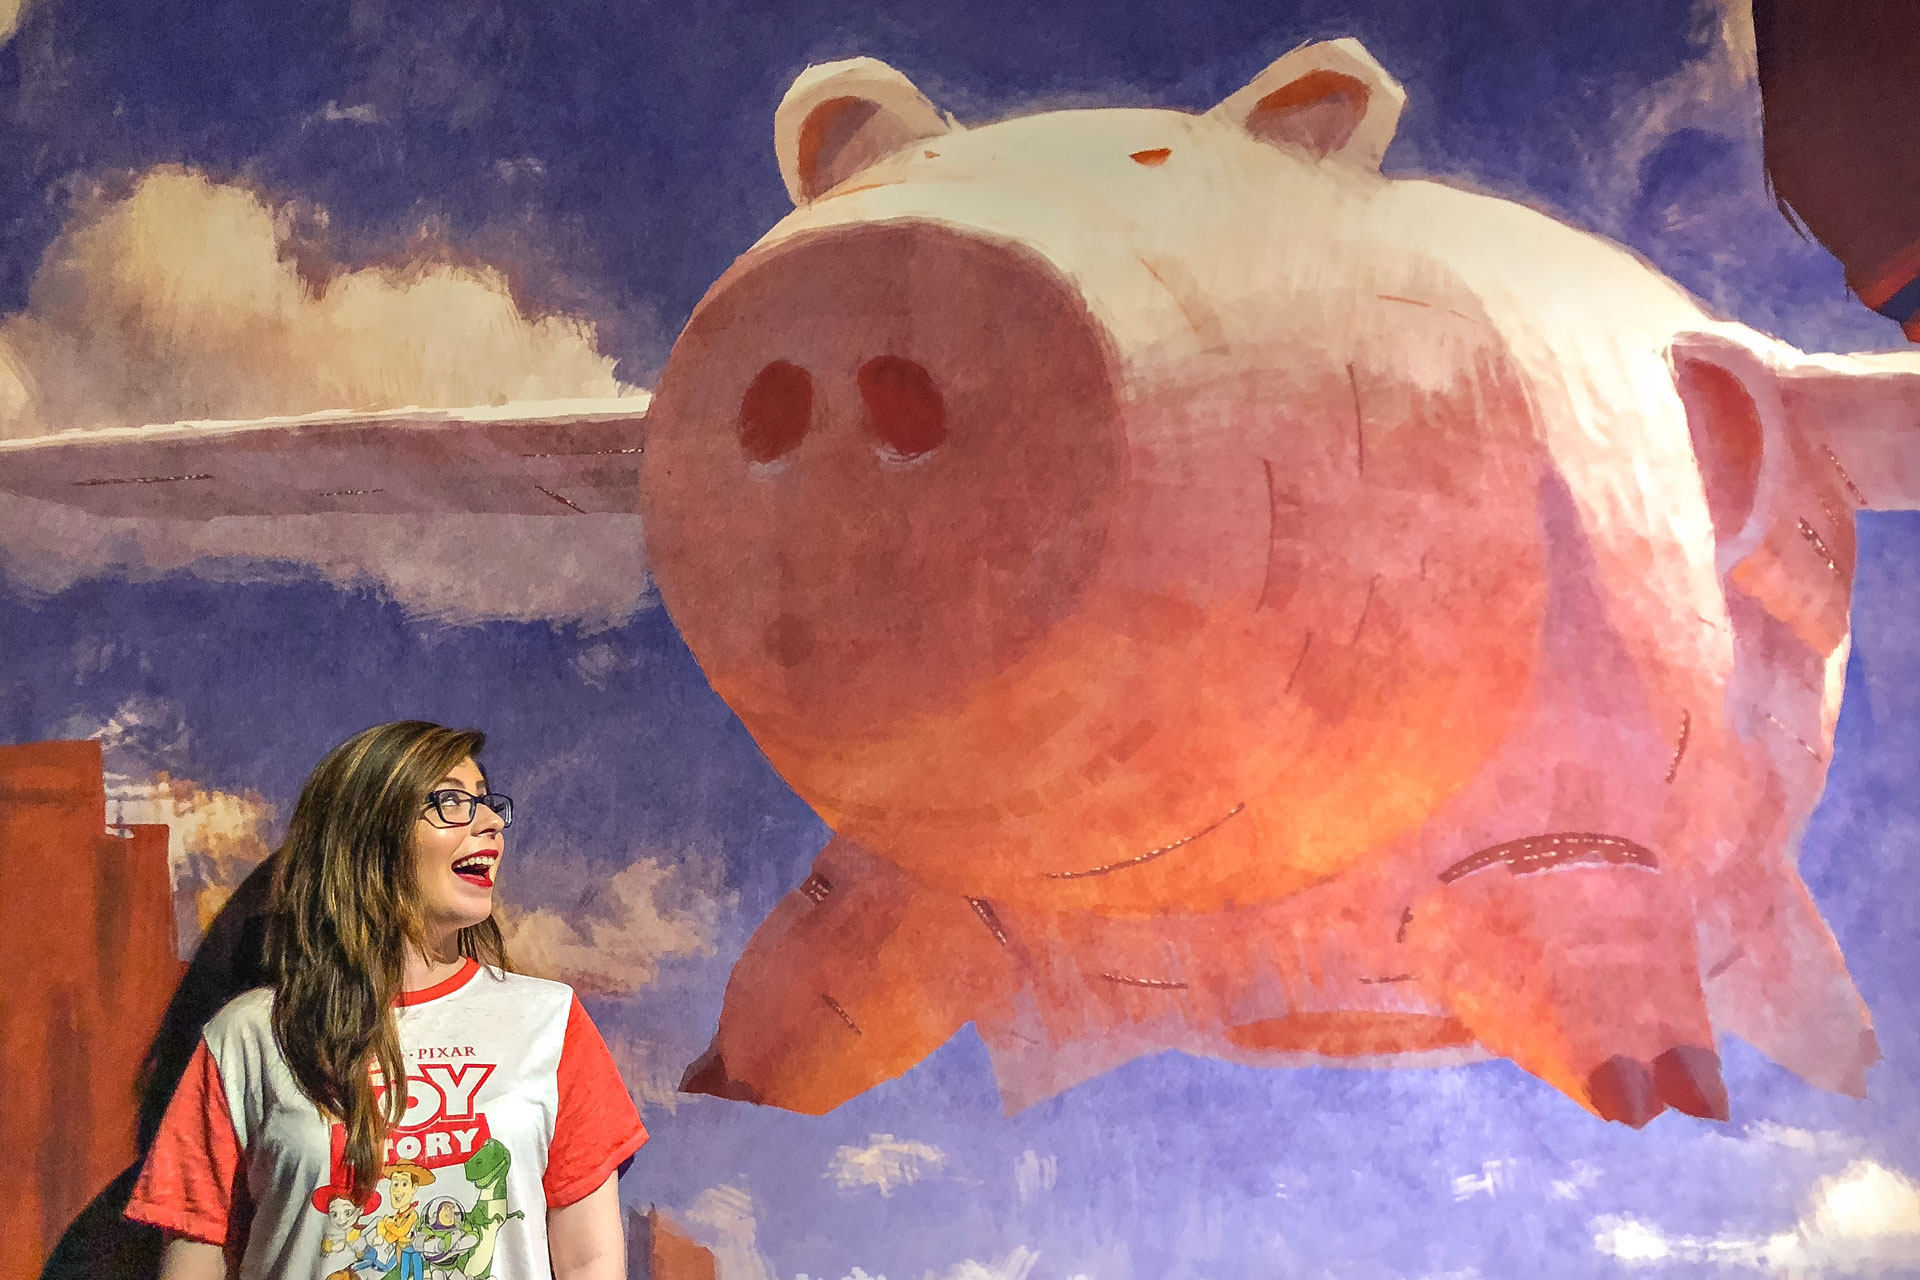
Photo-Op: WALL-E from WALL-E.
Camera Basics – The exhibit explained “focus distance” to demonstrate a camera’s role when working on a virtual set. At the workstation, there was a beautiful model (and photo-op) of WALL-E, and a Rubix Cube. The Rubix Cube was closer to the camera than WALL-E was. One type of focus distance is “close focus distance”. To further explain, the camera is focused on the Rubix Cube, but WALL-E appears blurry or out of focus in the background. Another focus distance, known as “middle focus distance” is when the camera is focused on only WALL-E, and the background is out of focus.
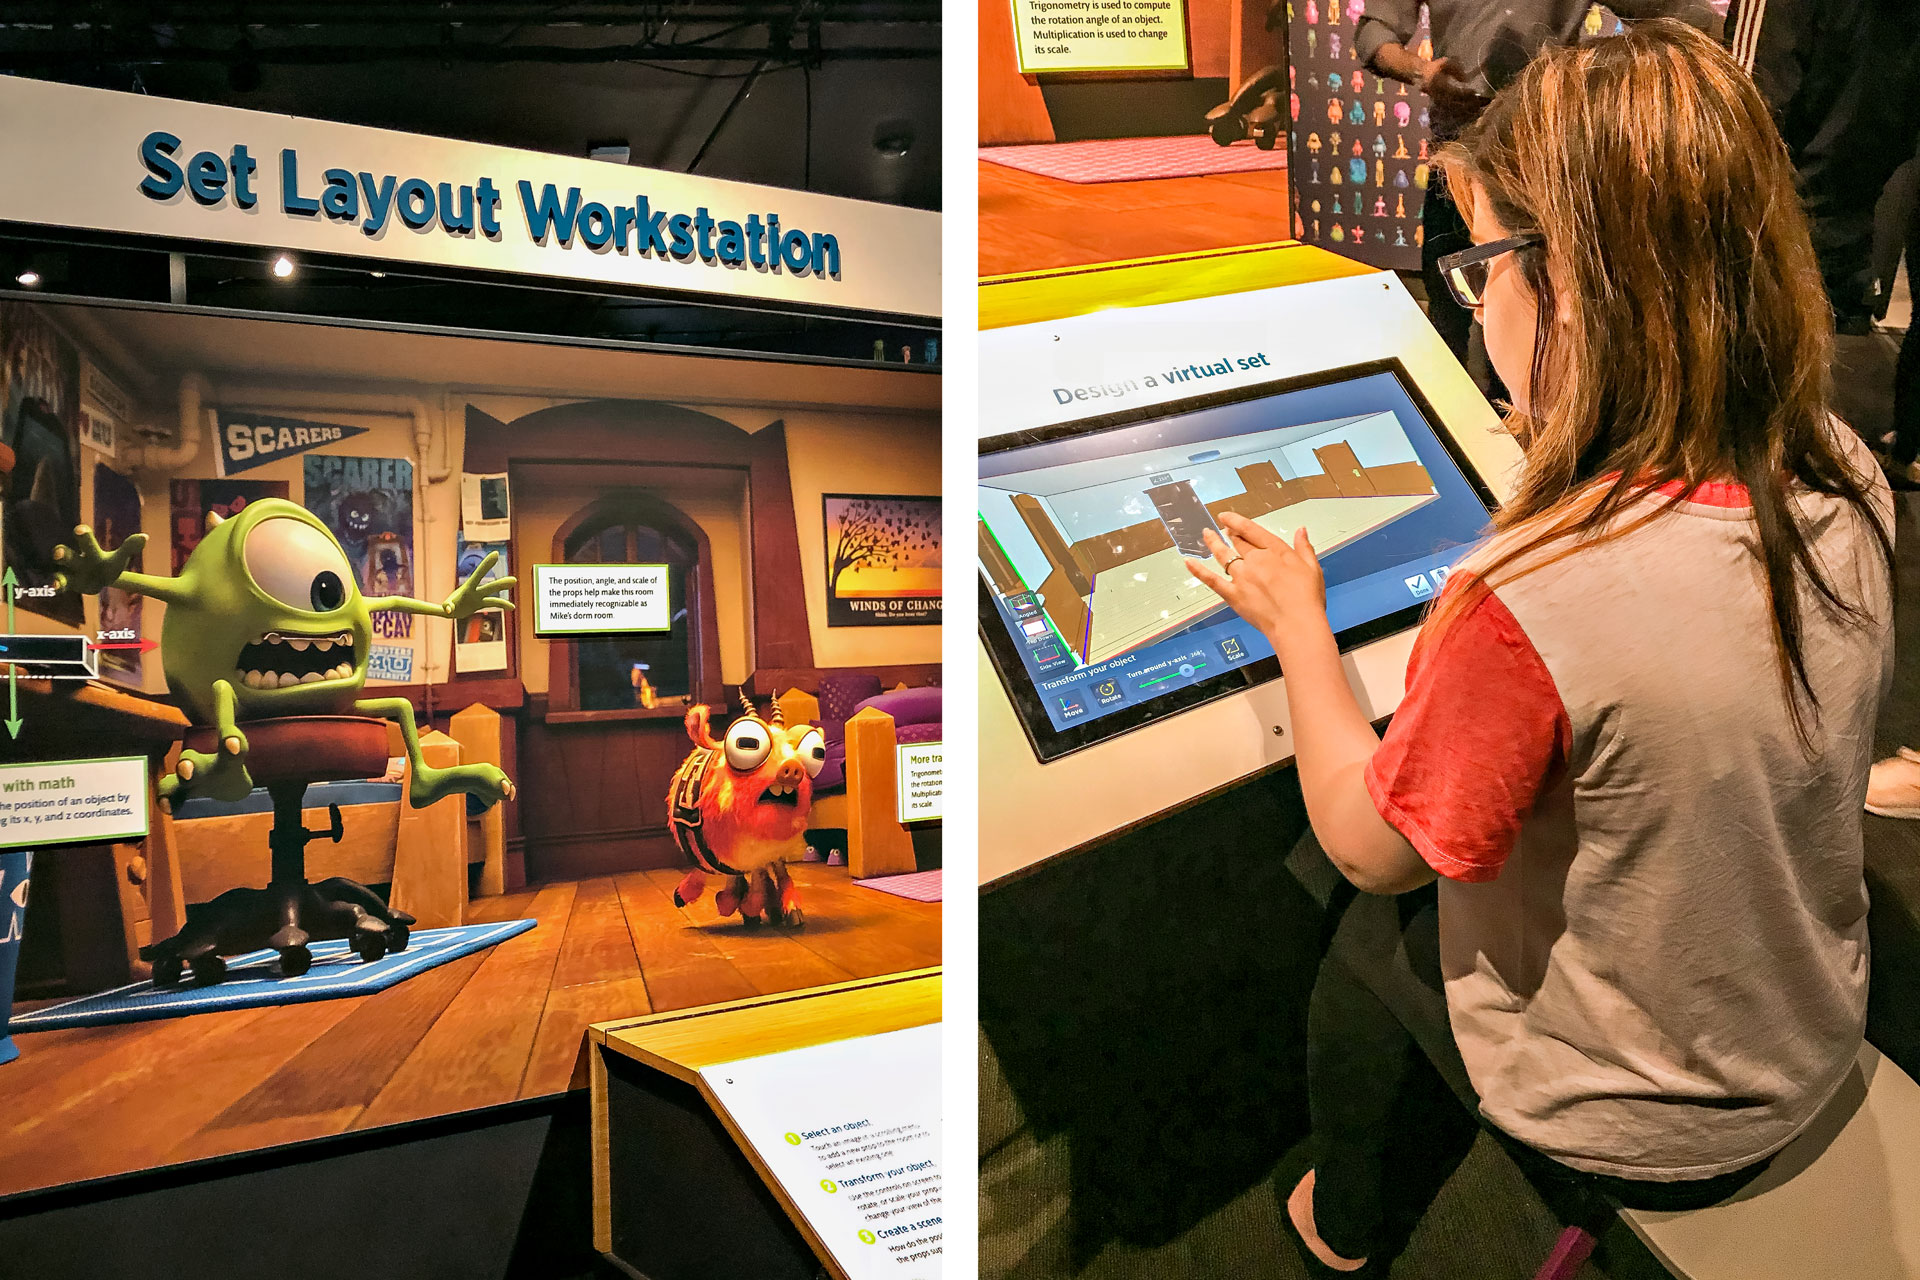
Set Layout – Set designer’s are the architects for Pixar films. They have to build every single part of a set from scratch, which means every building to every little blade of grass. The activity at the Set Layout Workstation was to design a virtual set using the 3D objects supplied. In this case, the virtual set was Mike’s dorm room from Monster’s University. During this activity, I experimented with scale, and placement to layout Mike’s furniture and belongings.
Gallery #2
After an information overload from Gallery 1, the Fam and I headed to Gallery 2 to see the rest of The Science Behind Pixar. Gallery 2 included the following steps from the Pixar Production Pipeline: Surfaces, Animation, Simulation, Lighting, and Rendering.
Surfaces
“Surface appearance is controlled separately from shape.”
When modelers create a shape, it has no defined surface. A cube is just a cube, until you give it a color, and texture. Then, it can be a dice, a box, or whatever a scene needs it to be.
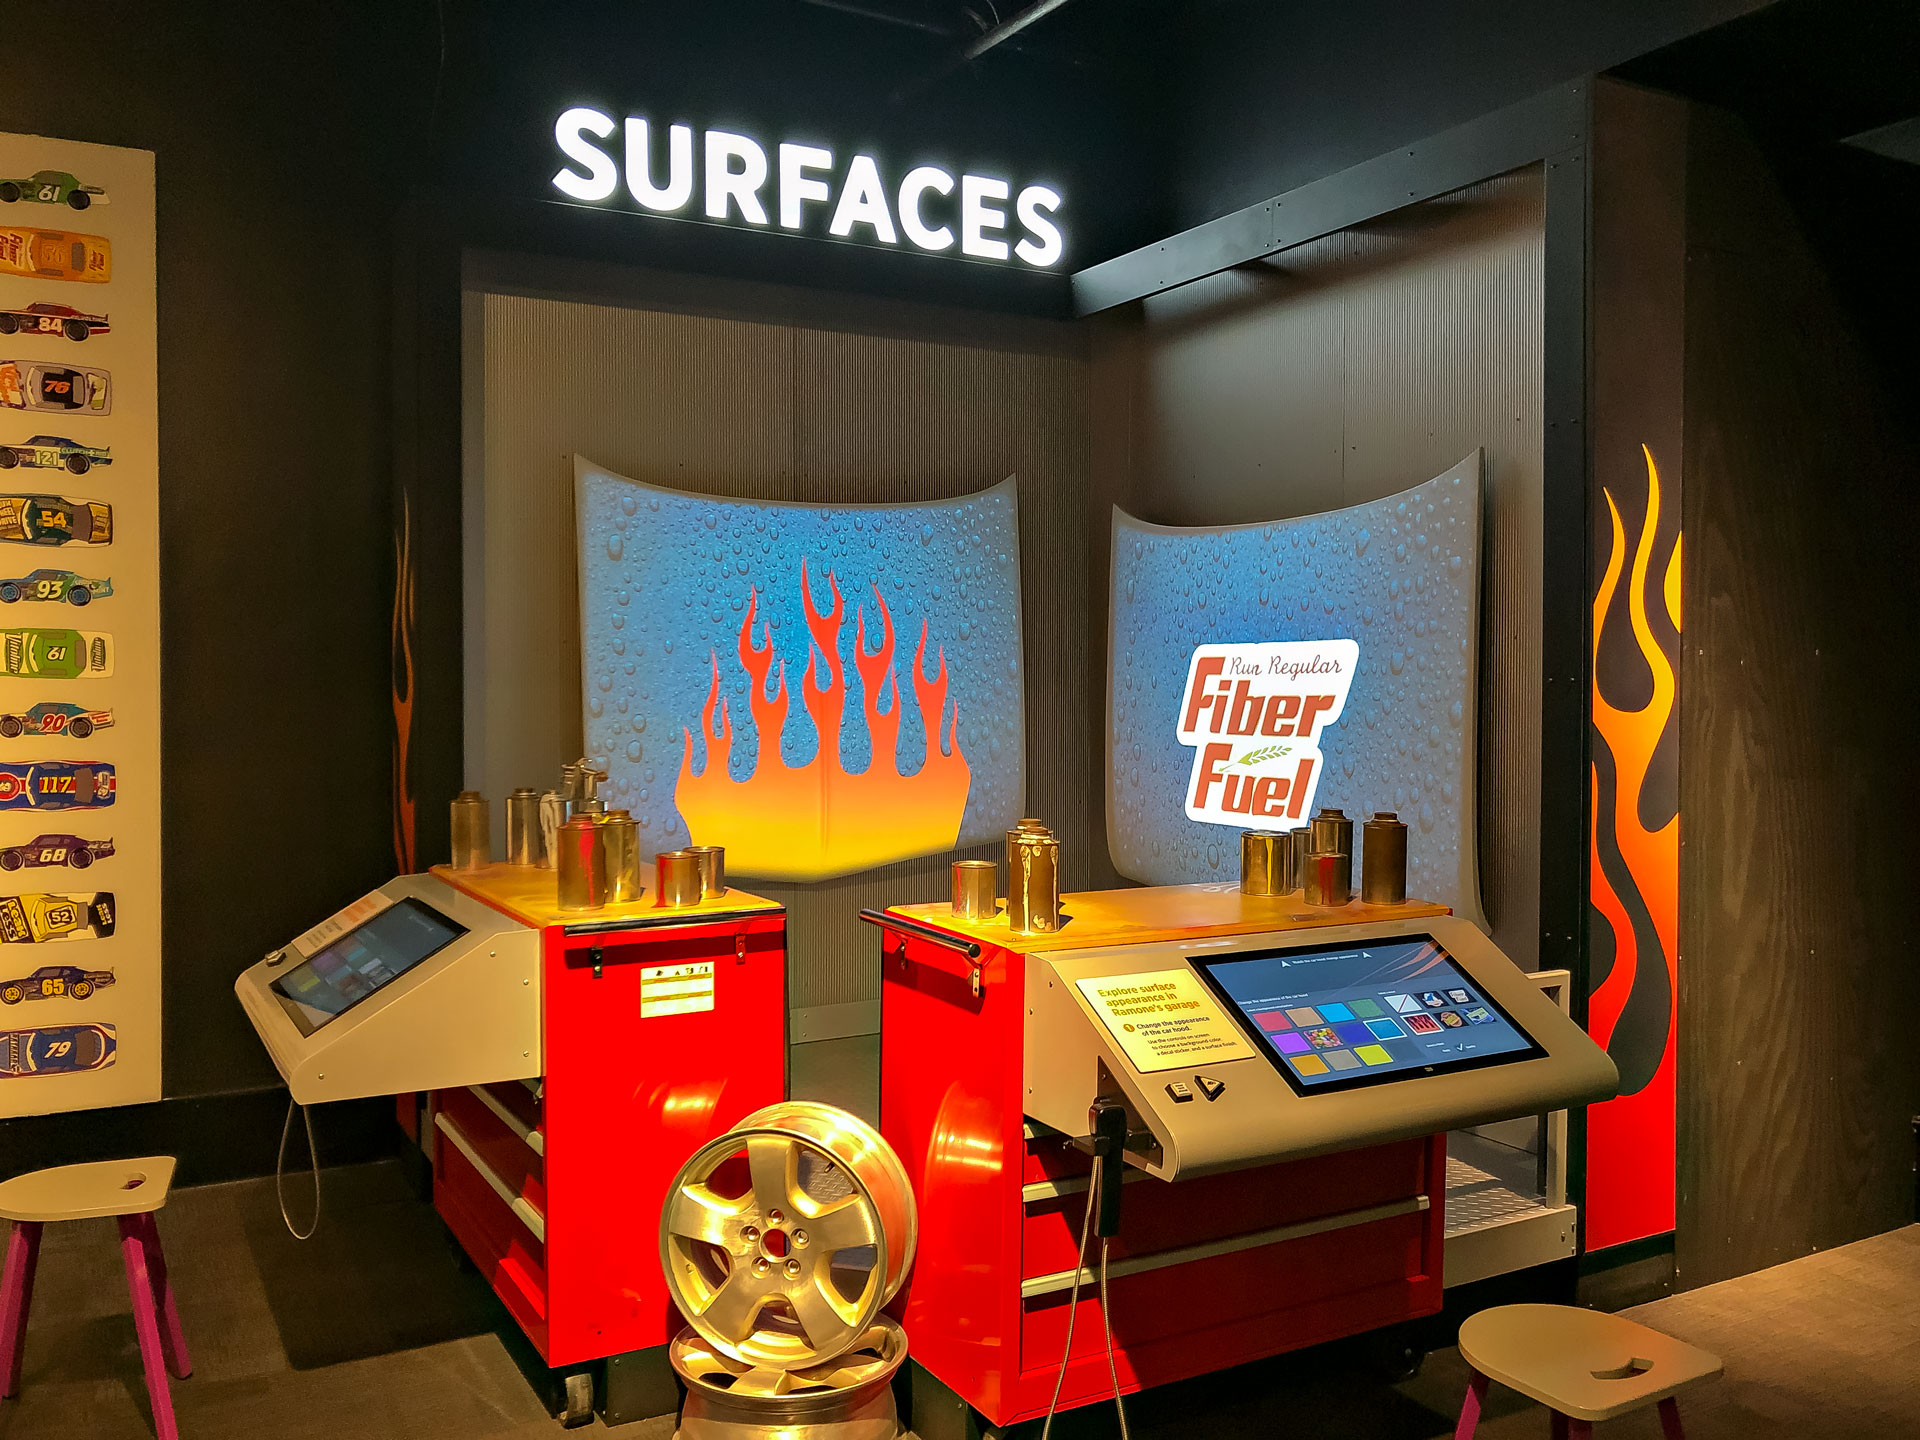
Exploring Surface Appearance – To learn about surface appearance, I visited Ramone’s Garage (from the movie, Cars), which was a station where I could change the appearance of a car hood. To change the appearance of the car hood, I chose a background color/pattern, and a cool decal.
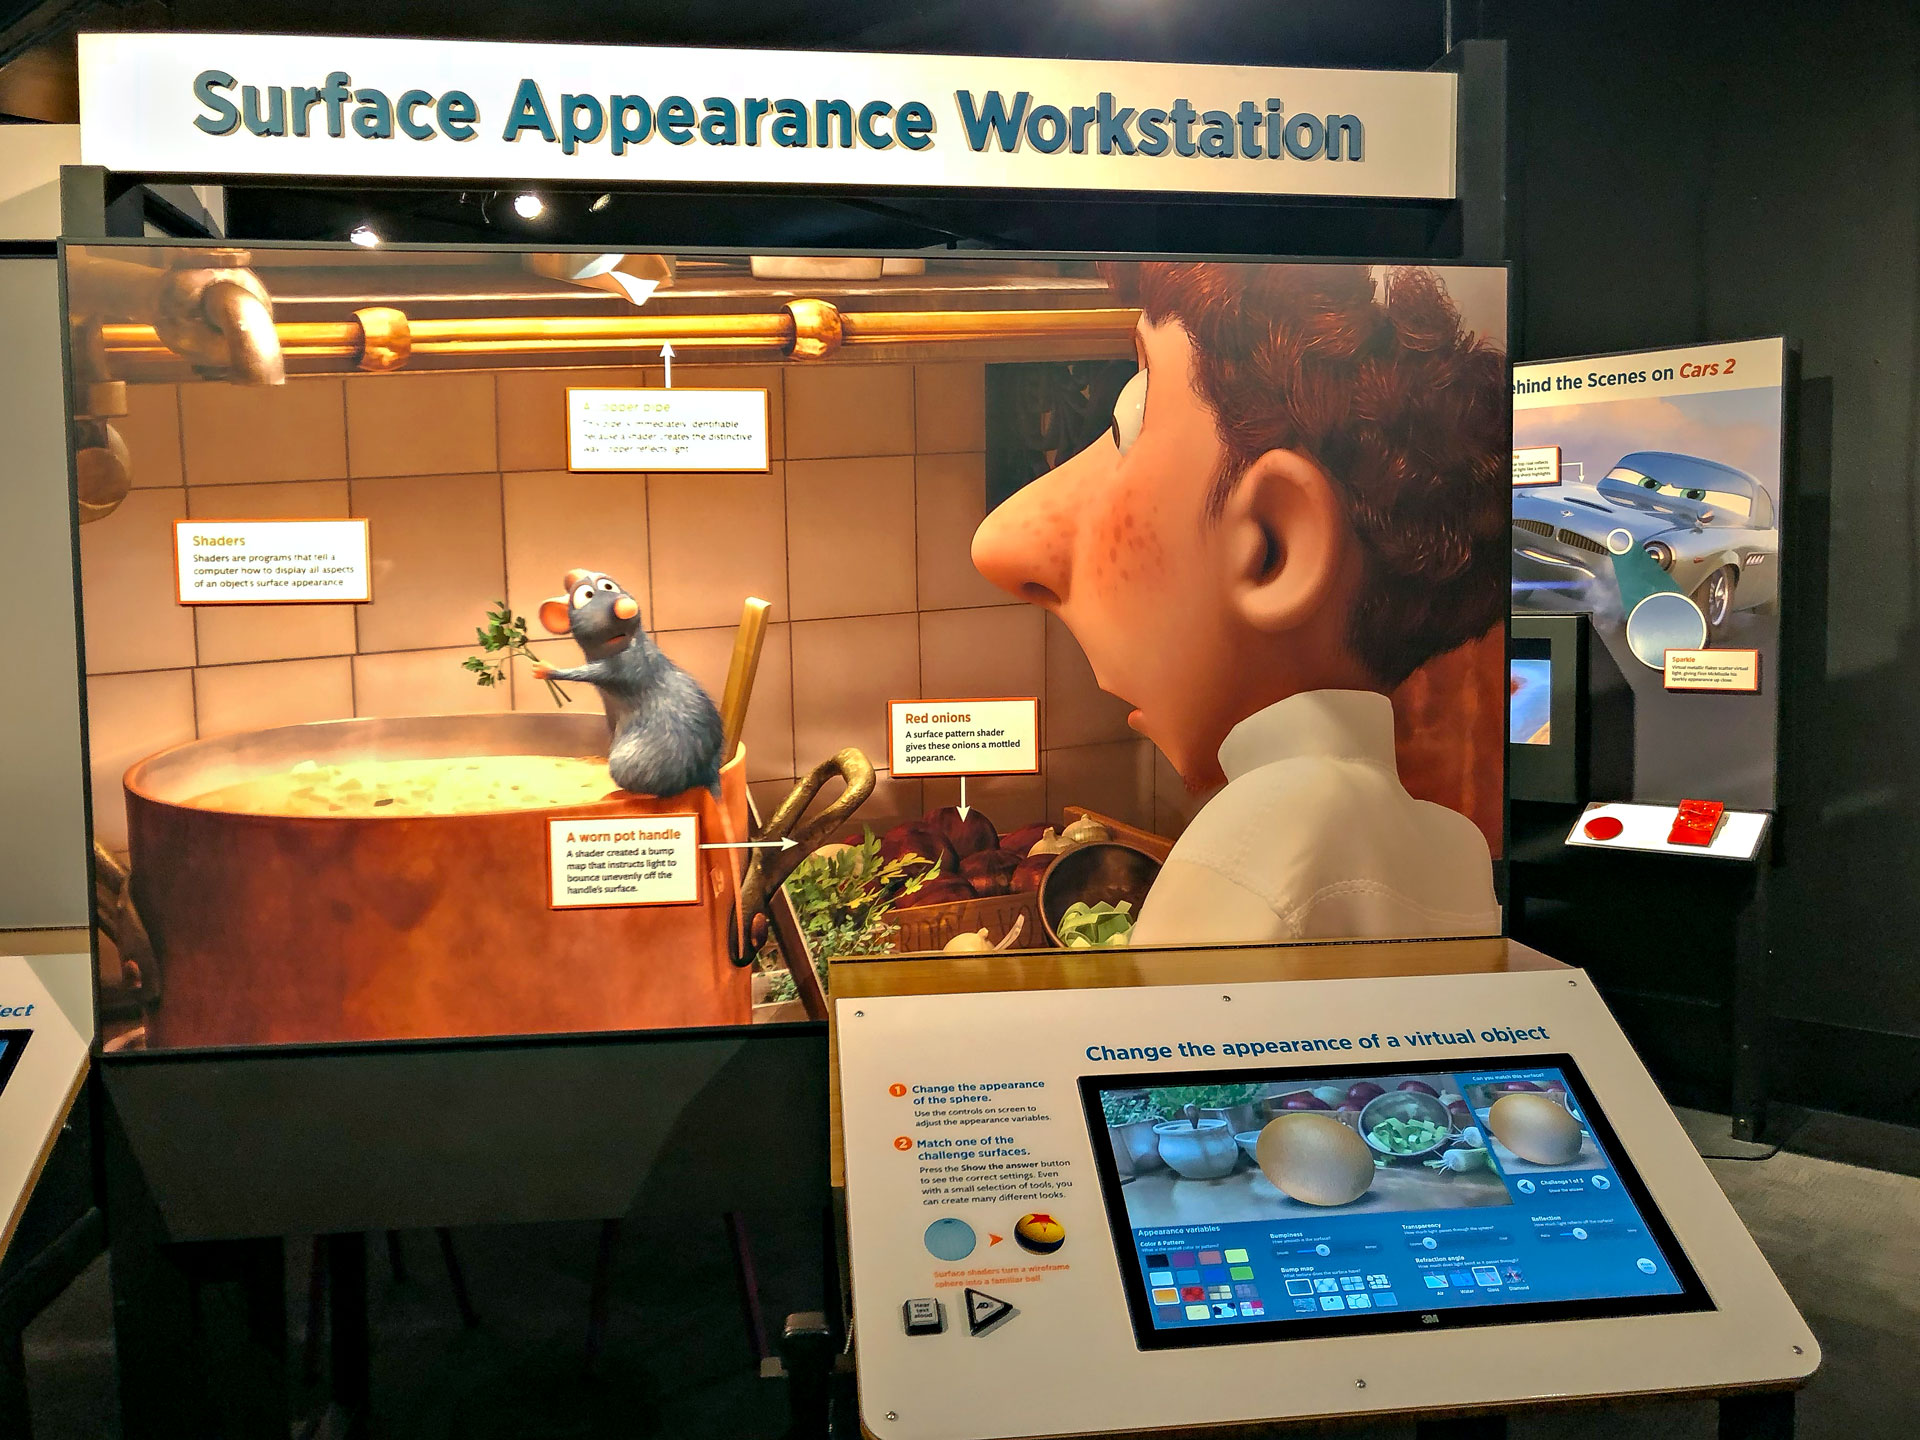
Surface Appearance Workstation – At the Surface Appearance Workstation, I was given a sphere without a surface. The challenge was to match the surface of the sphere with the surface of objects from Ratatouille using the following appearance variables: colors & pattern, bumpiness, bump map, transparency, refraction angle, and reflection. I’m a very detail-oriented person, so the challenge only took me a few minutes to complete.
Animation
“Animation is acting. In this stage of the pipeline, animators pose the characters to act out each scene.”
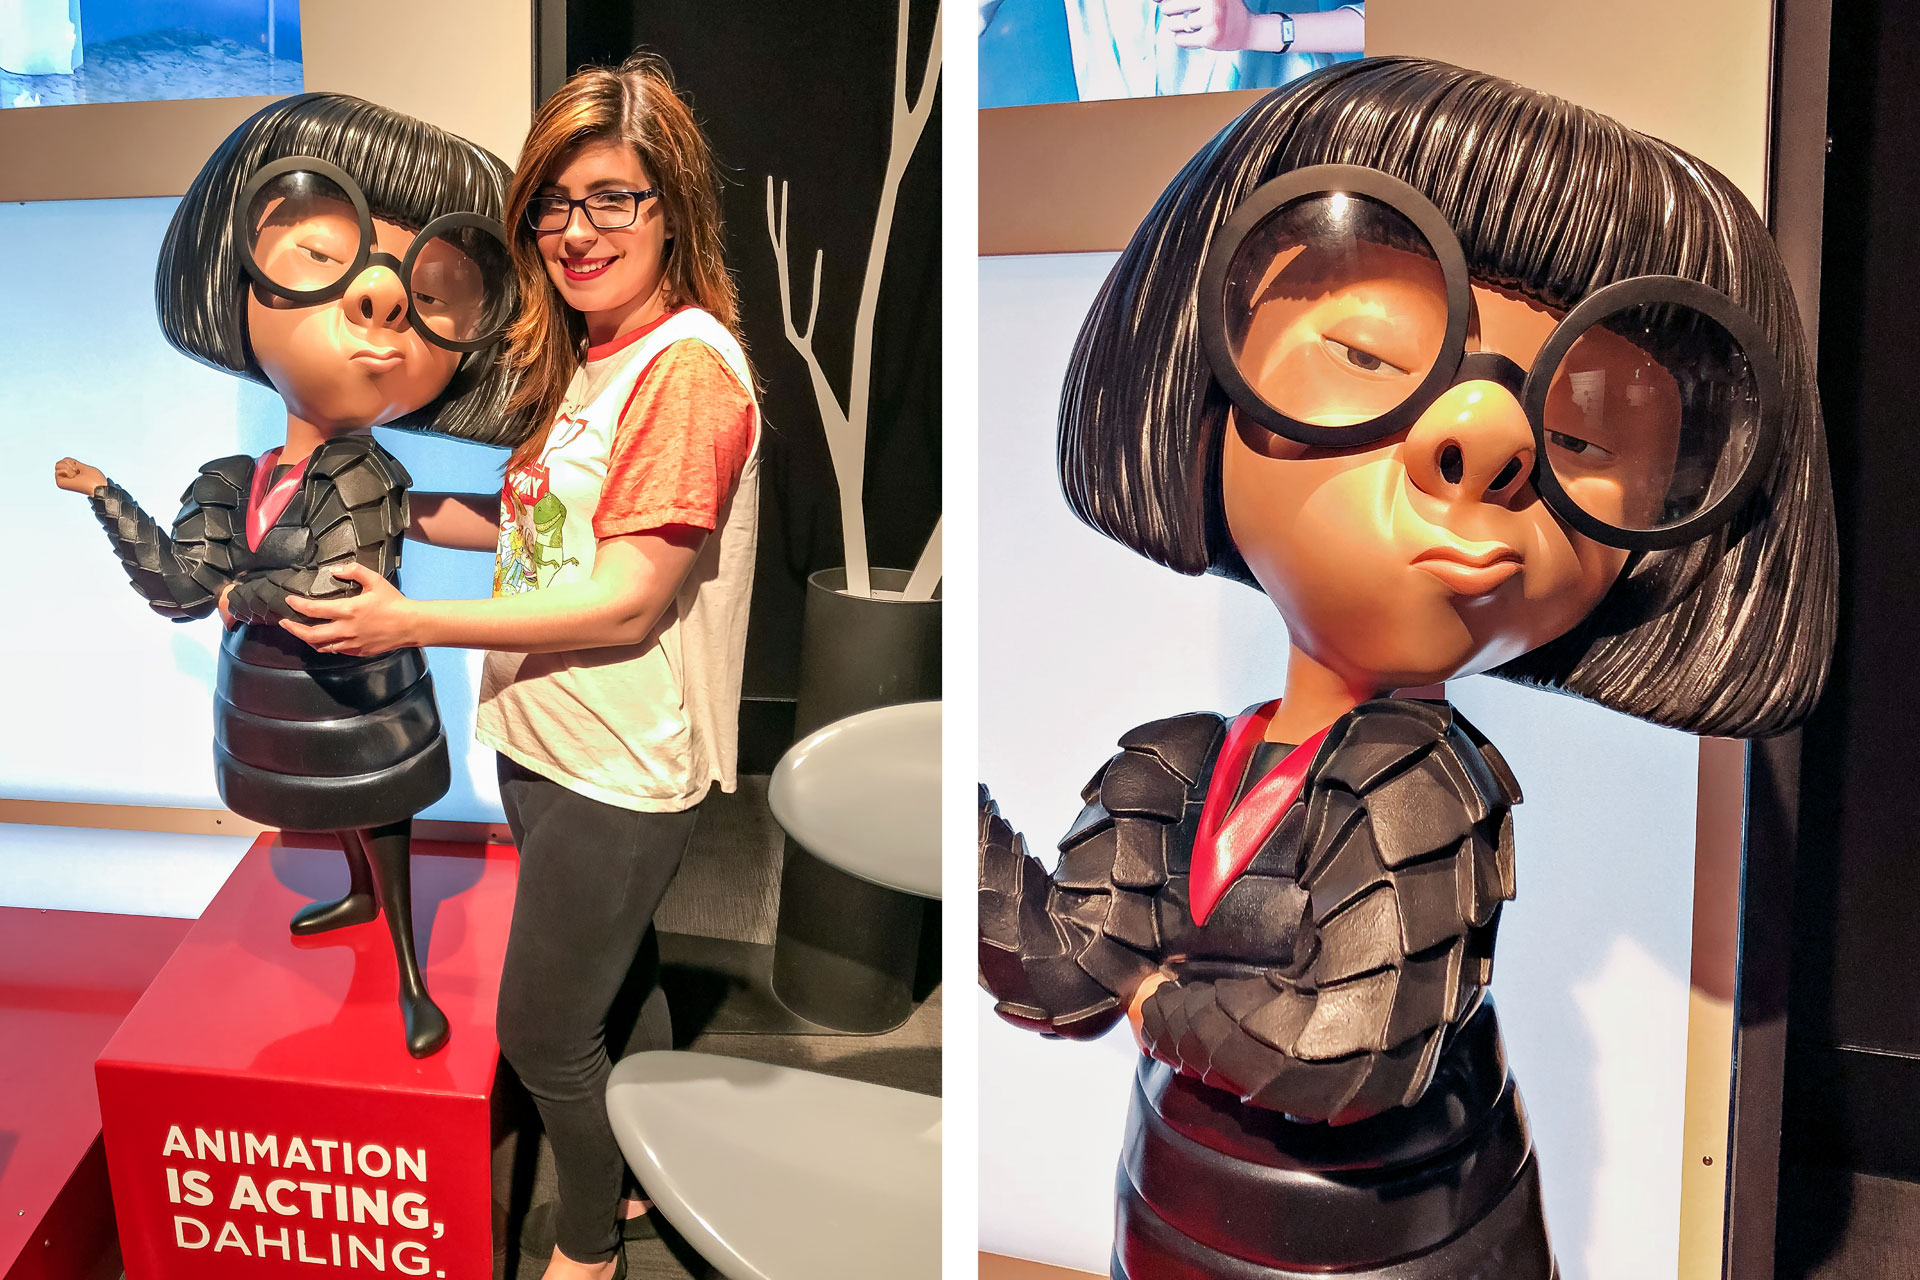
Photo-Op: Edna Mode from The Incredibles.
Animation is Acting – In many of Disney’s earlier films, the animation was created by a series of hand drawings. In Pixar films, animation is created with a series of sequential images that are made up of 3D sets and objects. According to The Science Behind Pixar’s website, “Animators bring the story to life, posing characters to act out each scene. They start by breaking down an action into a series of poses called key frames that mark out important positions.” So, it can be said that animation is like acting.
Edna Mode Photo-Op – “Animation is acting, Dahling!” If anyone knows about acting it’s Ms. Edna Mode. She’s had her share of acting in The Incredibles movies. I was so starstruck. I had to take a picture with my favorite fashion designer. Photo-op time!
Simulation
“Computer programs create automated motion.”
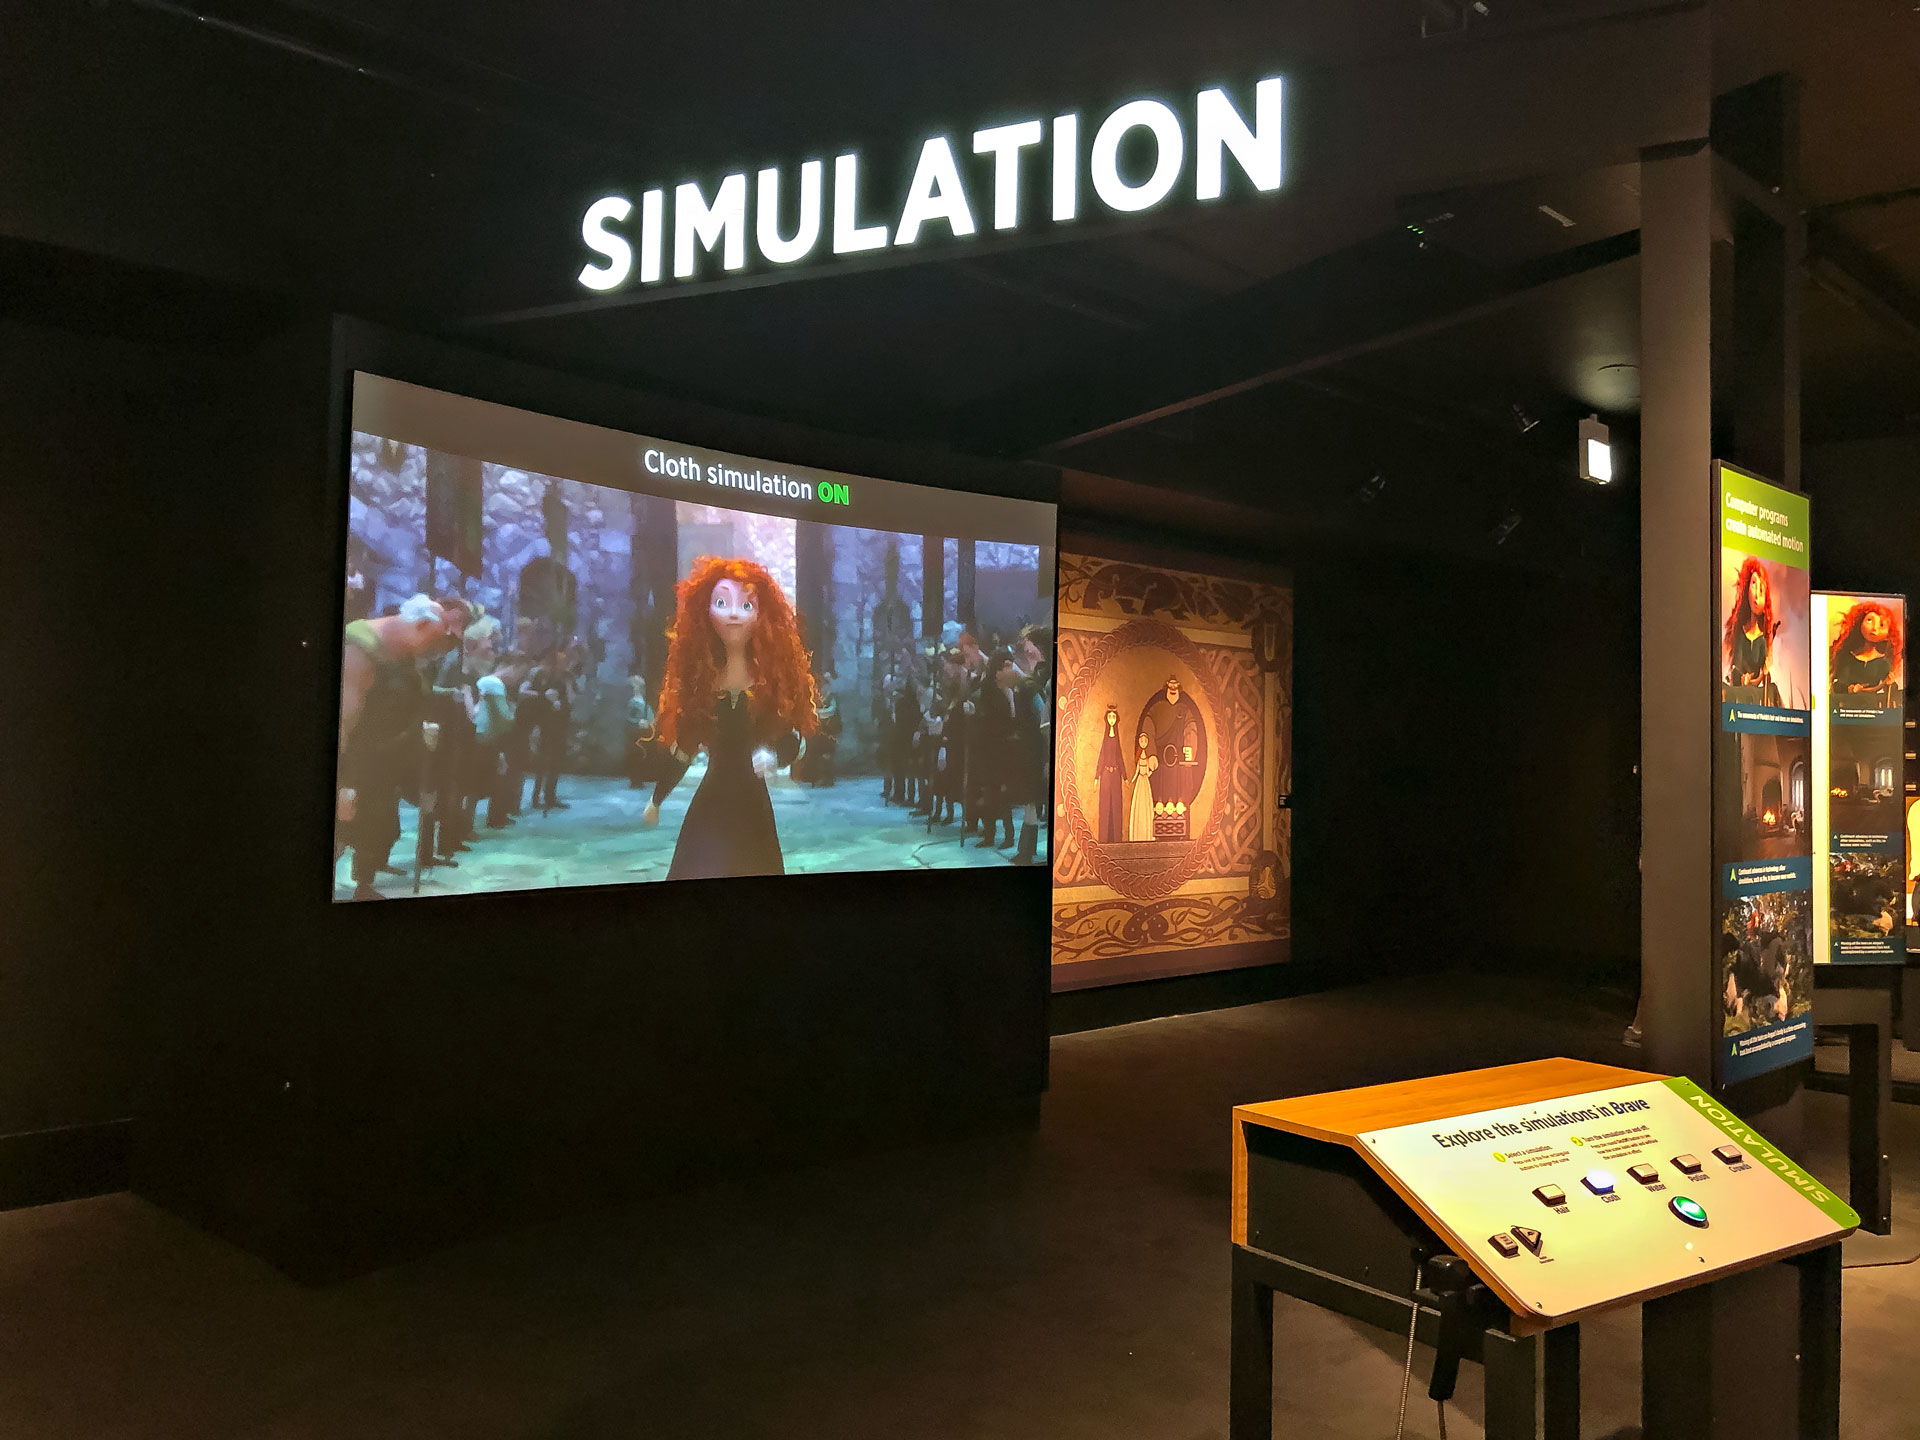
Simulation is a motion that is created to make a scene feel more realistic. Simulations like hair, fur, and clothing are responsive in which way a character moves. Natural elements, such as fire and water are programmed to have the realistic behaviors that they would have in nature.
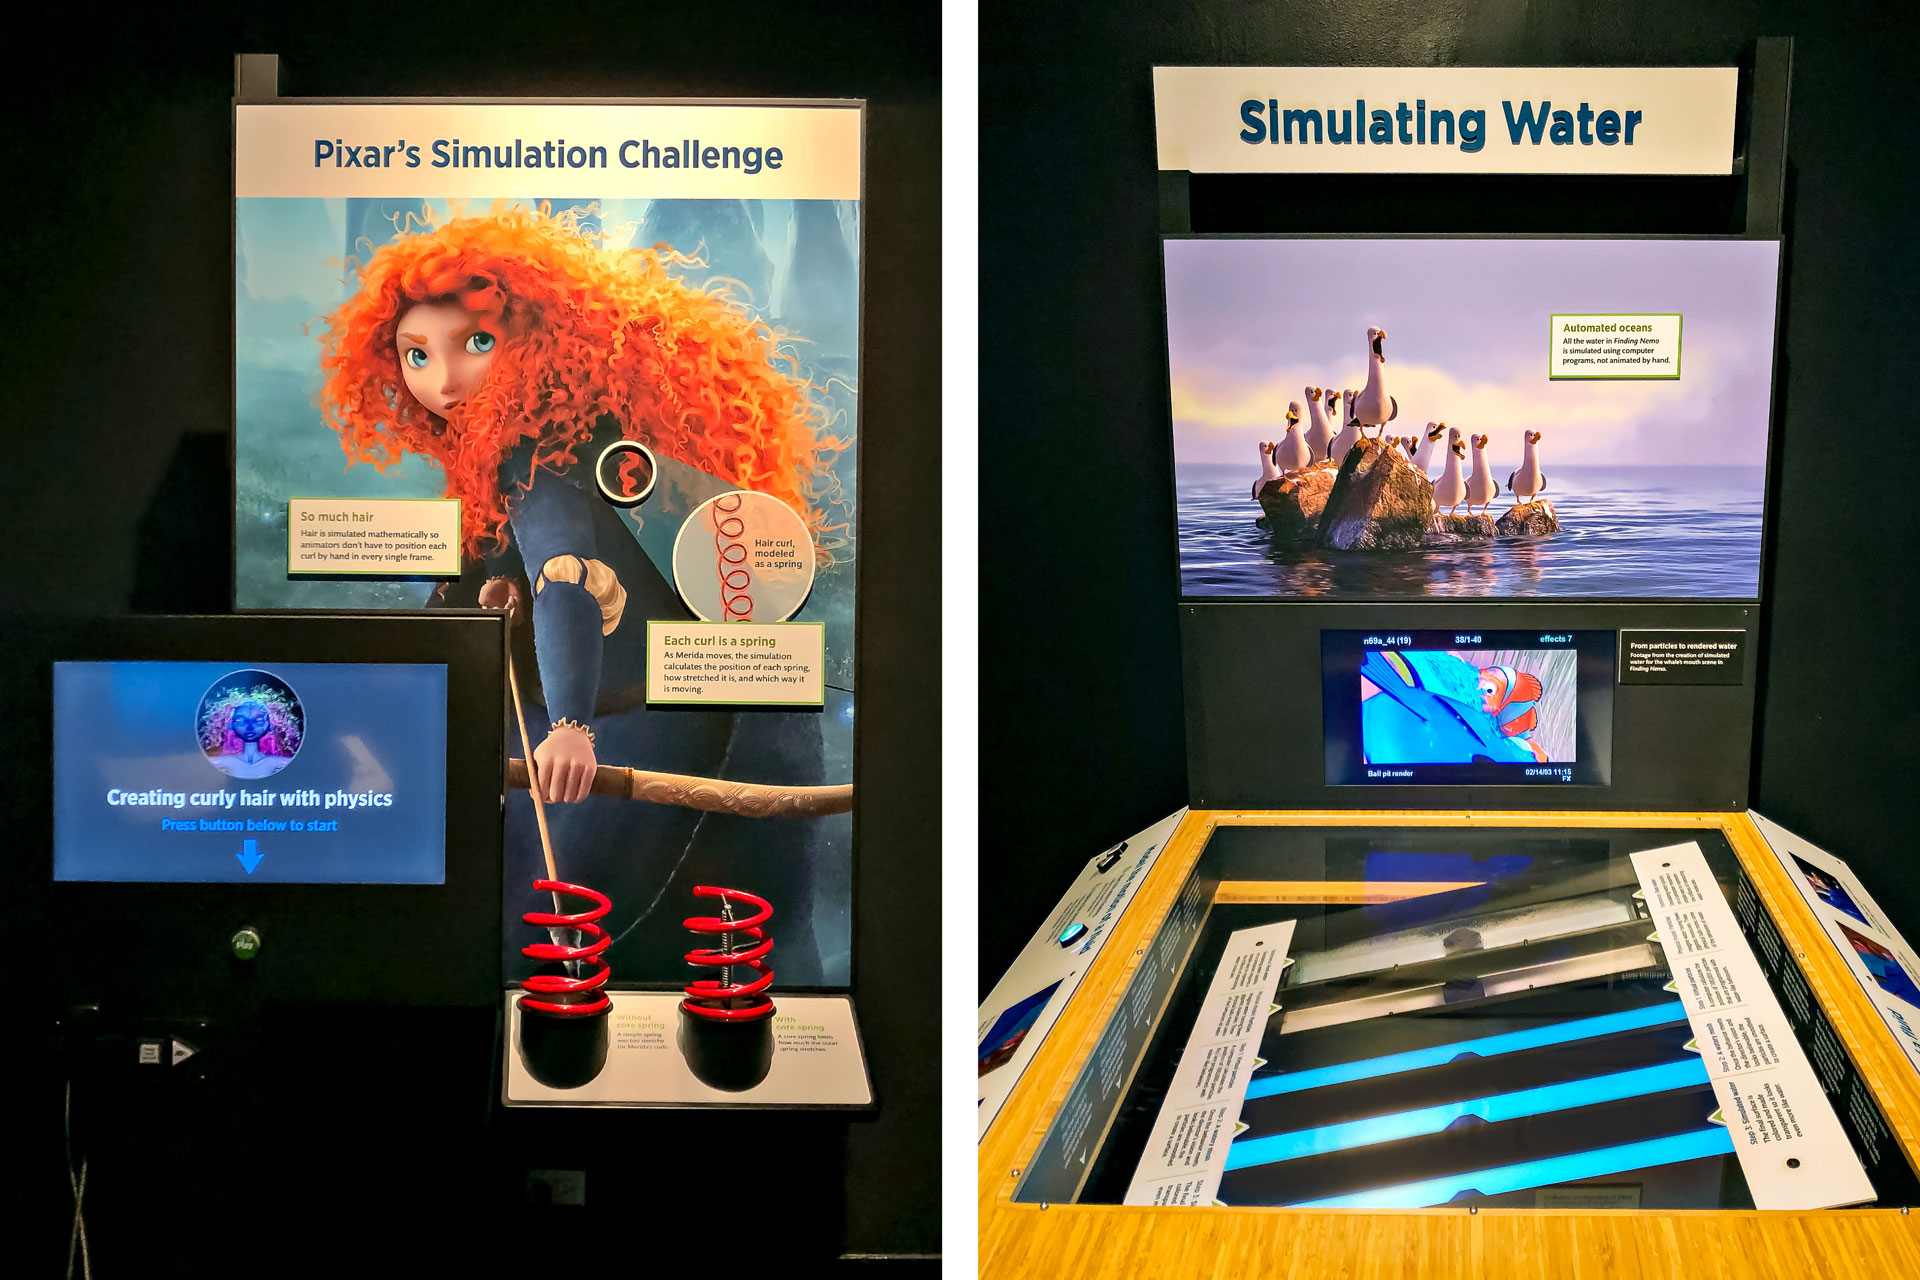
Pixar’s Simulation Challenge – Merida, our fiery redhead from Brave has luscious curly hair. In fact, she has so much hair that each strand is mathematically simulated. The simulation treats each strand of hair like spring, which is how the simulation calculates the position and movement of each curl.
Simulating Water – The water in Pixar films like Finding Nemo is simulated by a computer program – it’s not animated by hand. Say what?! The exhibit demonstrated the steps to simulating water: 1. Real Water 2. Particles 3. Virtual Particles 4. Watery Mesh 5. Simulated Water. It’s so fascinating how a computer can program 100,000 virtual particles to have water-like behaviors.
Lighting
“The final lighting changes the atmosphere of the entire scene. This work-in-progress render does not have the high image quality of the final movie.”
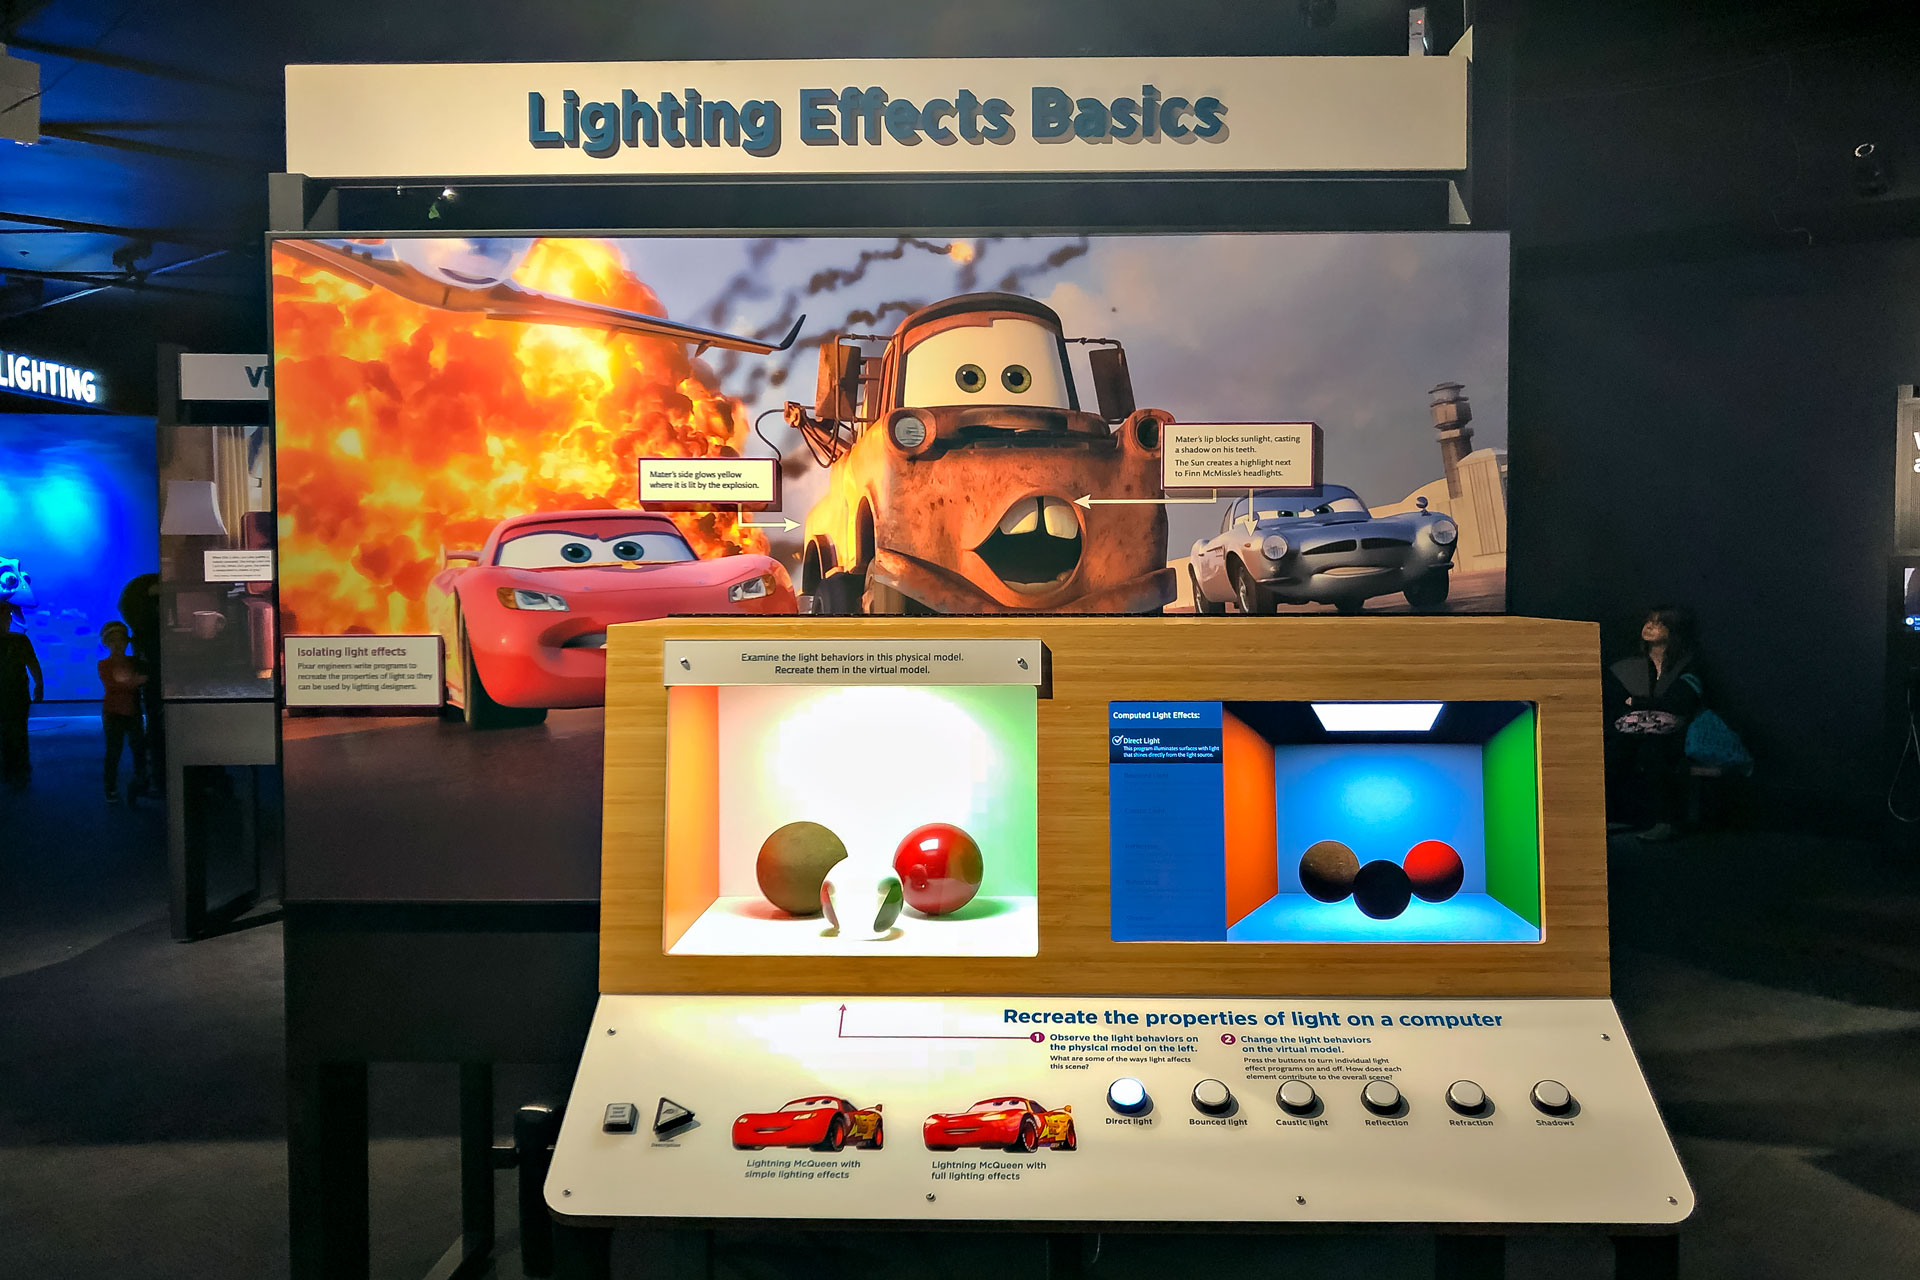
Lighting enhances a scene in a lot of ways. For instance, it makes a surface look more realistic, it helps draw attention to a subject, and it gives the scene an overall vibe.
Lighting Effects Basics – At the Lighting Effects Basics station, the challenge was to recreate the properties of light on a computer. There was a box with three spheres – each with a different type of surface. I experimented with different light behaviors, such as direct light, bounced light, caustic light, reflection, refraction, and shadows. From there, I was able to see what the spheres would look like if they were a 3D model. Truly, it’s amazing how lighting designers can create a scene with virtual lights!
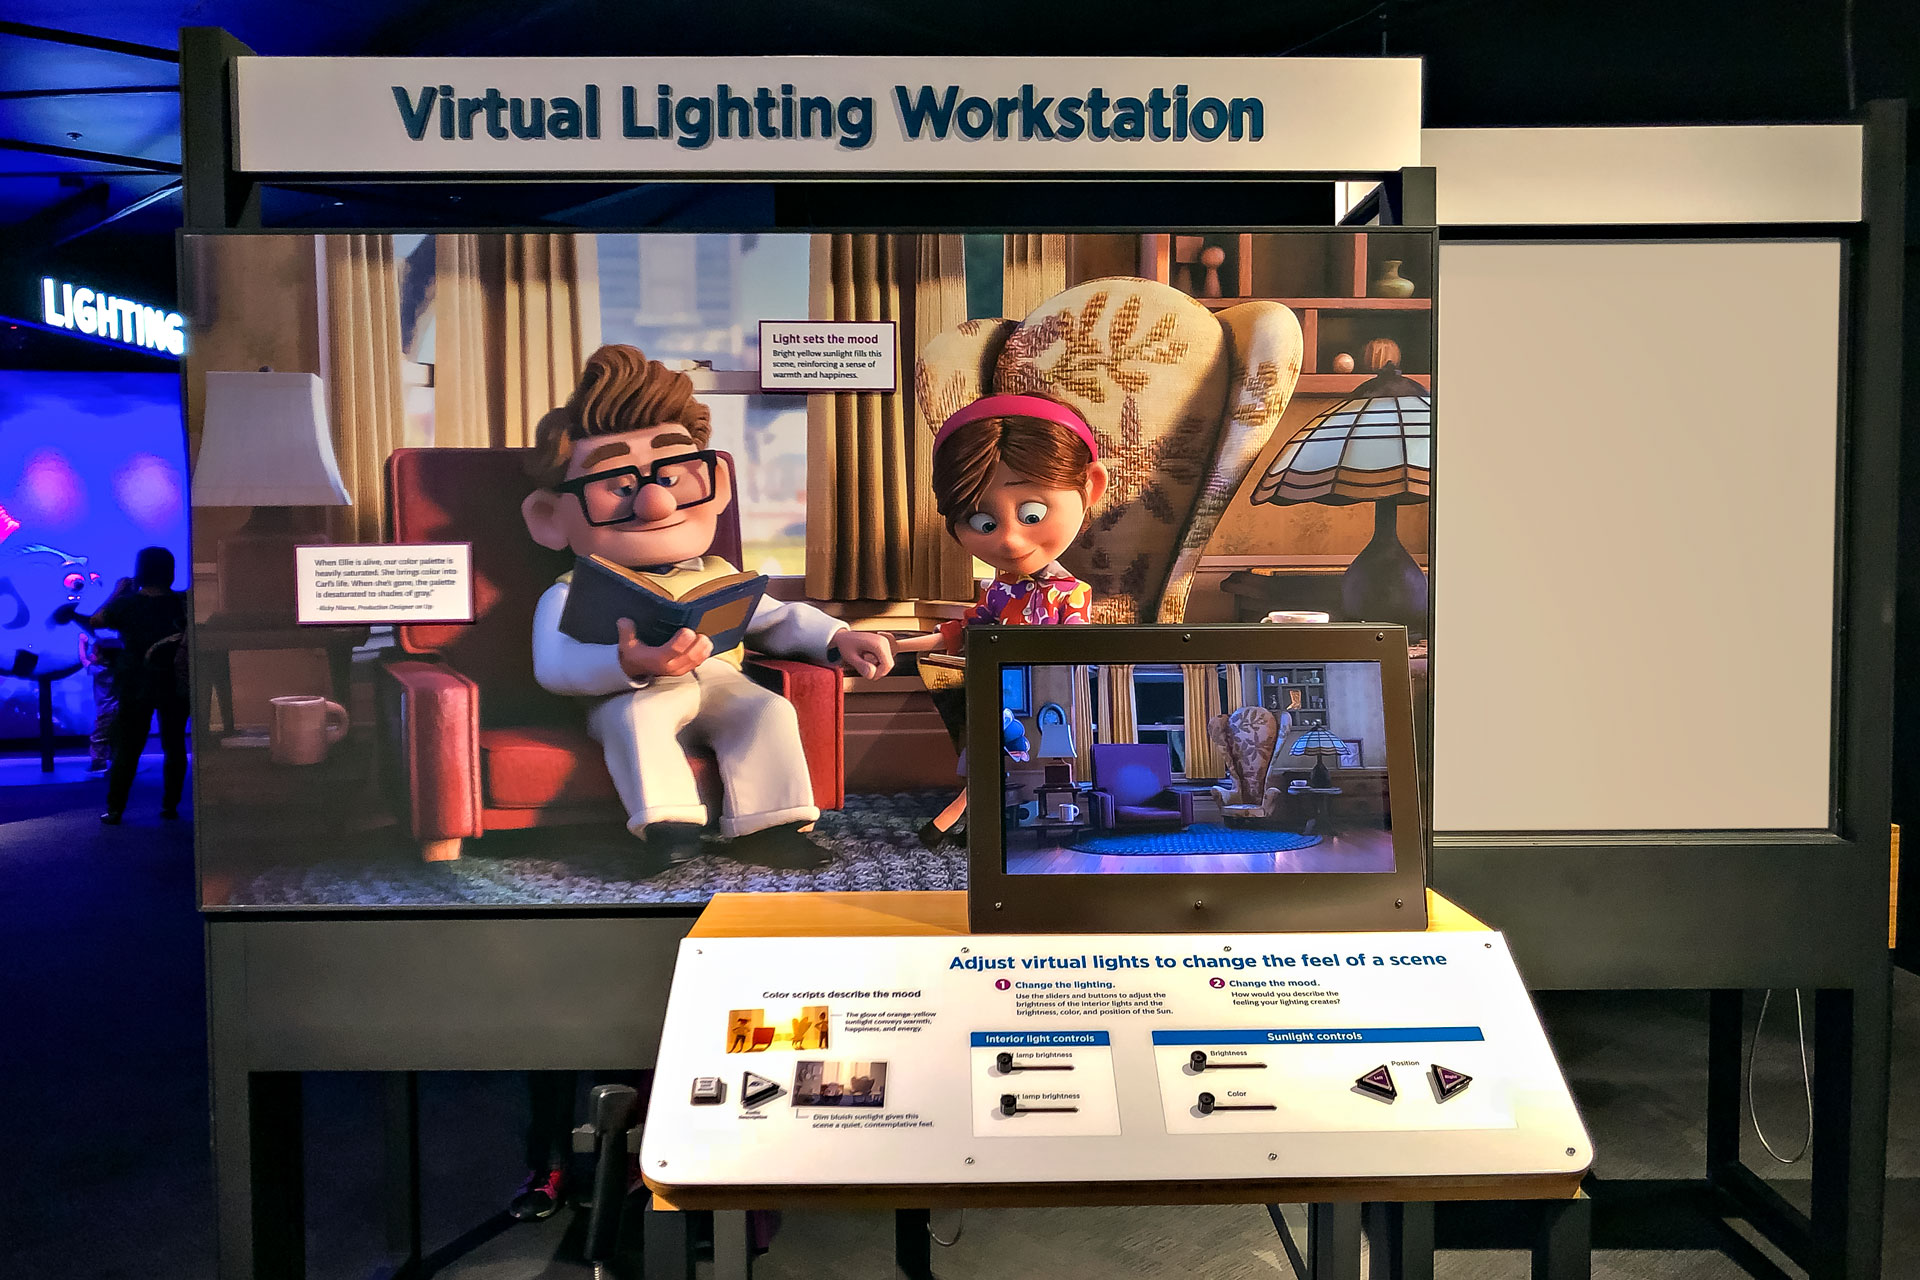
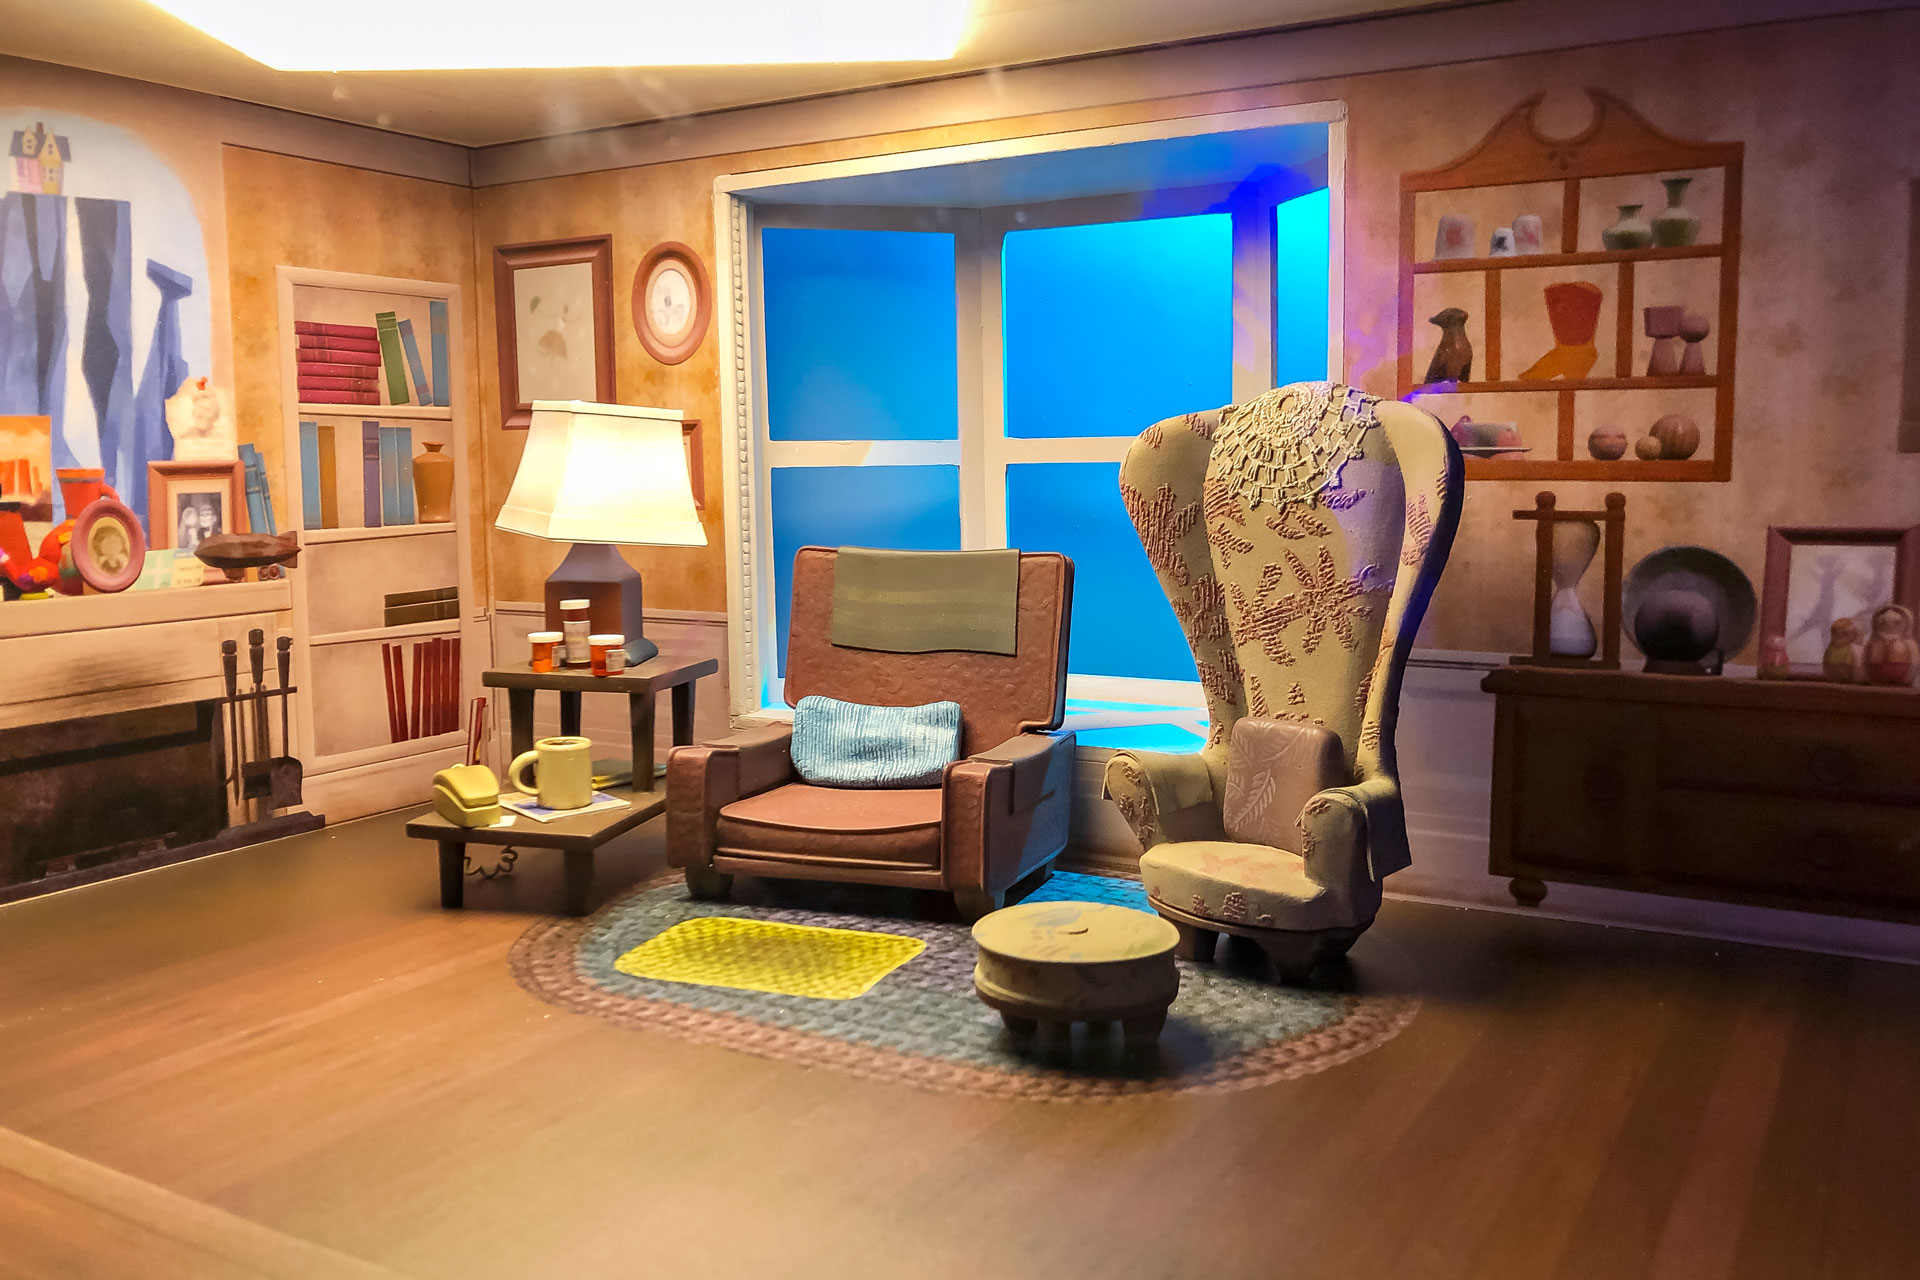
Lighting Design Basics – At the Lighting Design Basics station, I played with physical light, such as the sunlight (simulated natural light) and lamps in Carl and Ellie’s adorable living room from Up.
Virtual Lighting Workstation – By adjusting virtual lights, I was able to change the feel of a scene, which again was Carl and Ellie’s living room. I changed the lighting by adjusting the brightness of the lamps, and I changed the mood by adjusting the color and brightness of the sunlight. It was interesting to see the how the lighting from the Lighting Design Basics station transferred to virtual lighting.
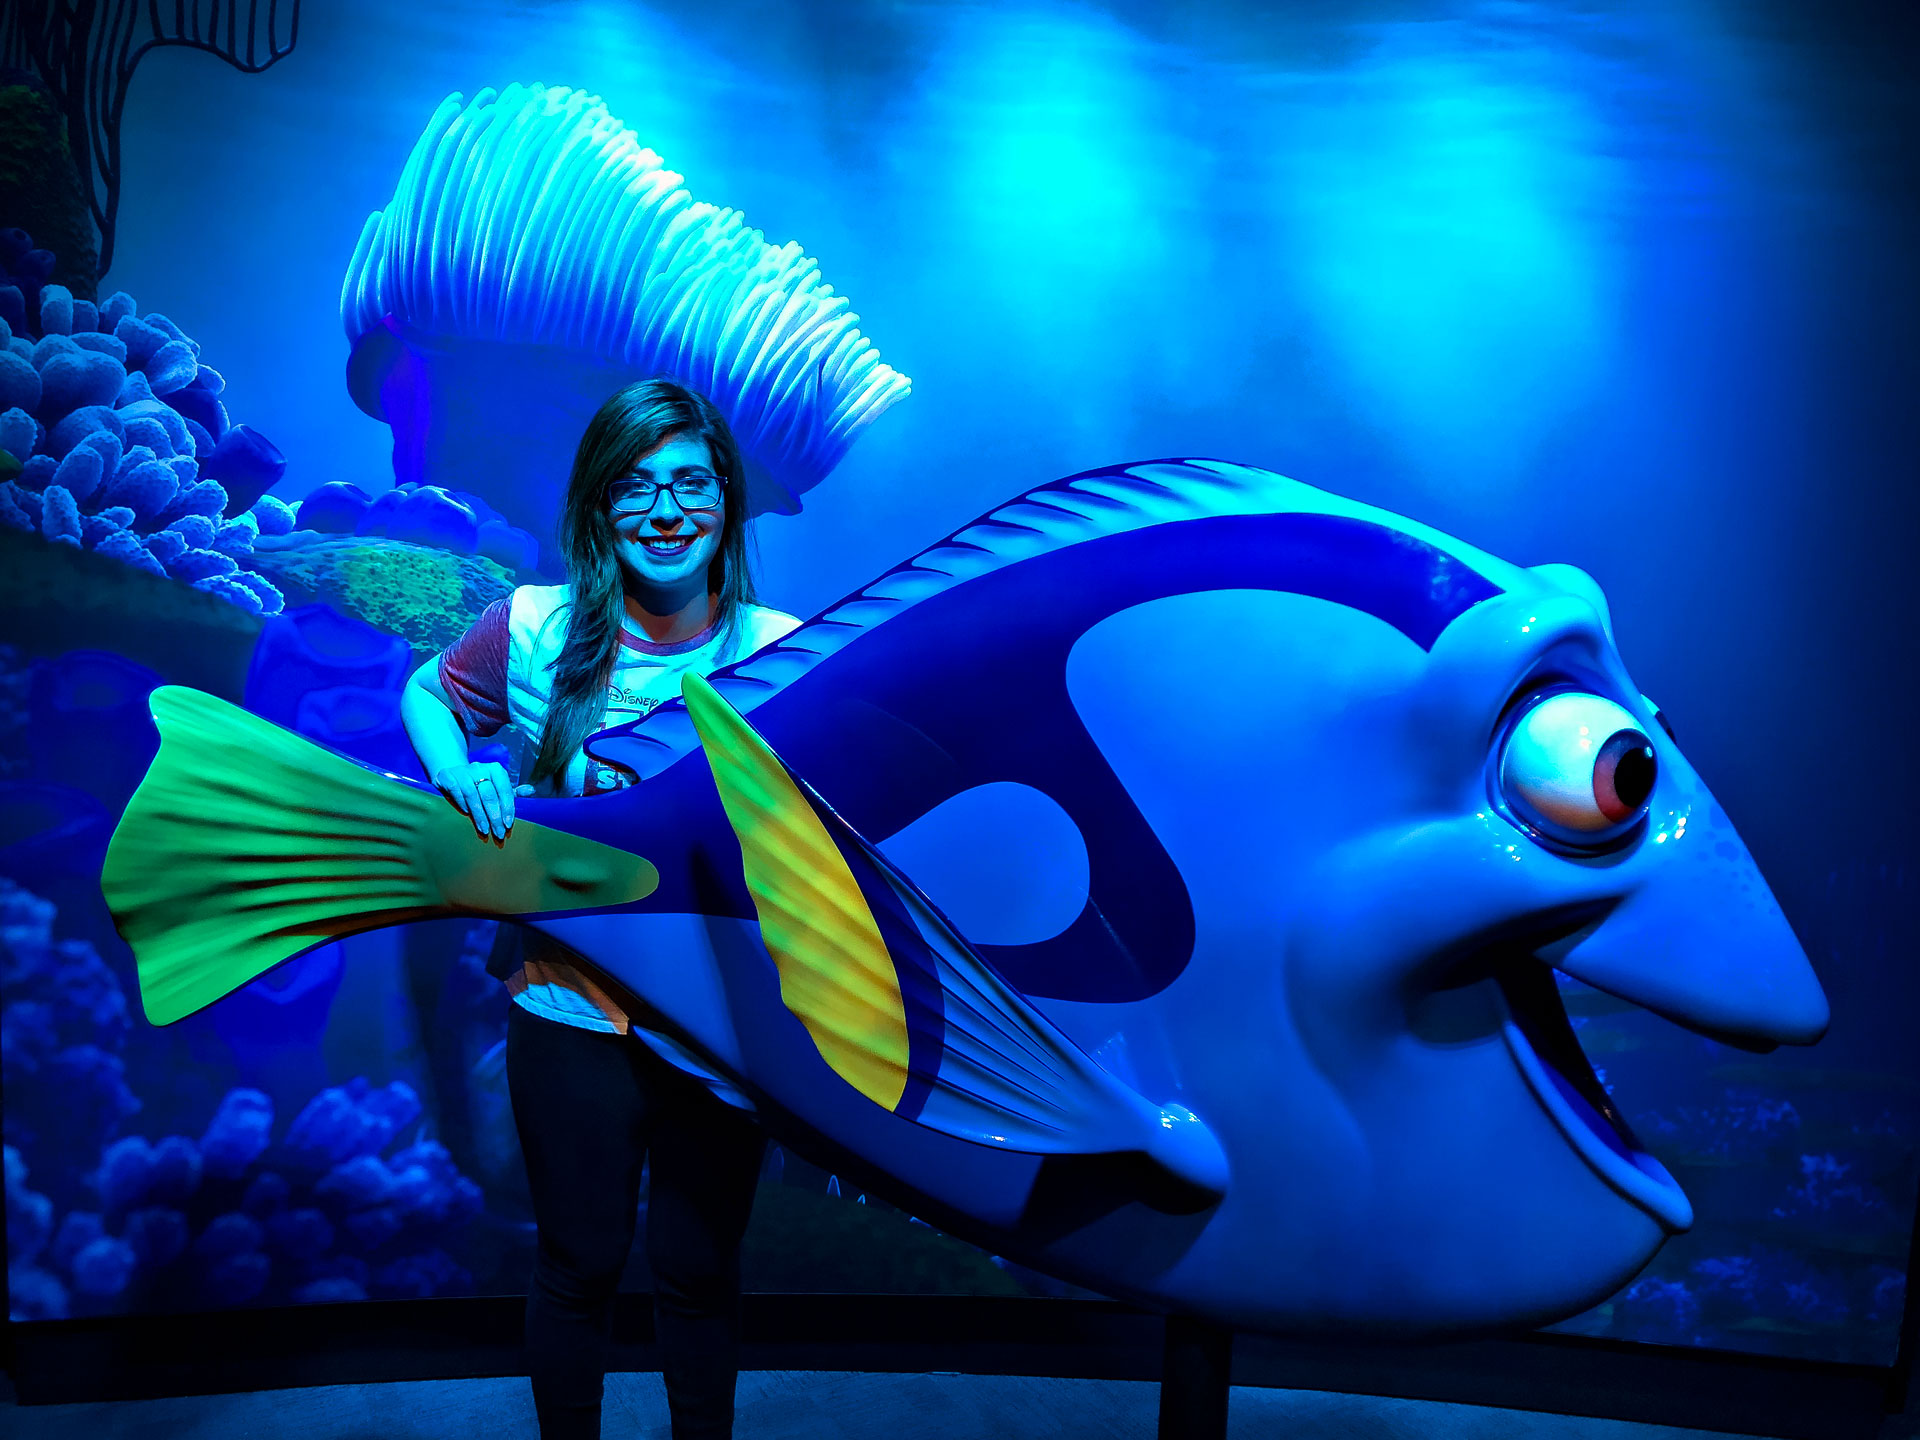
Photo-Op: Dory from Finding Nemo.
Explore Lighting with Dory – “Just keep swimming, just keep swimming, just keep swimming, swimming, swimming.” Dory is my favorite character from Finding Nemo, so I was thrilled to have a photo-op with her. This was a really neat photo-op because I got to adjust both the color and brightness of the water, as well as the speed of how fast or slow the water was moving. I decided to go with the standard clear blue water, but I think the photo turned out really cool!
Rendering
“This final rendered image brings together all the steps of the pipeline. Rendering calculated the color of every pixel. Each frame in this scene took about 33 hours to render.”
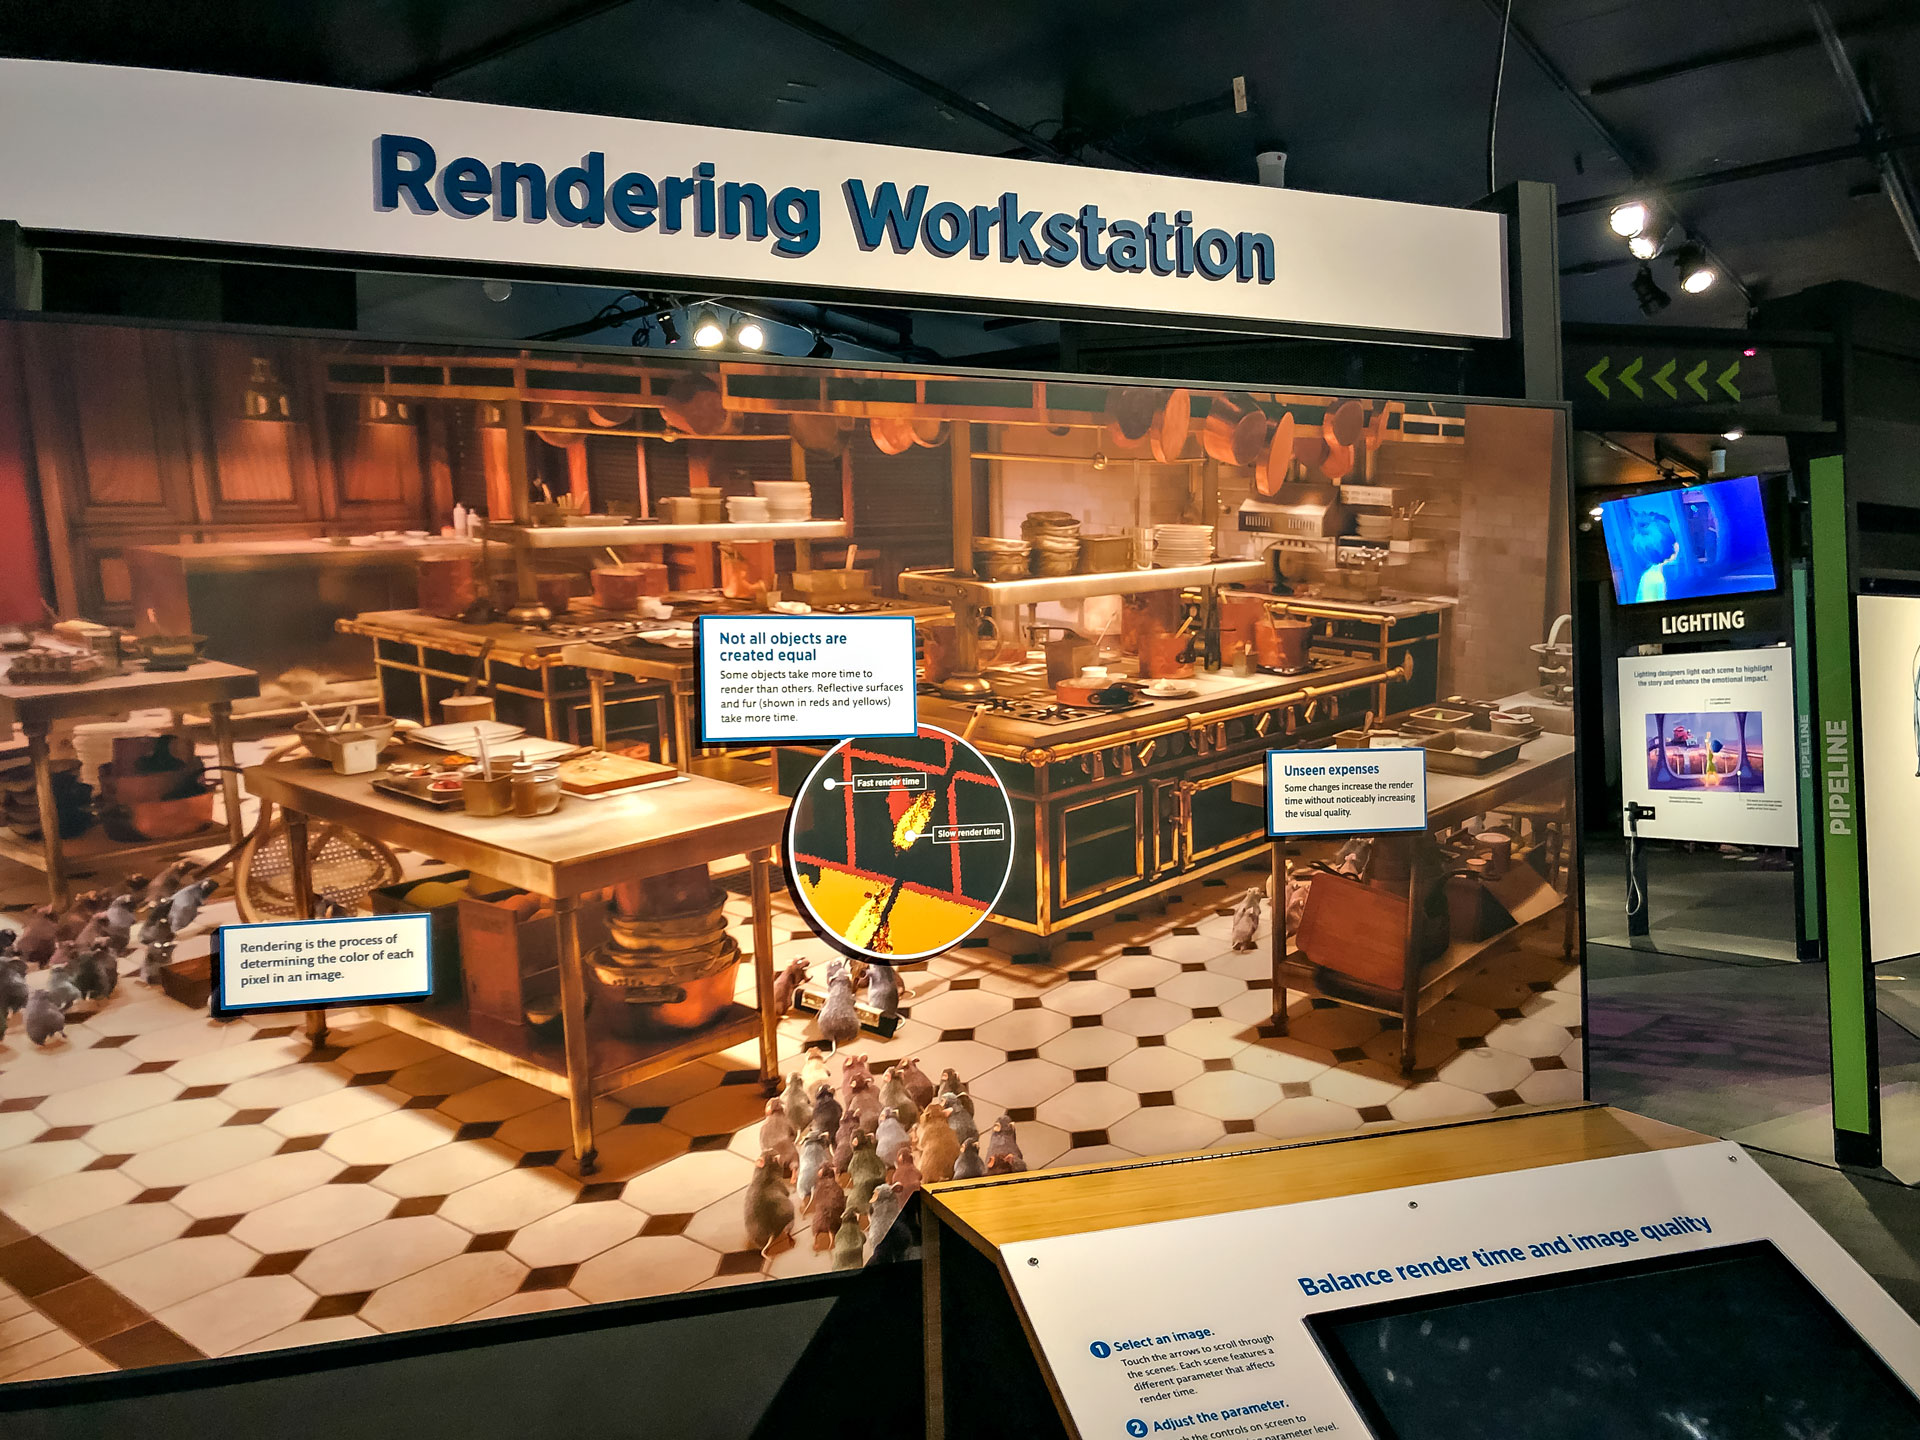
Once all of the previous steps in the Pixar Production Pipeline have been created, and approved (Story & Art, Modeling, Rigging, Surfaces, Sets & Cameras, Animation, Simulation, and Lighting), it’s time to render the final scenes of a Pixar film. The rendering process take days to complete, as it can take 33 hours just to render ONE FRAME. According to the exhibit, “Rendering is the process of determining the color of each pixel in an image.” Some objects take longer to render than others based on what type of surface they have. In some cases, a scene might take longer to render. However, any changes in quality can’t be seen by the human eye.
Rendering Workstation – When rendering, there must be a balance between render time, and quality. At the Rendering Workstation this is demonstrated in Ratatouille. During the activity, I increased or decreased the number of rats in Gusteau’s kitchen to dictate how long the rendering process will take as well as the quality of the final scene. It’s crazy, one frame in a scene in a Pixar film, like Inside Out can take 33 hours to render! With that said, it probably takes way more than a couple of days or even months to render an entire Pixar film.
The Science Behind Pixar: Review
Photo-Op: Concept art from Cars.
Don’t Miss The Science Behind Pixar
Without a doubt, The Science Behind Pixar is an exhibit worth checking out! As both a creative and Disney fan, it was really fun learning about the production of a Pixar film. Honestly, I never really thought about how math and science could play a role in the production process, so some parts of the exhibit were surprising to me. For instance, Character Marquettes, and Simulation. In my opinion, the concepts of the Pixar Production Pipeline can be quite complex if you aren’t familiar with animation, and 3D modeling. I have to say, I thought the exhibit did a good job in breaking down the steps. By providing families and children multiple hands-on activities, these concepts become much easier to understand. I myself am a visual learner, so being able to have hands-on activities helped me retain information better, and just made the exhibit a more fun experience.
More Movie Memorabilia, Please
The Disney fan in me wished the exhibit would have included more movie memorabilia. I understand that Pixar films are animated, so there aren’t any movie props. However, it would have been cool to see toys, scripts, or even original copies of concept art. I noticed that a lot of the concept art was reproduced to fit on presentation boards. Personally, I think it would have been really interesting and nostalgic to see the first sketch of Woody or even original movie posters. On the other hand, I understand that The Science Behind Pixar is first and foremost an educational exhibit about the Pixar Production Pipeline – not the memorabilia that came out during the films’ releases.
Overall…
Overall, The Science Behind Pixar is an educational experience that can be enjoyed by all ages. Your experience of the exhibit is what you make of it. If you watch the videos, and do the hands-on activities, I think you’ll get a lot out of the exhibit. Plus, there’s tons of fun photo-ops with iconic Pixar characters. Why would you want to miss out on that?
Resources for Educators & Researchers
If you can’t make it out to the exhibit, The Science Behind Pixar has a website dedicated to exploring the exhibit. The website includes photos, videos, and even some of the hands-on activities from the Workstations that users can experiment with in the comfort of their own computer. Additionally, there are resources for educators and researchers, to aid them in the classroom or in their research.
“So Long, Partner…”
I hope you enjoyed exploring The Science Behind Pixar exhibit with me. Hopefully, you even learned a thing or two about the magic (a.k.a science) of making the Pixar films we love. The Science Behind Pixar is at The Museum of Science and Industry in Chicago from now to January 6th 2019. In the comments below tell me…
- Have you been to The Science Behind Pixar exhibit?
- What was the most interesting fact that you learned while joining me on my tour of the exhibit?
- What’s your favorite Disney Pixar movie or character?
Thanks for reading! See you in my next blog post!
♥ Candis
Sources
This blog post could not have been made without the following sources:
DISCLAIMER: This post is not sponsored. All thoughts and opinions are my own.
Pin It For Later! 🙂

29 Comments
Kidult King
August 14, 2019 at 8:25 pmHello, I have published an article about “The Science Behind Pixar Exhibition” in Tokyo City View:
https://kidultkingdom.com/science-behind-pixar-tokyo/
Might make a nice addition to the page, thank you.
Candis Barbosa
August 21, 2019 at 7:44 amHi! I took a look at your article! So much fun! It’s so cool to see someone experience the same things…from miles and miles away. I’m glad you had fun!😀
Haley
September 1, 2018 at 6:28 amThis is so cute! I love Disney and getting behind the scenes looks!
Candis Barbosa
September 4, 2018 at 8:58 amAw, thanks!💕 I love meeting other Disney lovers! I love seeing the BTS of all sorts of things, but since this was Disney AND animation, I got the best of both worlds! Thanks for stopping by!😀
Alyssa
August 31, 2018 at 9:33 pmWow!! I love Disney too and this was such a fun post to go through! You got to do so many different things!
Alyssa | ninethreezero.blogspot.com
Candis Barbosa
September 4, 2018 at 8:55 amDisney is life!😍 I’m glad you enjoyed the post! Thanks for reading!❤️
Heather
August 20, 2018 at 8:27 amOh wow that looks amazing! I will definitely need to keep an eye out for it or something like it popping up over here. Even just an art exhibition would suit me, and I know my fiancé would have a total field day with all the tech too.
Candis Barbosa
September 4, 2018 at 8:51 amIt was so much fun! I love exhibits! Especially when it’s a behind the scenes look at something. This exhibit was really different for me because I really did feel like I learned something. I hope you get to go someday. Thanks for reading!💕
balanceandblessings1
August 17, 2018 at 5:59 pmThis Pixar exhibit looks like it had things that would interest both young and old. I hope they bring something like this to my area in PA. I would definitely check it out!
Candis Barbosa
September 4, 2018 at 8:49 amYes! This exhibit is great for all ages! Of course, it will be a different learning experience for everyone. I hope the exhibit comes to your hometown. It’s definitely worth checking it out. Otherwise… it’s a nice excuse to come to Chicago! 😂
Telia
August 17, 2018 at 4:04 pmThis is definitely on my bucket list now. My kids would love this! Thanks for sharing!
Candis Barbosa
August 21, 2018 at 12:49 pmWhat I love about this exhibit is it’s great for both children and adults. You and your kids would both love it. Thanks for reading!❤️
Linsey Barta
August 10, 2018 at 5:12 pmOmg I want to go!!
Candis Barbosa
August 21, 2018 at 12:48 pmDo it! I hope you get to go someday! It’s totally worth it!
Kelly Moyer
August 6, 2018 at 9:50 amHow fun is this. I love the Pixar Movies. This looks like an awesome time.
Candis Barbosa
August 6, 2018 at 10:56 pmPixar movies are the best! They always get me in the feels! I had such a fun time and learned a lot! Thanks for stopping by! 😬
Jibran Yousuf
August 6, 2018 at 7:54 amWoah, this is something cool!
HideNGoShauna
July 25, 2018 at 12:54 pmWoah so much info! And I love the tons of pics too, it’s like I was there XD
Super cool.
Candis Barbosa
July 31, 2018 at 9:35 amHaha! I hope it wasn’t TOO much info! I’m glad my post made you feel like you were really there – that was my goal! Thanks so much for reading! 🙂
Matz Mag
July 23, 2018 at 11:11 pmThe artwork and technology is amazing! I love seeing and hearing people be so passionate about things like this!
Candis Barbosa
July 31, 2018 at 9:33 amArt and technology do wonderful things when you put them together! I’m very passionate about both art and Disney, so I was in heaven! I was geeking out pretty hard! Haha! 😀
thatsmycupofcocoa
July 21, 2018 at 3:07 pmWhat a fun exhibit! Chicago is a little far from me. I am wondering if the exhibit will travel to others cities. Thanks for including the links. Maybe I can get some ideas of where to see something like this a little closer to home. I can’t choose a favorite Pixar film. Not just one. But I love Brave, Up, and Coco….
Candis Barbosa
July 31, 2018 at 9:30 amIt was a really fun exhibit! I know this exhibit has toured to other places before, but I’m not sure where they are going next. Hopefully it’s close to your home town. I’ve actually never seen Brave, but I love Up and Coco! Thanks for stopping by! 🙂
Bizarre Brunette
July 20, 2018 at 5:15 pmThis looks like a lot of fun!
Candis Barbosa
July 23, 2018 at 8:26 amIt really was! I love anything that has to do with Disney! 😀
That Dog Momma
July 19, 2018 at 10:16 amI love Disney! I’m actually going twice in September. Thanks for sharing this it actually makes me want to get involved. I normally wouldn’t do something like this!
Candis Barbosa
July 23, 2018 at 8:25 amHappy to meet another DisNerd! I’m so jealous you’re going to Disney this year! Twice! I haven’t been to Disney World since 2012. I hope you have an amazing time! Thanks for reading!💕
Kayla Whitter
July 18, 2018 at 2:41 pmThis is amazing! I totally wish I could get there to see it all in real life.
Candis Barbosa
July 18, 2018 at 10:52 pmThank you! It was a really neat exhibit! I know the exhibit has toured to other places, so hopefully it will visit you guys!